¶ Controls
The given locations shows a link to the implementation details and the versions shows the implementation version.
¶ Character
¶ Movement
| Shortcut | Description | Implementation | Ver. |
|---|---|---|---|
| Mouse X / Mouse Y | Turn camera | BP_Character | [V1] |
| W / S | Move forward / backward | BP_Character | [V1] |
| A / D | Move left / right | BP_Character | [V1] |
| Space | Jump | BP_Character | [V1] |
¶ Utility
| Shortcut | Description | Implementation | Ver. |
|---|---|---|---|
| H | Randomize Hairstyle | BP_Character | [V7] |
| J | Randomize Apparel | BP_Character | [V7] |
¶ Character Editor
¶ General
| Shortcut | Description | Implementation | Ver. |
|---|---|---|---|
| C | Open Character Editor and in-game controls | BP_Character | [V1] |
| C | Close Character Editor and in-game controls | BP_CameraStudio | [V1] |
| V | Toggles the Character Editor visibility | BP_CameraStudio | [V3] |
| X | Toggles the rotation mode between Character and Camera | BP_CameraStudio | [V2] |
¶ Viewport
| Shortcut | Description | Implementation | Ver. |
|---|---|---|---|
| LMB/RMB Click + Drag X | Rotate the character or camera, depending on rotation mode | BP_CameraStudio | [V1] |
| MMB Click + Drag Y | Pan the camera up and down | BP_CameraStudio | [V1] |
| Mouse Wheel | Zoom the camera | BP_CameraStudio | [V1] |
| W / S | Increase / decrease auto zoom velocity | BP_CameraStudio | [V3] |
| A / D | Increase / decrease auto rotation velocity | BP_CameraStudio | [V3] |
| E / Q | Increase / decrease auto panning velocity | BP_CameraStudio | [V3] |
| R | Randomize Apparel | BP_CameraStudio | [V3] |
| Tab | Toggles the controls visualization | BP_CameraStudio | [V5] |
¶ Details Panel
| Shortcut | Description | Implementation | Ver. |
|---|---|---|---|
| Mouse Wheel | Scroll the Details Panel (if not hovering CDA Pickers) | Unreal Engine | [V1] |
| RMB Click + Drag Y | Alternative to scrolling, when not possible (e.g., CDA Pickers) | Unreal Engine | [V1] |
¶ CDA Pickers
| Shortcut | Description | Implementation | Ver. |
|---|---|---|---|
| Mouse Wheel | Select next or previous hairstyle/apparel | Unreal Engine | [V1] |
¶ Tutorials
¶ Persist Customization Profile between different levels [V8]
The following controls can be used, when the level CE_TutorialLevel_PersistCustomizationProfiles is open, according to tutorial Persist Current Customization Profile between different levels.
| Shortcut | Description | Implementation | Ver. |
|---|---|---|---|
| P | Change Level | BP_CE_TutorialCharacter | [V8] |
¶ Implementation Details
¶ BP_Character
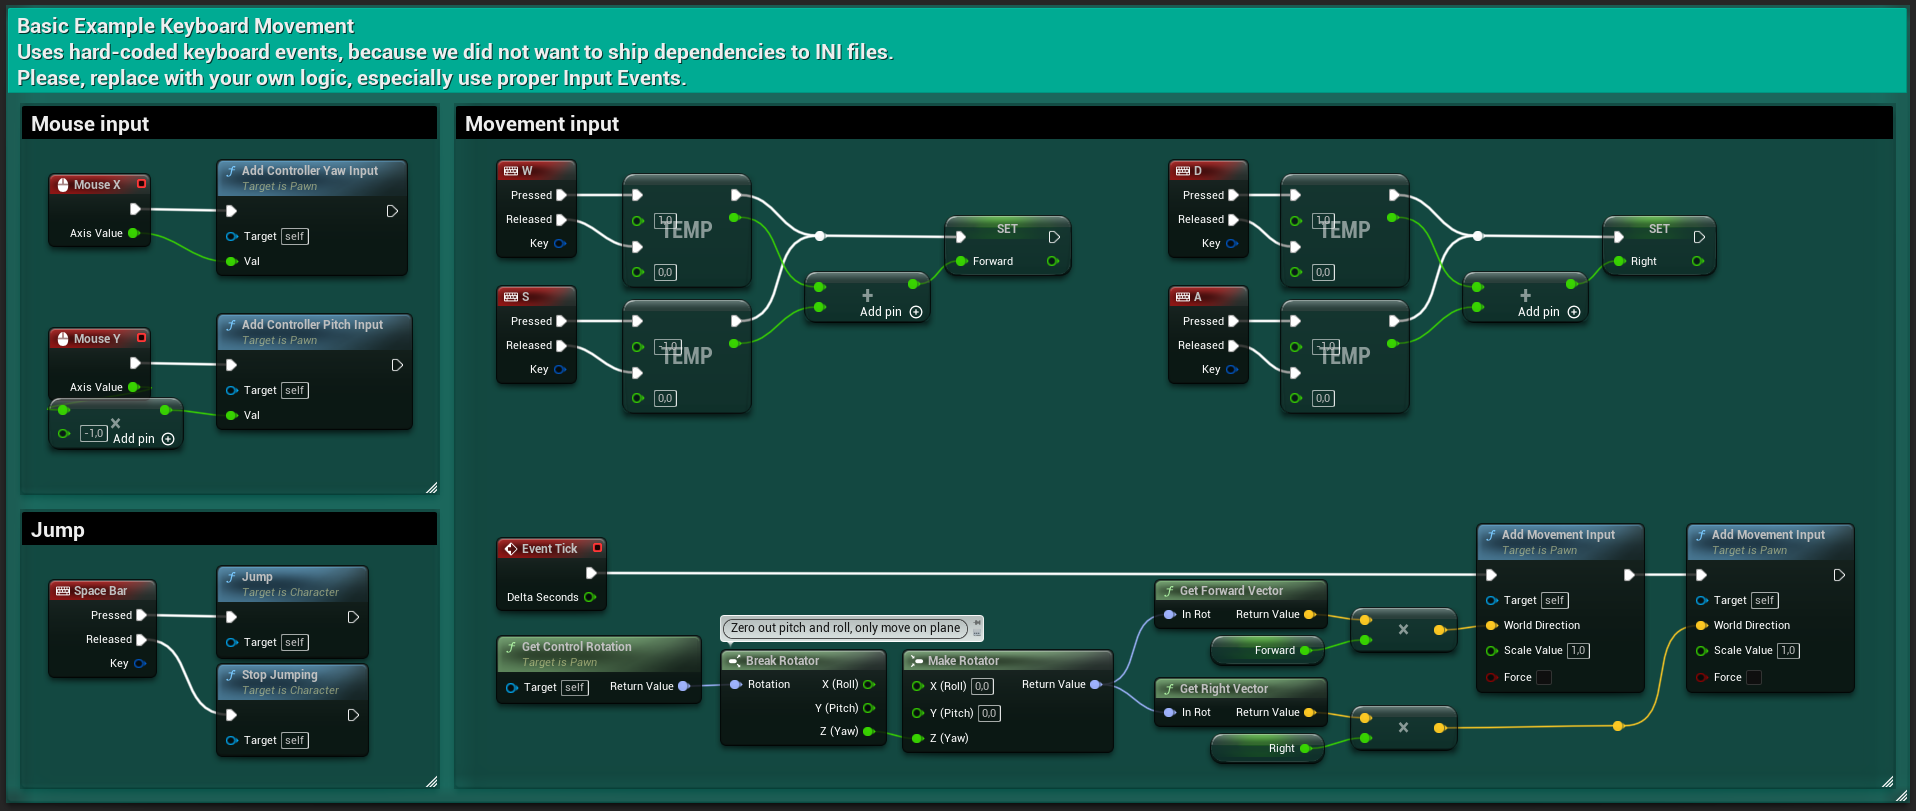
This Blueprint is responsible for all controls when the Character Editor is closed.
¶ Basic Example Keyboard Movement

The Basic Example Keyboard Movement with hard-coded inputs allow you to move around our sample character like a third person template character. We chose hard-coded inputs for testing purposes, so that the Character Editor content pack can be simply added to your projects. If we had chosen proper input events that are stored in the input.ini, we had to deliver a complete project that – rules by Unreal Marketplace – can only be used with “Create project” and not with “Add to project”.
¶ Randomization [V7]

[V9] Since the Utility Update the functions have the following signature:

This is used to randomize the shown Customization Data Asset types when the Character Editor is closed, through the randomization functionality introduced in the V7 Customer Update.
¶ Toggle Character Editor

This is usually only used to open the editor, but also prepared for closing in case you want to implement special logic, that is not utilizing the BP_CameraStudio for closing the editor.
When opening the Character Editor by pressing "C", thus calling BP_CharacterEditor > Event: Open Editor, in turn the following BP_CameraStudio > Event: Enable is called. On the right hand side you can see that the input is disabled on the Focused Character and enabled on the BP_CameraStudio (self). From here on, all the input is processed by BP_CameraStudio.

¶ BP_CameraStudio
This Blueprint is responsible for all controls when the Character Editor is open. We use a separate Blueprint rather than the BP_Character here, to decouple as much logic as possible from the Character.
¶ Close Editor

When closing the Character Editor by pressing "C", thus calling BP_CharacterEditor > Event: Close Editor, in turn the following BP_CameraStudio > Event: Disable is called. Here, the input switches back to from self to Focused Character.

¶ Toggle Visibility [V3]

Toggles the visibility of the whole Character Editor UI, while all BP_CameraStudio controls are kept in tact. This can be useful for fullscreen screenshots or other behavior.
¶ Toggle Rotation Mode [V2]

Sets the current Rotation Mode to either rotate the character itself or camera around the character in Event: Tick.
¶ Randomize Apparel [V3]

Calls the randomization logic on the Expandable Category for Apparel.
¶ Rotate Character or Camera

Mouse X increases or decreases the TargetAddRotation variable by the current X Axis Value, used in Event: Tick to either rotate the character itself or camera around the character, based on current Rotation Mode.
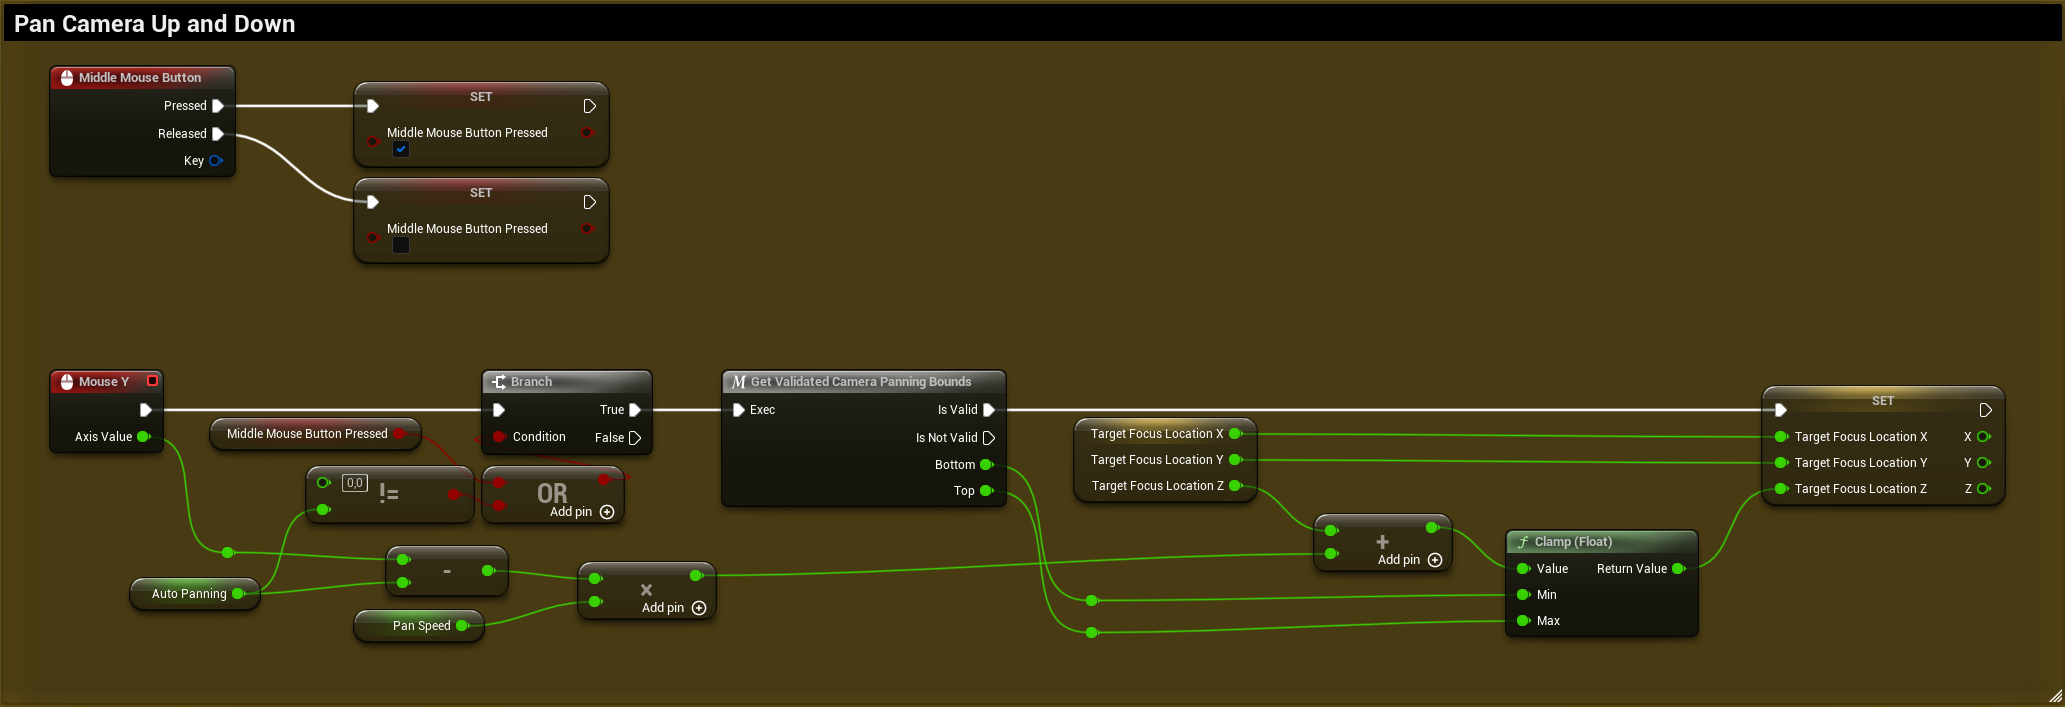
¶ Pan Camera Up and Down

Middle Mouse Button activates or deactivates the MiddleMouseButtonPressed variable, which is used to enable panning, while blocking Character Rotation.
Mouse Y increases or decreases the TargetFocusLocation.Z variable by the current Y Axis Value, used in Event: Tick to move the camera up and down.
¶ Zoom Camera

Mouse Wheel Up and Down increase or decrease the TargetCameraDistance by a calculated amount of ZoomSpeed, depending on the current camera distance to the character. When further away, the camera zooms faster to give better zoom control in close-ups. The value is clamped between MinCameraDistance and MaxCameraDistance.
¶ Auto Rotation [V3]

Increases or decreases the AutoRotation variable used in Rotate Character to add to the TargetAddRotation variable. Since Mouse X is a tick event, this is done each tick or "automatically".
¶ Auto Panning [V3]

Increases or decreases the AutoPanning variable used in Pan Camera Up and Down to add to the TargetFocusLocation.Z variable. Since Mouse Y is a tick event, this is done each tick or "automatically".
¶ Auto Zoom [V3]

Increases or decreases the AutoZoom variable used in Event: Tick to set the target camera distance continuously or "automatically".
¶ Toggle Controls UI [V5]

Toggles the key binding list in the bottom left corner of the UI.
¶ Camera Interp Speed

No actual user control, but a reset for the camera interpolation, bound on Any Key.
¶ BP_CE_TutorialCharacter [V8]
Additionally to the nodes in the BP_Character, the following nodes add tutorial-specific controls when the Character Editor is closed.
¶ Tutorial: Persist Customization Profiles between different levels [V8]
In BP_CE_TutorialCharacter > Event Graph > Tutorial Example: Persist Customization Profiles between different levels - Change Level sub graph you can find following nodes to change the level, according to tutorial Persist Current Customization Profile between different levels.
