¶ Introduction
CDA Pickers are used to select Customization Data Assets in-game.
The Index defaults to 0. You are free to use multiple CDA Apparel Pickers for the same CDA Class in your Character Editor. Each additional picker must have an increasing index (0, 1, 2 etc.) always starting at 0! This way e.g., two pickers could display accessories (which in our examples is the base class for data assets like rings, necklaces, watches etc.) and in-game you are able to choose a ring and a necklace at the same time. CDA Pickers with the same CDA Class block their sibling's CDA, so the user cannot select the same e.g., necklace in both pickers.
The picker may host any number of data assets as they are handled, virtually. The final display implementation is up to you, but we provide an example with WBP_CDA_Picker_DefaultStyle and WBP_CDA_PickerItem_DefaultStyle, which uses a horizontally scrollable List View (see In-game Controls). Since [V11], this abstraction layer provides you with all the functionality to easily inherit your custom CDA pickers. This makes it easier to initialize CDA pickers, as well.
A CDA Collection Picker can further define what data assets are displayed. In Unreal Editor it just displays four empty data assets.
When being initialized, it automatically selects the CDA Picker Item that matches the current CDA profile of the given Character Customization. (see Initialize Selected CDA By Picker Settings for details)
¶ Core Blueprints
The main logic happens between WBP_CDA_PickerBase (Widget Blueprint) and BP_CDA_PickerItemObject (object) where the widget manages multiple CDAs and the object represents a single CDA that can be selected. The WBP_CDA_PickerItemBase is the parent for the visual representation of a CDA.
The following chapters as well as the Initialize & Update Visuals and Selecting CDAs diagrams on this page, explain in detail how the different Blueprints interact with each other.
¶ BP_CDA_PickerItemObject
The BP_CDA_PickerItemObject represents a single CDA that can be selected. It provides various functions for selection and can handle one of the possible CDA types at once. Which CDA type/profile is used, depends on the specified CDA Class. Selection only happens, if the object is marked as IsSelectable.
The important functions and event dispatchers are as follows. Protected functions are intended to be used internally or in your derived child Blueprints. You can find detailed descriptions in engine.
¶ Functions
-
CDA Picker Item Object | Selection
- Deselect
- GetIsSelectable
- GetIsSelected
- SetIsSelectable
- Select
- Select_CDA_ApparelProfile
- Select_CDA_AttachmentProfile
- Select_CDA_EquipmentProfile
- Select_CDA_GroomProfile
- Select_CDA_HairstyleProfile
-
CDA Picker Item Object | Initialization
- Initialize
-
CDA Picker Item Object | Selection (Protected)
- SetIsSelected
- SetIsSelected_By_CDA_ApparelProfile
- SetIsSelected_By_CDA_AttachmentProfile
- SetIsSelected_By_CDA_EquipmentProfile
- SetIsSelected_By_CDA_GroomProfile
- SetIsSelected_By_CDA_HairstyleProfile
-
CDA Picker Item Object | Initialization (Protected)
- Initialize_CDA_ApparelProfile
- Initialize_CDA_AttachmentProfile
- Initialize_CDA_EquipmentProfile
- Initialize_CDA_GroomProfile
- Initialize_CDA_HairstyleProfile
¶ Event Dispatchers
- CDA Picker Item Object
- OnSelected_CDA
- OnSelected_CDA_ApparelProfile
- OnSelected_CDA_AttachmentProfile
- OnSelected_CDA_EquipmentProfile
- OnSelected_CDA_GroomProfile
- OnSelected_CDA_HairstyleProfile
¶ WBP_CDA_PickerBase
The WBP_CDA_PickerBase manages multiple CDAs in the form of BP_CDA_PickerItemObject and is the parent for the visual representation of the CDA list.
It provides various functions for settings and selection, but requires a child Blueprint of your desired style (our example is WBP_CDA_Picker_DefaultStyle) to configure how exactly the visual list of CDAs is initialized and updated.
It can handle one of the possible CDA types at once, defined by its CDA Class, which is passed to the instantiated BP_CDA_PickerItemObjects.
Multiple CDA Pickers with the same CDA Class (called "Sibling CDA Pickers") share their selection state, thus the same CDA can only be selected once and does not produce unnecessary overlapping. Sibling CDA Pickers disable those CDAs to make them unavailable for selection.
The important functions and event dispatchers are as follows. Protected functions are intended to be used internally or in your derived child Blueprints. You can find detailed descriptions in engine.
¶ Functions
-
CDA Picker | Settings
- GetAcceptDebugAssets
- GetCDA_Class
- GetCDA_Index
- GetCDA_Filter
- GetCDA_FilterCollections
- SetAcceptDebugAssets
- SetCDA_Class
- SetCDA_Index
- SetCDA_Filter
- SetCDA_FilterAnatomy
- SetCDA_FilterCollection
- SetCDA_FilterCollections
- SetCDA_Settings
- SetDeselectionBehavior
-
CDA Picker | Selection (Protected)
- FindSelectableCDA_PickerItemObject
- GetSelectableCDA_PickerItemObjects
- GetSelectedCDA_PickerItemObject
- SelectCDA_PickerItemObject
- SetCDA_PickerItemObjectsSelectable
- SetCDA_PickerItemObjectsSelectableByCDA
- SetSelectedCDA
- SetSelectedCDA_ApparelProfile
- SetSelectedCDA_AttachmentProfile
- SetSelectedCDA_EquipmentProfile
- SetSelectedCDA_GroomProfile
- SetSelectedCDA_HairstyleProfile
- ToggleSelectableCDAsInSimilarCDA_Pickers
-
CDA Picker | Selection
- GetSelectableCDAs
- GetSelectedCDA
- GetSiblingCDA_Pickers
- IsAnyCDA_Selectable
- SelectCDA
- SelectCDA_ApparelProfile
- SelectCDA_AttachmentProfile
- SelectCDA_EquipmentProfile
- SelectCDA_GroomProfile
- SelectCDA_HairstyleProfile
- SelectNextCDA
- SelectPreviousCDA
-
CDA Picker | Initialization
- Initialize
- Reinitialize
- UpdateVisuals
-
CDA Picker | Initialization
- Initialize_SelectedCDA_by_PickerSettings
¶ Event Dispatchers
- CDA Picker
- OnValueChanged_CDA
- OnValueChanged_CDA_ApparelProfile
- OnValueChanged_CDA_AttachmentProfile
- OnValueChanged_CDA_EquipmentProfile
- OnValueChanged_CDA_GroomProfile
- OnValueChanged_CDA_HairstyleProfile
¶ WBP_CDA_PickerItemBase
The WBP_CDA_PickerItemBase is the parent for the visual representation of a single CDA.
It provides base initialization functions, but requires a child Blueprint of your desired style (our example is WBP_CDA_PickerItem_DefaultStyle) to configure how exactly the visuals of the CDA is initialized and updated.
That child Blueprint must be assigned to the Entry Widget Class of any following UE-native list widgets (List View, Tile View, or Tree View) in the CDA Picker widget for maximum performance and compatibility with the preconfigured User Object List Entry interface. If displayed elsewhere, e.g. a normal Horizontal Box, you have to trigger Initialize, manually. The WBP_CDA_Picker_DefaultStyle uses a List View.
You can find detailed descriptions in engine.
¶ Functions
- CDA Picker Item | Initialization
- Initialize
- Update Visuals
¶ Logical Flow
¶ Initialize & Update Visuals
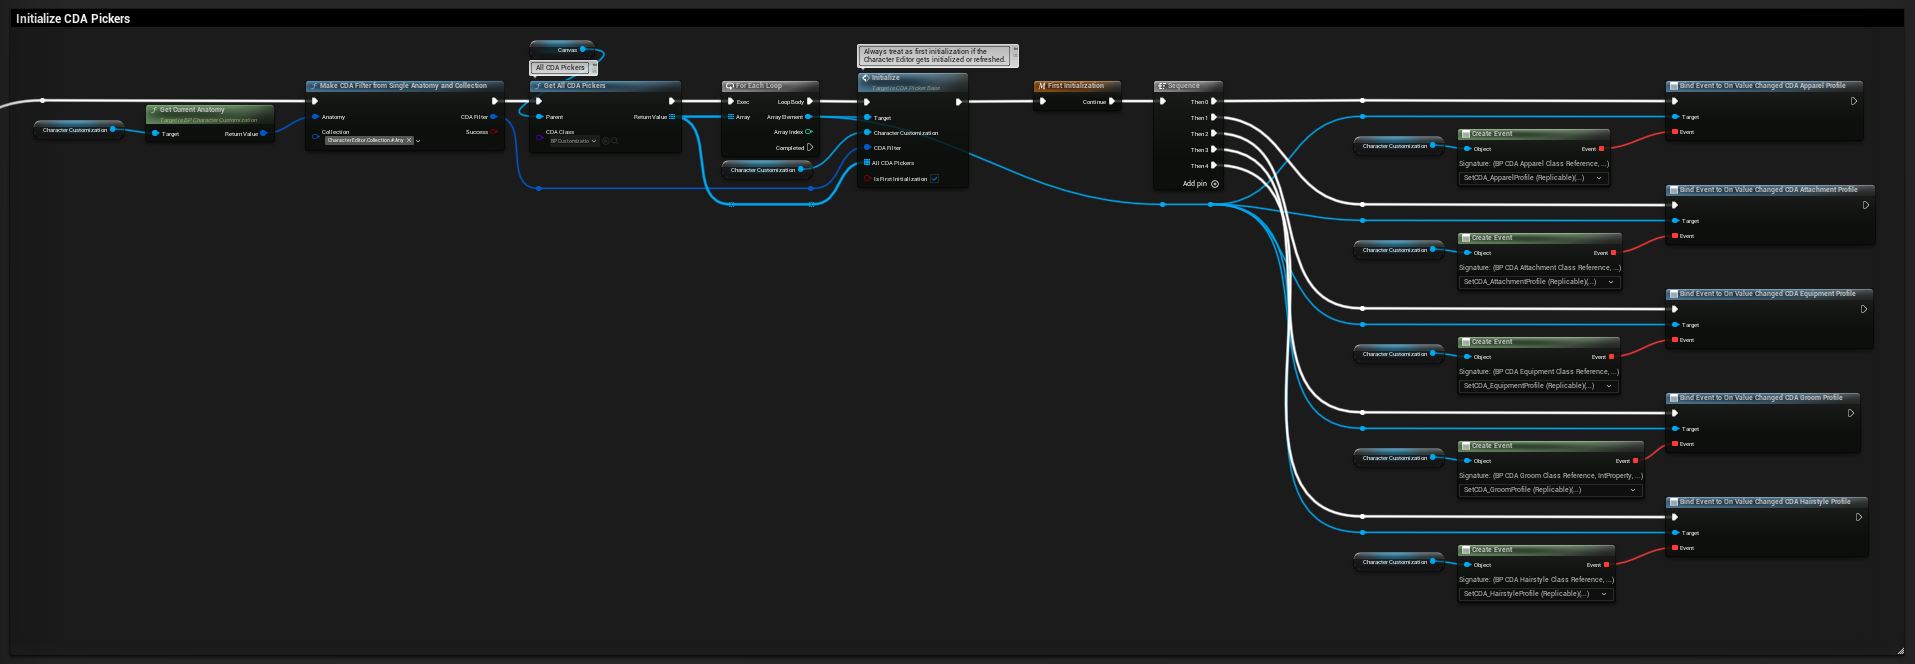
This diagram shows the flow for Initialize and Update Visuals across the related Blueprints. WBP_CharacterEditor starts on the left column by iterating all CDA Pickers. Since each CDA Picker inside of WBP_CharacterEditor is a WBP_CDA_Picker_DefaultStyle the flow continues in the second column, bottom box (below its parent WBP_CDA_PickerBase in the top box). From there you can follow the arrows.
The diagram nodes are representing individual Blueprint nodes or groups of Blueprint nodes for simplicity. The green nodes are representing Initialize and Update Visuals and their parent functions.
The yellow, orange and purple nodes are representing the event dispatcher flow of the Selecting CDAs diagram below. The red text references places where CDA-data is passed or used.
Compare the diagram with the Blueprints and use the browser zoom to improve the diagram readability.
The starting point in Blueprint is at WBP_CharacterEditor > Initialize - CDA Pickers And CDA Collection Pickers.
¶ Selecting CDAs
This diagram shows the flow, when using Select CDA or Select CDA Apparel Profile on a CDA Picker and the interaction between WBP_CDA_PickerBase and BP_CDA_PickerItemObject.
The diagram nodes are representing individual Blueprint nodes or groups of Blueprint nodes for simplicity. The green nodes are representing Select CDA and Select CDA Apparel Profile as well as Update Visuals to create a connection to the Initialize & Update Visuals diagram above.
The yellow, orange, purple and blue nodes are representing the event dispatchers and connected functions that are called upon selection. See the diagram above to recap when they are bound.
Compare the diagram with the Blueprints and use the browser zoom to improve the diagram readability.
¶ Use in Character Editor
¶ WBP_CDA_Picker_DefaultStyle
This is our example CDA Picker to be placed in the Character Editor widget, based on WBP_CDA_PickerBase.
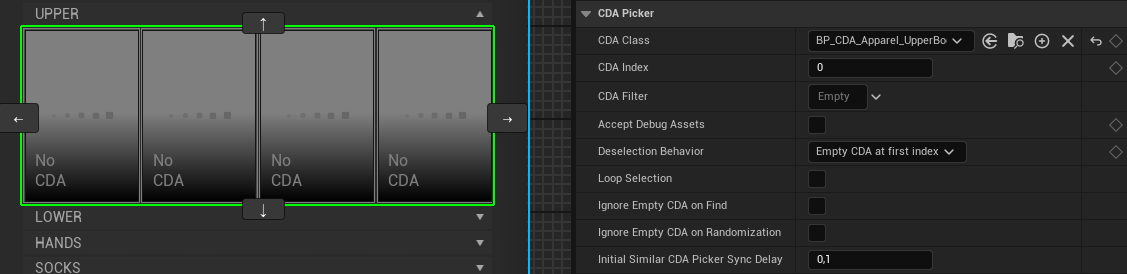
The following variables configure the CDA Picker.
| Variable | Description |
|---|---|
| CDA Class | The CDA Class used to filter this CDA Picker. |
| CDA Index | The CDA Index used to connect multiple CDA Pickers of the same CDA Class. This prevents selecting the same CDA in those CDA Pickers. Further Details in Blueprint. |
| CDA Filter | The CDA Filter used to filter the CDAs by Anatomy and Collection gameplay tags. Further Details in Blueprint. |
| Accept Debug Assets | If True, the CDA Picker displays CDAs flagged with bDebugAsset=True. Further Details in Blueprint. |
| Deselection Behavior | Details in Blueprint. |
| Loop Selection | Details in Blueprint. |
| Ignore Empty CDA on Find | Details in Blueprint. |
| Ignore Empty CDA on Randomization | Details in Blueprint. |
| Initial Similar CDA Picker Sync Delay | Details in Blueprint. |
The blue comment in the CDA Picker's Event Graph outlines the List View configuration.
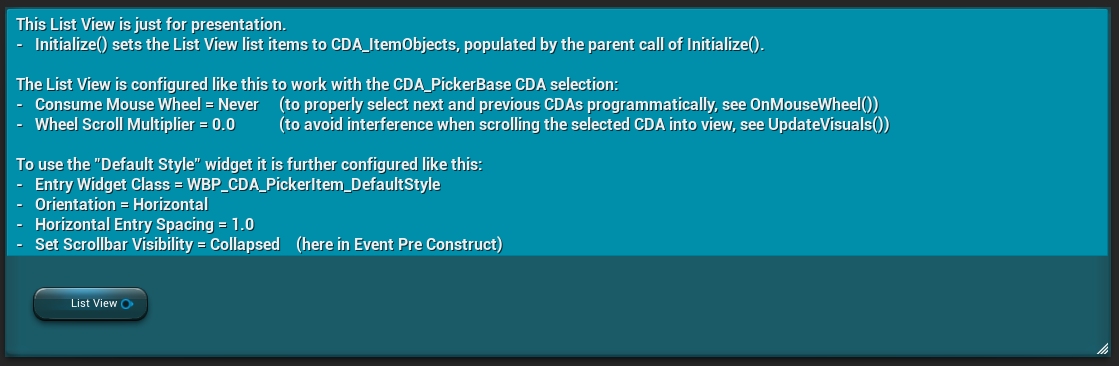
¶ WBP_CDA_PickerItem_DefaultStyle
This is our example CDA Picker Item, based on WBP_CDA_PickerItemBase.
It has no public variables, but it is used as Entry Widget Class as shown in the blue comment above.