¶ Introduction
This Character Blueprint shows you how to use the following components of the pack and shows you, with intermediate Blueprint knowledge, how to implement all relevant logic into your own character. Also, there are some variables and functions to help you work with BP_Character in Unreal Editor viewport as well as on save game content.
¶ Components
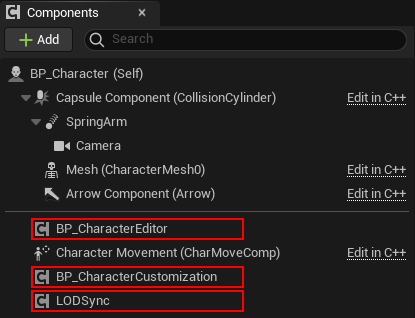
There are three components added to the character:
- BP_CharacterCustomization component which contains all the core logic and is mandatory on each character Blueprint that should benefit from customization.
- BP_CharacterEditor component which is optional and handles the in-game Character Editor.
- [V8] LODSync component which is optional if you want to use the skeletal mesh LODs provided by the V8 Groom Update.
¶ Character Customization Interface
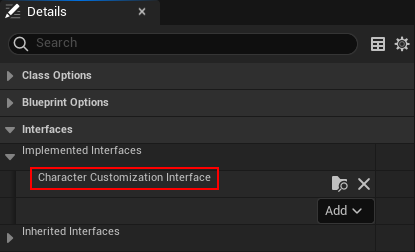
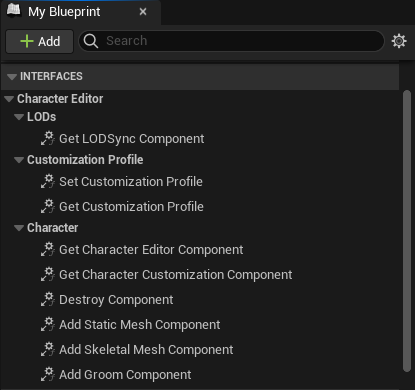
To setup interaction with the BP_CharacterCustomization component, the character implements the Character Customization Interface in its Class Settings. It has 9 functions. The descriptions are order by their business logic.
-
Customization Profile
Get Customization Profile
Must return a Customization Profile variable, if you want to modify your customization in the Unreal Editor viewport and use the Initialization Behaviors ending with "Current Profile". See Variables for details. This can also return nothing, if you want to ignore that and e.g. have character Blueprint where you directly apply loaded customizations from differently. See Apply Customization Profiles (Replicable) for details.- [V7]
Set Customization Profile
Must set the Customization Profile variable respectively. This is currently used by the Character Editor Tools.
-
Character
Get Character Customization Component
Must return theBP_CharacterCustomizationcomponent to pass around various functionality.- [V2]
Get Character Editor Component
Must return theBP_CharacterEditorcomponent, when used. This can return nothing if the character does not use that component. Add Skeletal Mesh Component
Must callAddSkeletalMeshComponentdirectly on this character, since adding a component from within a Blueprint component is not allowed and must be called directly on the owning actor. Used for Skeletal CDAs.- [V2]
Add Static Mesh Component
Must callAddStaticMeshComponent. Used for Static CDAs. - [V7]
Add Groom Component
Must callAddGroomComponent. Used for Groom CDAs. Destroy Component
Must callDestroyComponentfor the same reason as forAdd...Component.
-
LODs
- [V8]
Get LODSync Componentmust return the LODSync component, when used. This can return nothing if the character does not use that component.
- [V8]
¶ Actor Details
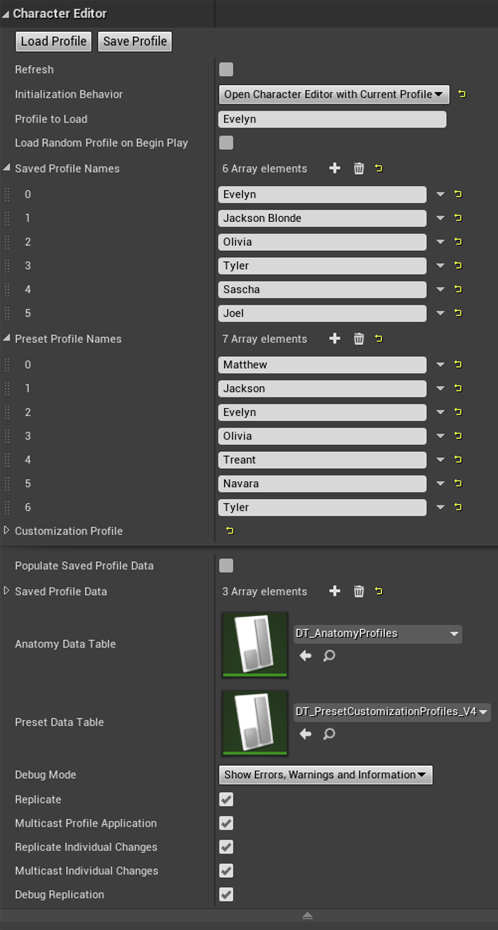
There are various variables and functions exposed to the Actor Details, that you can control if you place BP_Character in the Unreal Editor viewport.
In this chapter, variables that are passed directly to the BP_CharacterCustomization component are marked with (CC) and will be explained here from user perspective to get you started and in the component’s chapter from technical perspective.
An exception is “Customization Profile (CC-Initialize)”, which is passed indirectly by calling BP_CharacterCustomization > Initialize with Initialization Behavior “Use Current Profile” or "Open Character Editor with Customization Profile", which in turn gets this variable from BP_Character through the Character Customization Interface > Get Customization Profile.
¶ Variables
- Refresh forces the Construction Script to run again. This sets Refresh directly back to false, so this checkbox acts like a button and never turns true.
- Initialization Behavior (CC) defines how your character initializes and loads its customization profile. Can be used in conjunction with “Profile to Load”
- Profile to Load (CC) defines the profile you want to load by either clicking the button “Load Profile” or by starting the game while having selected an appropriate Initialization Behavior. You must specify a profile found in the two profile lists below.
- Load Random Profile on Begin Play ignores Initialization Behavior and Profile to Load and loads a random profile from the two profile lists below.
- Saved Profile Names lists all profile names available in the save game that is used to store the customization profiles you saved in the in-game editor. The corresponding “Saved Profile Data” can be viewed in the advanced details.
- Preset Profile Names lists all profile names available in the currently assigned Preset Data Table from below.
- Customization Profile (CC-Initialize) can be used to manually tweak your customization directly in the Unreal Editor viewport. Anything that can be changed, will modify the Characters visuals – according to the rules and possibilities of the Character Editor.
- [V8] Use Skeletal Merging (CC) merges basebody body with all apparel meshes. Requires built-in Unreal Engine plugin "Skeletal Merging" to be active. (See Update Skeletal Merging for details.)
¶ Advanced Variables
- Populate Saved Profile Data enables the list below to be loaded from save game.
- Saved Profile Data shows, if “Populate Saved Profile Data” is enabled, the stored customization profiles from within your save game file. These can be viewed for troubleshooting.
- Anatomy Data Table (CC) defines from which table Anatomy Profiles are selected based on the anatomy of the current customization profile. Default is DT_AnatomyProfiles.
- Preset Data Table (CC) defines from which table preset customization profiles are chosen to load them with “Load Profile” or in-game with the Profile Manager. Default is DT_PresetCustomizationProfiles_V4.
- Debug Mode (CC) defines which granularity of logging is performed.
- Replicate (CC) defines whether the character replicates or not. Ignored if the game is played standalone.
- Multicast Profile Application (CC) defines whether applying a whole customization profile is replicated to all clients or just to the owning client. Requires “Replicate” to be set to true.
- Replicate Individual Changes (CC) defines whether individual changes in the Character Editor (e.g. changing colors or single CDAs) is replicated or not. Requires “Replicate” to be set to true.
- Multicast Individual Changes (CC) defines whether individual changes are replicated to all clients or just to the owning client. Requires “Replicate” to be set to true.
- Debug Replication (CC) enables logging to identify which player or NPC is calling a specific step during initialization and profile application. The general “Debug Mode” has to be set at least to “Show Errors, Warnings and Information”.
¶ Functions
- Load Profile enables you to load the “Profile to Load” from existing save game or the Preset Data Table. As described, all available profiles are listed the respective lists.
There is a small caveat as of now: bone transforms of our Anim Blueprints (e.g. size, age and foot transforms) as well as Anim Dynamics (e.g. the beard from Preset Profile 6 “Tyler”) will not update correctly at this stage in Blueprint, because calling this function seems to be different than triggering Construction Script via Refresh checkbox or other variable changes.
Until we find a solution on how to trigger the Construction Script properly from within Blueprint (no Unreal Engine function available, yet) or until maybe YOU 😉 have some advice our recommended workaround is to load the profile and then hit the Refresh checkbox or make changes to the customization profile to forcefully trigger the Construction Script.
- Save Profile enables you to store the current Customization Profile in the save game. The name of the profile will be the Customization Profile > Meta Data > Name.
¶ Construction Script
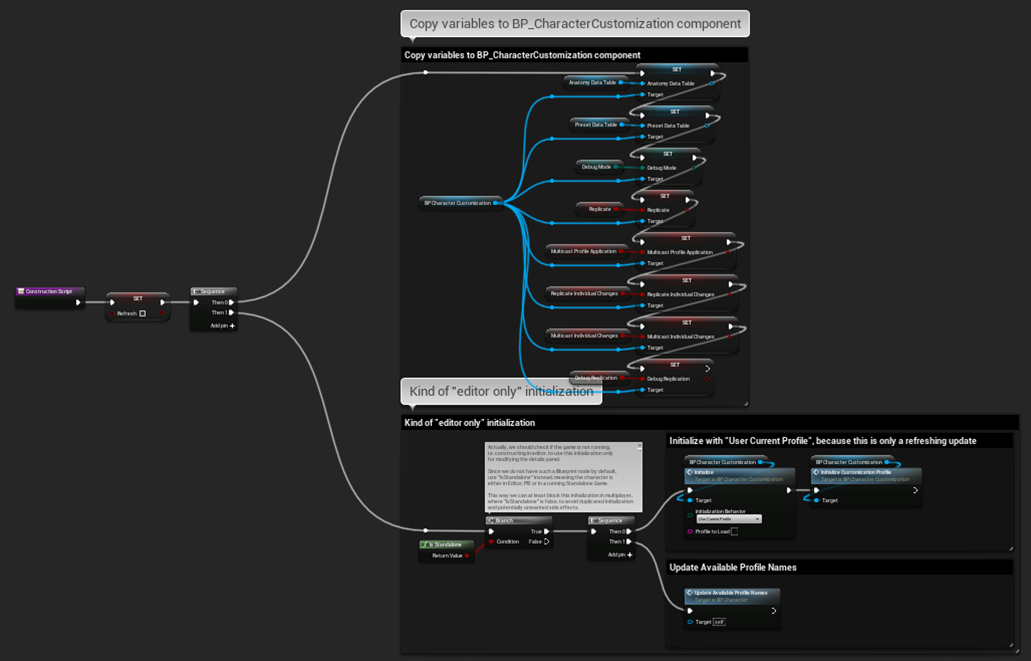
In Construction Script the Refresh variable is reset to be triggered again and again in Actor Details panel, acting as a button. All the variables from above marked with “(CC)” are passed directly to the BP_CharacterCustomization component.
In standalone (non-network) mode the Construction Script initializes BP_CharacterCustomization and updates “Available Profile Names”, so you can see directly what you are modifying in the Actor Details panel.
Actually, we should check if the game is not running, i.e., constructing in editor, to use this initialization only for modifying the details panel. Since we do not have such a Blueprint node by default, use "IsStandalone" instead, meaning the character is either in Editor, PIE or in a running Standalone Game.
This way we can at least block this initialization in multiplayer, where "IsStandalone" is false, to avoid duplicated initialization and potentially unwanted side effects.
Of course, you could change the Initialization Behavior but initializing the character with an open character editor in Construction Script has no effect, since widgets can only be created while the game is running.
¶ Begin Play
¶ Replication Implementation [V6]
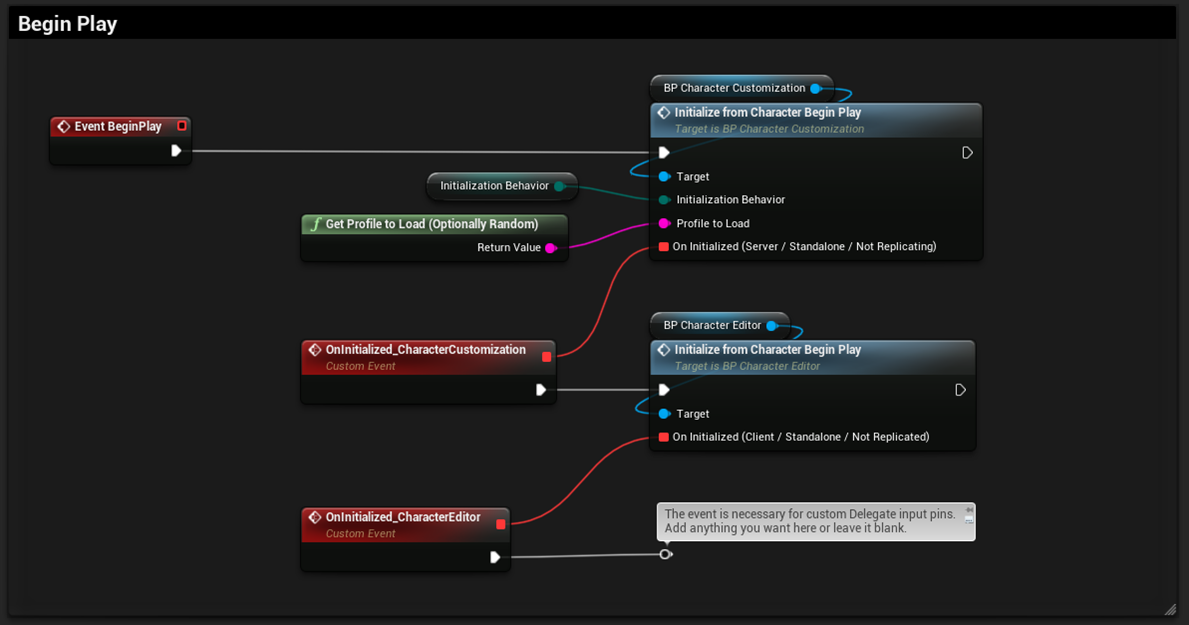
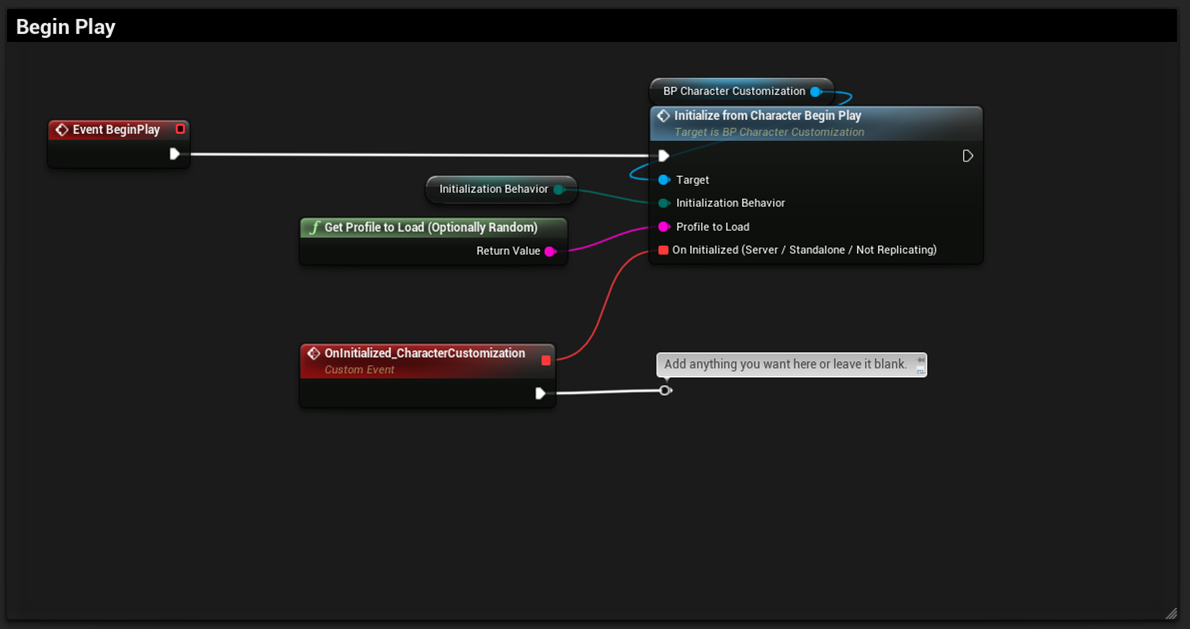
Since the Replication Update, the whole process is divided in multiple steps and depends on if replication is enabled or not. If the Character Editor is used in standalone, the initialization almost behaves like before the update from the user’s perspective. If replication is enabled it may feel a tiny bit different, because of network delay and two manual delays, that are explained in BP_CharacterCustomization component.
For now, focusing on the BP_Character itself, you need to call Character Customization’s Function: Initialize From Character Begin Play and connect an Initialization Behavior, a Profile to Load and Character Editor’s Function: Initialize From Character Begin Play to the delegate pin of the first function, as well as a custom event for your own logic at the second nodes’ delegate pin.
At the delegate pins, you see on which network target / in which situation they are called, so be aware that e.g., the BP_CharacterCustomization client-side of a replicating NPC does not call “On Initialized” – only the server instance of that NPC does. This is necessary because in this case the client-side NPC only pre-initializes itself, because it is completed by the client players’ request for the NPCs’ customization profile.
¶ Old Implementation [V5]

Previously we were initializing the BP_CharacterCustomization component and the (optional) BP_CharacterEditor component on a player-controlled BP_Character. Our showcase map had set the characters Initialization Behavior to “Use Current Profile”, thus not showing the editor at Begin Play.
You had to press [C] to show it.
¶ Character Controls
Besides that, right below the Begin Play section there are the character controls, which are further described in In-game Controls > Implementation Details.