¶ Introduction
This component enables character customization core logic of your pawn's visual appearance and handles different things. It is built around Anatomies and the Customization Profile structure.
Since the V11 Gameplay Tag Update this component works with Pawn-based Blueprints. Before, it only worked with Character-based Blueprints. In this page we mostly refer to pawns from now on.
¶ Replication [V6]
Since V6 Replication Update, our product has replication support for applying whole customization profiles and setting individual properties over network. Do not worry, if your game has nothing to do with replication, you can use the Character Editor in a standalone (non-network) game as before the update. We tried to refactor the core logic as little as possible but had to update quite a few places to make everything work smoothly but as well keeping the old standalone behavior.
In general, BP_CharacterCustomization is the source of truth for replication logic and got a new initialization function specific to BP_Character ➝ Begin Play and lots of new events in the Event Graph handling the initialization for players and NPCs, applying their customization profiles after initialization and from within the Character Editor, as well as setting individual values of your customization.
Every functionality that potentially can be replicated has a corresponding event with a (Replicated) suffix, where we decide to either replicate or not, depending on Replicate and related variables.
The Replicate variable does not need to be disabled manually, if you want to play in a standalone game, because we also check for “Is Standalone” in the Replicate branch.
This update does not contain any content for setting up a database to store your Customization Profiles. It is only about replication itself. This cannot be provided as of now because it would depend on Unreal Engine Plugins, which dependencies we are not allowed to submit to Marketplace. If you want to store profiles in a database, you must create your own implementation. We recommend using MongoDB or MySQL.
We will address the related events and functions in the next chapters. 
¶ Initialization Paths
As a little foreword, the initialization is split into two main paths:
- Event: Initialize (Replicable)
Intended for server-side, standalone and not-replicating players, and NPCs - Event: Initialize Locally If Uncontrolled
Intended for client-side uncontrolled characters (other players and NPCs)
Those paths must be executed at your Pawn's Begin Play event or sometime after, as explained below.
[V11] There is the additional Event: Send Current Customization Profile To Player for replication in dedicated-server and listen-server scenarios, which is triggered by BP_CharacterCustomization_Controller.
[V10 removed] Before the V11 Gameplay Tag Update, the Event: Request Customization Profile For Other Characters was responsible for that part and no controller component was available.
Last but not least, there is Event: Apply Customization Profile (Replicable) which is called on server-side at the end of initialization and can be called anytime after initialization to apply other customization profiles.
There will be also an example right after explaining these main events.
¶ Function: Initialize From Character Begin Play [V6]
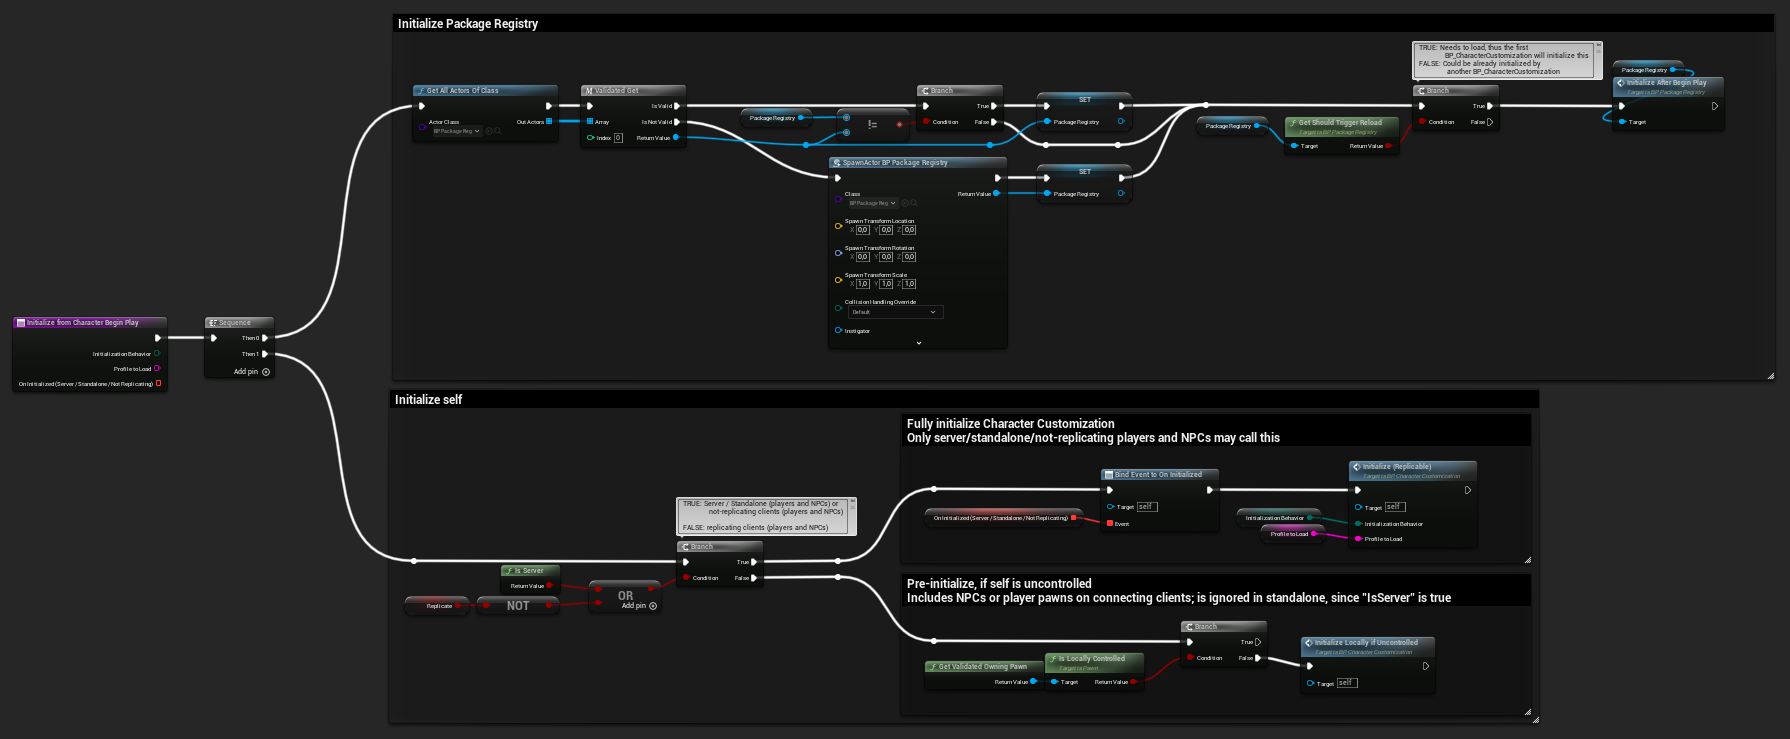
This function is the entry point from within our BP_Character or your own Pawn-based Blueprint. Thus, think back to chapter BP_Character > Begin Play, where you saw when it was called.
[V7] Since the Customer Update, at first the Package Registry gets initialized. We search the level for an already placed Package Registry.
- If present, we reference that Package Registry.
- If present but different, we reference the different Package Registry. (It can be different if another reference was previously used by the Character Editor Tools.)
- If not present, we spawn a new Package Registry and reference it. This spawning will only happens once per world (server and individual clients), since the characters being initialized after the first character will find the Package Registry as present.
Then, in case the Package Registry needs a reload, it will be triggered. (See Package Registry for details.)
Afterwards, as described in the previous chapters, on server / standalone / not-replicated characters we bind to On Initialized and call Event: Initialize Replicable on client pawns. If the pawn is a replicating client, we call Event: Initialize Locally If Uncontrolled to prepare them for receiving customization from sever.
[V10 removed] Before V11 Gameplay Tag Upadte, additionally, all not-replicating player characters (without NPCs) were calling exactly that logic: Event: Request Customization Profile For Other Characters right here, which got replaced by the logic of BP_CharacterCustomization_Controller.
Server/standalone/not-replicated characters also call the latter event at the end of their initialization.
¶ Event: Initialize (Replicable) [V6]

Intended server-side, standalone and not-replicating players, and NPCs. It first checks if Replicate is enabled.
- If replication is disabled, we call Function: Initialize and Function: Initialize Customization Profile. Then, OnInitialized will be called whereafter the connected initialization event of BP_CharacterEditor in BP_Character is called.
- If replication is enabled, we follow the replication and call the event Server_Initialize, which in turn performs some more complex logic and is described below.
¶ Server_Initialize

On this event, we hide the player or NPC on server-side, which as well internally replicates to its owning client, so a human player does not see his character, while we are initializing everything. Optionally, you could add a progress bar, particle animation etc. during this time.
In case the event is called on an NPC, the owning “client” is always the server, thus replicating to its owning client will not hide the NPC for human players on their clients. A multicast event is not suitable in this situation, because lately joining players would not receive that multicast, thus Event: Initialize Locally If Uncontrolled is used in BP_Character > Begin Play as well (see chapter for details).
[V10] Furthermore, in Server_Initialize there is a logic (see Wait Until Player Is Fully Connected right below) to delay initialization if necessary. (This replaces the 2-seconds-delay from [V6 removed] Replication Update)
Right after this preparation we call Function: Initialize, whereafter we call event Multicast_Initialize to initialize all network instances of BP_CharacterCustomization as well (this also happens for the NPCs that already have been initialized locally due to Event: Initialize Locally If Uncontrolled). This way all characters are prepared for receiving the customization profile.
Afterwards we call Event: Initialize Customization Profile, unhide the character, and call On Initialized.
[V10 removed] Before V11 Gameplay Tag Update, we did call Event: Request Customization Profile For Other Characters at the very end for this specific pawn, to complement the request for all not-replicating player characters in Initialize Character From Begin Play. This call got replaced by the logic of BP_CharacterCustomization_Controller.
¶ Wait Until Player Is Fully Connected [V10]
This functionality replaces the 2-seconds-delay from [V6 removed] Replication Update.
It is necessary for joining players, if this component is initialized directly at character BeginPlay (as in our BP_Character example). Since the server calls BeginPlay instantly, the player connection may not be established completely, thus the following server-client events would not be sent correctly.
Unfortunately, there is no specific event in Blueprints, we could wait for, without using a custom Game Mode Blueprint. Removing this delay would result in incorrect initialization.
Establishing the connection usually takes 3 attempts (less than 1 second by default), but may depend on network conditions. Please, expect differences between local and remote server execution.
With Debug Mode set to Verbose Information, you can see the following lines printed in the server log.
- Wait for player connection - attempt {X}/{MaxAttempts} - next attempt in {Delay} seconds (repeated)
- Player #{PlayerId} is connected!
If the character stays invisible after connecting to the server, all connection check attempts have been used, showing the following message:
- Player connection took an unexpectedly long time. Cancel initialization.
If the latter happens, try to adjust variables Initialization_MaxAttempts (default: 20) or Initialization_Delay (default: 0.05). The defaults result in a roughly 10 seconds total check time as shown in the following table.
| Attempt X | Next attempt in Delay seconds | Total time passed after attempt |
|---|---|---|
| 1 | 0.00 | 0.00 |
| 2 | 0.05 | 0.05 |
| 3 | 0.10 | 0.15 |
| 4 | 0.15 | 0.30 |
| 5 | 0.20 | 0.50 |
| 6 | 0.25 | 0.75 |
| 7 | 0.30 | 1.05 |
| 8 | 0.35 | 1.40 |
| 9 | 0.40 | 1.80 |
| 10 | 0.45 | 2.25 |
| 11 | 0.50 | 2.75 |
| 12 | 0.55 | 3.30 |
| 13 | 0.60 | 3.90 |
| 14 | 0.65 | 4.55 |
| 15 | 0.70 | 5.25 |
| 16 | 0.75 | 6.00 |
| 17 | 0.80 | 6.80 |
| 18 | 0.85 | 7.65 |
| 19 | 0.90 | 8.55 |
| 20 | last attempt | - |
¶ Multicast_Initialize
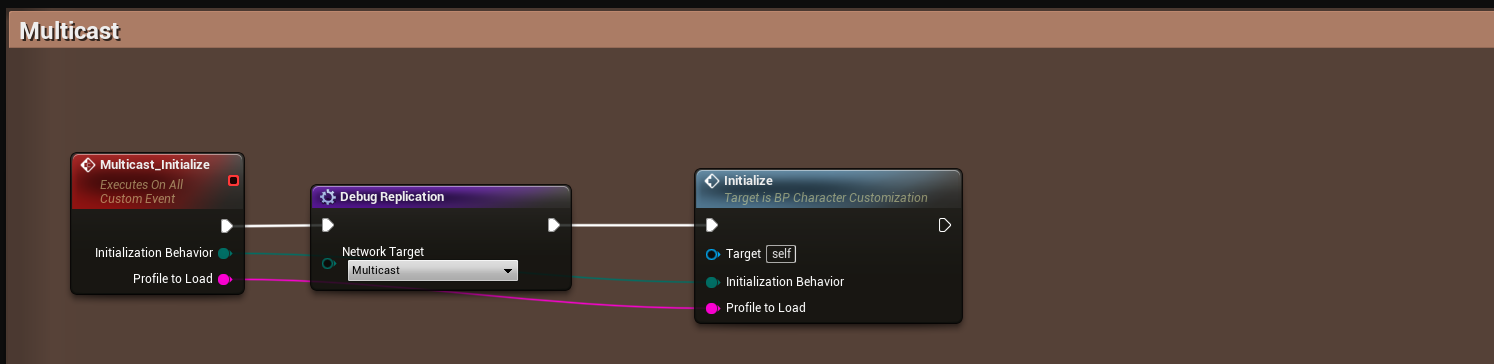
Calls Function: Initialize on all client instances.
¶ Event: Initialize Customization Profile [V6]

Running only on the server, it calls Function: Initialize Customization Profile which relies on properties set by Function: Initialize, that's why the latter always needs to be called first. Do not change the order of these functions.
¶ Event: Request Customization Profile For Other Characters [V6] [V10 removed]
Since V11 Gameplay Tag Update the following events are replaced by Event: Send Current Customization Profile to Player.
¶ Server_RequestCustomizationProfileForOtherCharacters
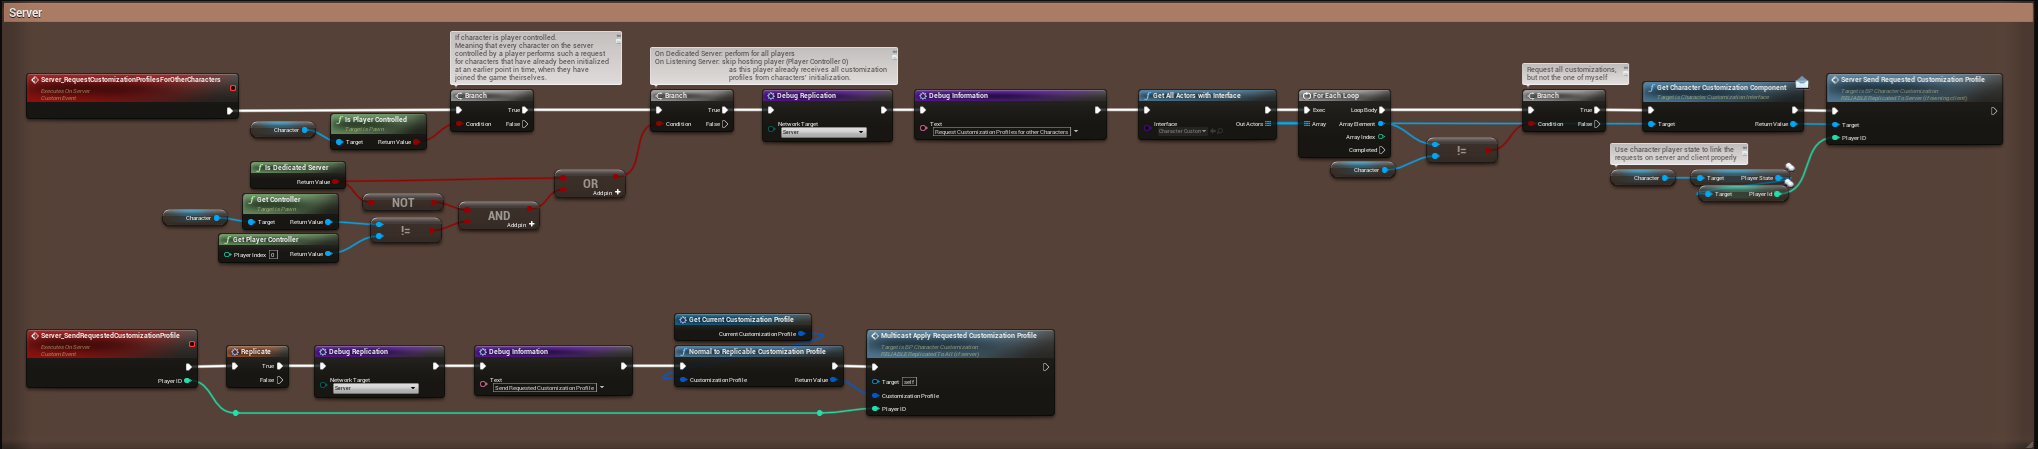
Running only on the server, it only works for player-controlled characters (no NPCs) and for
- All players on a Dedicated Server or
- Only remote players on a Listening Server (skipping the hosting player on server)
This event iterates over all characters in the level with an implemented Character Customization and let them all call Server_SendRequestedCustomizationProfile.
¶ Server_SendRequestedCustomizationProfile
This event works if the specific character replicates and calls Multicast_ApplyRequestedCustomizationProfile with its current replicable customization profile and Player ID as parameters. This will exclude the current character from re-applying its own Customization Profile twice, by checking for its Player ID – explained in the next event.
(See Replicable Customization Profile and Function: Apply Customization Profile for details on profile conversion.)
¶ Multicast_ApplyRequestedCustomizationProfile
Since a multicast gets sent to all clients and by default Unreal Engine has no replication type for sending to “a requesting client”, we compare the given Player ID with the current Player ID, thus only execute the following code on the requesting players’ client to avoid unwanted duplicated application on other clients.
Replication mode “owning client” is not suitable, because a newly joining player is simply not the owning client of all the characters in his world. For other players these are the other players’ clients and for NPCs the “owning client” is the server.
Once successfully checked for the Player ID, the event converts the replicable customization profile back to a normal customization profile and applies the character customization profile on client characters of the requesting player. After application, the characters get visible again, thus also reverting their hiding that was made on client-side in Event: Initialize Locally If Uncontrolled.
(See Replicable Customization Profile and Function: Apply Customization Profile for details on profile conversion.)
¶ Event: Send Current Customization Profile to Player [V11]
Since V11 Gameplay Tag Update the following events replace the Event: Request Customization Profile For Other Characters.
¶ Server_SendCurrentCustomizationProfileToPlayer

This event works if the specific character is initialized and replicates, and is intended to be called by BP_CharacterCustomization_Controller, but could potentially be called by other logic.
This event calls Multicast_SendCurrentCustomizationProfileToPlayer with its current replicable customization profile and Player ID as parameters. This will exclude the current character from re-applying its own Customization Profile twice, by checking for its Player ID – explained in the next event.
(See Replicable Customization Profile and Function: Apply Customization Profile for details on profile conversion.)
¶ Multicast_SendCurrentCustomizationProfileToPlayer

Since a multicast gets sent to all clients and by default Unreal Engine has no replication type for sending to “a requesting client”, we compare the given Player ID with the current Player ID, thus only execute the following code on the requesting players’ client to avoid unwanted duplicated application on other clients.
Replication mode “owning client” is not suitable, because a newly joining player is simply not the owning client of all the characters in his world. For other players these are the other players’ clients and for NPCs the “owning client” is the server.
Once successfully checked for the Player ID, the event converts the replicable customization profile back to a normal customization profile and applies the character customization profile on client characters of the requesting player. After application, the characters get visible again, thus also reverting their hiding that was made on client-side in Event: Initialize Locally If Uncontrolled.
(See Replicable Customization Profile and Function: Apply Customization Profile for details on profile conversion.)
¶ Event: Initialize Locally if Uncontrolled [V6] [V11]

Intended for calling on a client-side uncontrolled character. It starts by checking if bReplicate is enabled.
- If replication is disabled, we just initialize the character with its current profile.
- If replication is enabled, we hide the calling character locally and initialize it.
The initialization is done by calling Function: Initialize to be ready for the above-described Multicast_ApplyRequestedCustomizationProfile, which is called by the client player in its own initialization process and at the end of which the current character will be made visible again.
“On Initialized” is currently not bound to before InitializeLocalUncontrolled is called and just there for you to bind to yourself, if desired.
[V6 removed] Previously, te event hase been named Initialize Local Uncontrolled.
¶ Event: Apply Customization Profile (Replicable) [V6]

Intended for calling on a server-side during initialization and on client-side from within WBP_ProfileManager.
- If replication is disabled, we call Function: Apply Customization Profile.
- If replication is enabled, we follow the replication and …
- On server: skip instant application, as the event Server_ApplyCustomizationProfile does this already, which is explained below.
- On client: apply the profile locally before the server event to bypass the network delay and have instant feedback.
… after this, we convert the current customization profile to a Replicable Customization Profile one and call Server_ApplyCustomizationProfile.
(See Replicable Customization Profile and Function: Apply Customization Profile for details on profile conversion.)
You can also call this event from your own custom logic, e.g., applying a profile on entering a Box Volume. Calling this event either on server-side or client-side depends on if you want to have direct visual feedback on that application (client-side is instant, while server-side has network delay).
¶ Server_ApplyCustomizationProfile

This event takes the converted Replicable Customization Profile and converts it back to a normal one to be passed into Function: Apply Customization Profile on server-side, after which it gets replicated on multicast or on owning client, depending on variable bMulticastProfileApplication, to apply the same customization profile on the client(s).
(See Replicable Customization Profile and Function: Apply Customization Profile for details on profile conversion.)
¶ Multicast / Client_ApplyCustomizationProfile
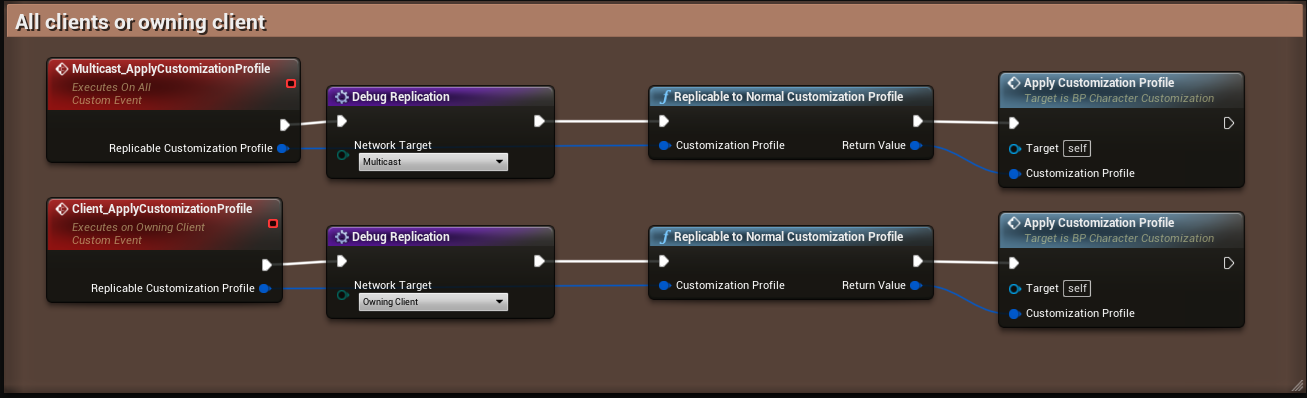
These events work identical and convert the replicable customization profile to a normal one to be passed into Function: Apply Customization Profile, this time on client-side.
(See Replicable Customization Profile and Function: Apply Customization Profile for details on profile conversion.)
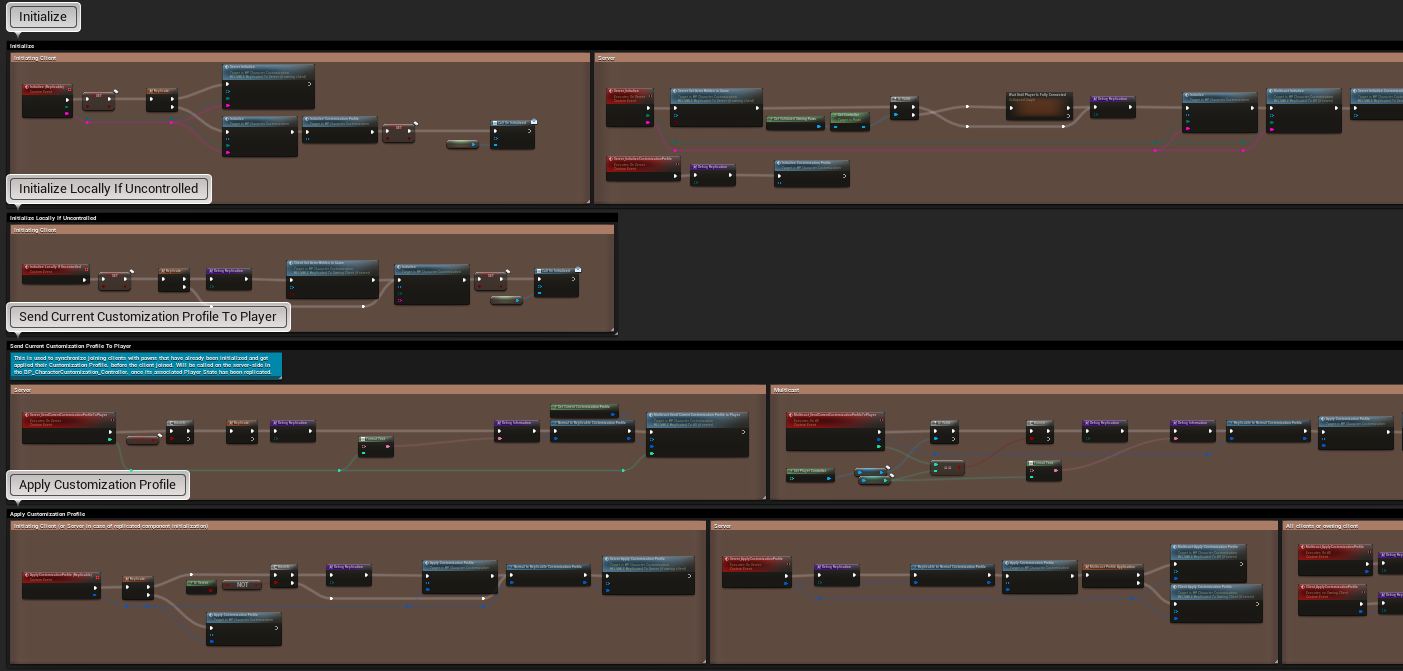
¶ Initialization Example [V6]
With all the theory from above, we hope to make it more tangible with the following example, while reviewing the given screenshot from the initialization chapter:
Let’s say Player A is hosting a Listening Server and owns his pawn. There is one NPC in the level.
All 3 pawns call Function: Initialize From Character Begin Play. As they belong to the listening server, all of them go the server-side path, thus they all bind to the dispatcher On Initialized and call Event: Initialize (Replicable). All of them get hidden and call their initialization functions on server-side as well as their client instances via multicast. The latter simply calls again on listening server for all 3 pawns, since there is no other client, yet. Going on with Event: Initialize Customization Profile a specific customization profile gets chosen on their server-sides, that are passed to Event: Apply Customization Profile (Replicable) which calls on server-side and multicasts to clients as well. Now, all 3 pawns have their profiles applied.
[V10 removed] Before V11 Gameplay Tag Update, Player A skips the Event: Request Customization Profile For Other Characters, as he is the host. (See the table below for the new process in V11).
Now, Player B joins the game, which owns his server-side and client-side pawn instance.
All 3 previous pawns have already been initialized and applied. On client-side of Player B, all 4 pawns (Player A, Player B, and NPC) call Function: Initialize From Character Begin Play. As they belong to the client, all of them go the client-side path. The pawn of Player B stops at the branch as it is locally controlled by Player B. All other pawns (Player A and NPC) go through and call Event: Initialize Locally If Uncontrolled, thus hiding and initializing themselves locally.
On server-side there is only Player B that calls Function: Initialize From Character Begin Play, because as mentioned the others have already been initialized. Player B goes the server-side path as the previous 3 pawns and binds to the dispatcher On Initialized, calls Event: Initialize (Replicable) and all the related functions as Player A and NPC did on server-side, already.
| [V11] Since V11 Gameplay Tag Update | [V10 removed] Before V11 Gameplay Tag Update |
|---|---|
| In the meantime, the Player Controller of Player B calls its Event Begin Play -> Request Customization Profiles from Other Pawns. | Player B also calls Event: Request Customization Profile For Other Characters at the very end of the server-side path, as he is a normal client player. |
The logic iterates over all pawns (or characters [V10 removed]) (Player A, Player B, and NPC) and skips Player B as it is the requesting player. Further, all customization profiles of Player A and NPC get multicast to all players (Player A and Player B), including the Player ID of the requesting Player B.
Since Player A does not have the same Player ID as Player B, the application is skipped on his client. On the other hand, all the client instances on Player B’s client (Player A and NPC) get all their replicated customization profiles applied. Afterwards they get visible again.
This process repeats for Player C, D, E etc.
On a Dedicated Server environment the server simply just initializes all NPCs that are in the level, as there are no players yet, if a Dedicated Server starts. Then Player A will go through the same process as Player B in this example.
¶ Function: Initialize
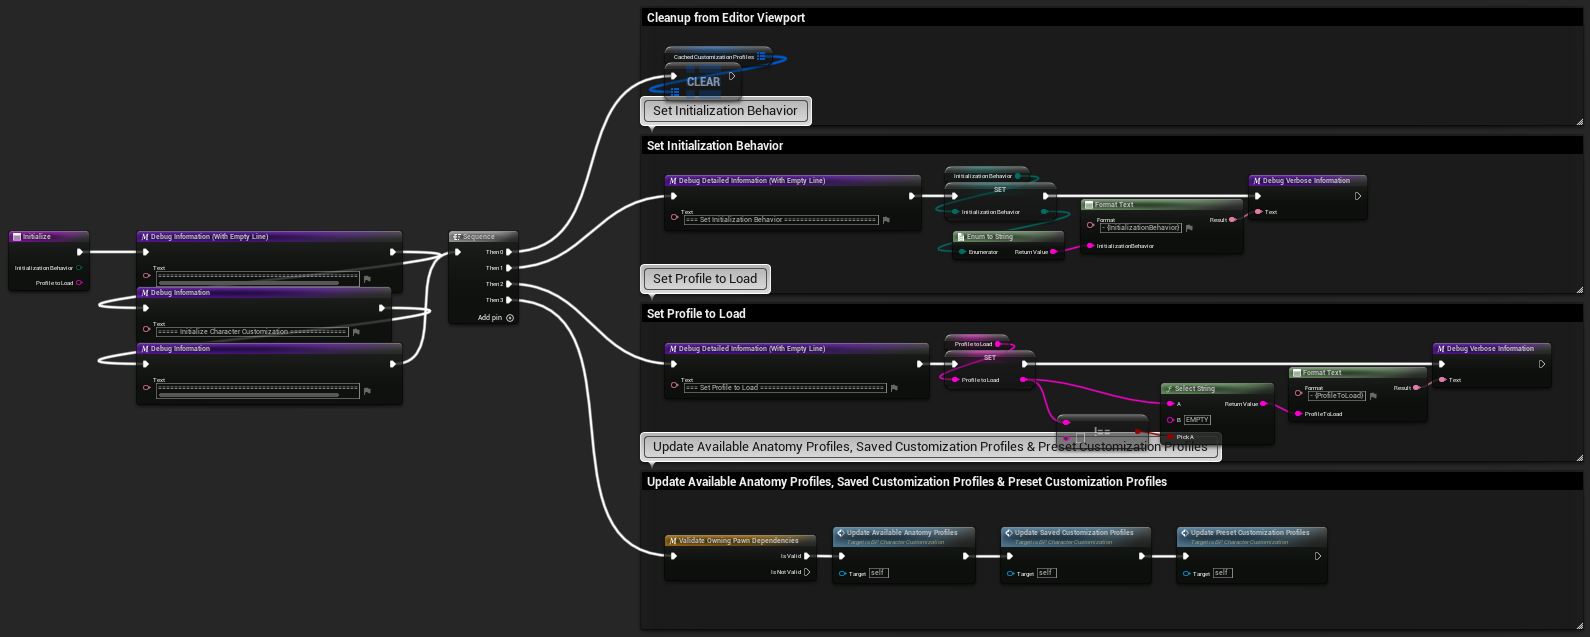
Initialize itself just clears the Cached Customization Profiles and sets the current Initialization Behavior and Profile to Load. It validates the character and sets the Character variable for validated access later.
It calls also UpdateAvailableAnatomyProfiles, UpdateSavedCustomizationProfiles and UpdatePresetCustomizationProfiles.
-
Initialization Behavior
- XXX Current Profile applies the current customization profile if supplied by the parent character. (See BP_Character > Get Customization Profile).
- XXX Profile to Load applies the given Profile to Load from parameter 2. See Function: Initialize Customization Profile on how the actual profile is selected.
-
Profile to Load is the profile name for Initialization Behavior Use Profile to Load.
[V2] Update Available Anatomy Profiles registers Available Anatomy Profiles by validating the Anatomies from Anatomy Data Table. They are used in the update functions later. Anatomy Profiles are valid, if at least their body mesh and Anim Blueprint are valid.
[V6] Update Saved Customization Profiles registers Saved Customization Profiles by reading all profiles names from the save game file. They are used in Function: Initialize Customization Profile to find out if Profile to Load is a saved profile, a preset profile or none of them.
[V6] Update Preset Customization Profiles registers Preset Customization Profiles by reading all profile names from the Preset Data Table. They are used in Function: Initialize Customization Profile to find out if Profile to Load is a saved profile, a preset profile or none of them.
¶ Function: Initialize Customization Profile [V6]
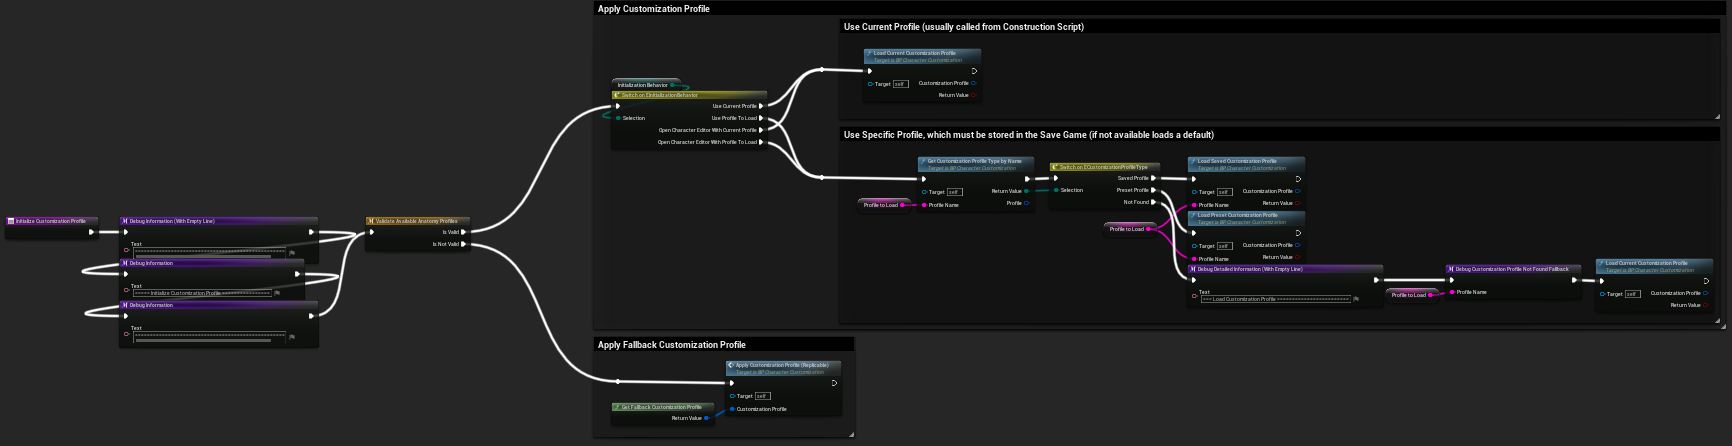
This function selects the desired way to load the customization profile based on the Initialization Behavior.
- Behaviors with Current Profile call Load Current Customization Profile
- Behaviors with Profile to Load take the corresponding string variable and check if the profile is a saved profile, a preset profile or the profile could not be found.
- Saved Profile calls Load Saved Customization Profile
- Preset Profile calls Load Preset Customization Profile
- Unfound profiles fall back to Load Current Customization Profile
- [V11] If there is no available anatomy profile the orange fallback customization profile is applied.
Load Current Customization Profile takes the Customization Profile structure from BP_Character > GetCustomizationProfile and passes it to Function: Apply Customization Profile.
Load Saved Customization Profile loads the Customization Profile structure from save game file which matches “Profile Name” and passes it to Function: Apply Customization Profile.
Load Preset Customization Profile loads the Customization Profile structure from PresetDataTable which matches “Profile Name” and passes it to Function: Apply Customization Profile.
[V5 removed] Before the Replication Update, this loading selection previously was part of Function: Initialize, but had to be separated, since the internally called Apply Customization Profile had to be made replicable itself to apply profiles to all clients, even from in-game Character Editor. If we had left that logic in the former function we had caused to call Function: Apply Customization Profile twice on client:
- the first time in Event: Initialize (Replicable) that multicasts now
- the second time in Event: Apply Customization Profile (Replicable) itself
That was not desired, thus we split the logic and now only apply from with InitializeCustomizationProfile.
¶ Function: Apply Customization Profile

Apply Customization Profile takes a Customization Profile structure and stores it in Current Customization Profile.
It can be called any time once the BP_CharacterCustomization component has been initialized (e.g., for applying a profile on runtime like the load functionality of the Character Editor does).
[V6] Since the Replication Update, in WBP_CharacterEditor this function has been replaced with its corresponding event “ApplyCustomizationProfile (Replicable)”. The latter is necessary for you to call instead of the function if you want to use replication as well.
The function itself calls all the main update functions described below.
- Update Basebody
- Update Apparel, -Equipment, and -Hairstyle
- Update Groom
- Update Attachments
- Update Morph Targets on All Meshes
- Update Skeletal Merging
Now the customization profile is completely applied to the character.
¶ Update Basebody
Updates body and head components depending on the Anatomy Profiles and Current Customization Profile > Basebody (Profile) by the following functionality and functions.
- Add Head Component (if nessary: defined in the Anatomy Profile)
- Set the Anim Instance Class
- UpdateBasebodyBody
- UpdateBasebodyHead
- UpdateBasebodyMorphTargets
- Reset all materials
- UpdateSkinMaterials
- UpdateEyesMaterials
Sepcialties about this function:
- Can be called on its own to update the whole basebody.
- [V6] Does not replicate on its own, use Event: Apply Customization Profile (Replicable) instead.
- [V8] Calls Function: Update LODSync Component.
¶ Update Basebody Body
Sets the body skeletal mesh.
Sepcialties about this function:
- Can be called on its own to update the body mesh.
- [V6] Does not replicate on its own, use Event: Apply Customization Profile (Replicable) instead.
- [V8] Calls Function: Update LODSync Component.
¶ Update Basebody Head
Sets the head skeletal mesh, if a head component has been created.
Sepcialties about this function:
- Can be called on its own to update the head mesh.
- [V6] Does not replicate on its own, use Event: Apply Customization Profile (Replicable) instead.
- [V8] Calls Function: Update LODSync Component.
¶ Update Basebody Morph Targets
Refreshes the morph targets on all skeletal meshes.
Updating only the Basebody Body component and letting Master Pose pass it around is disabled, because it seems that initializing the character customization with weights > 0.0 let further calls ignore the Master Pose Component inheritance. Maybe it is an engine bug, starting in UE4.27.
E.g. loading a profile with Body Weight = 1.0, then changing the weight in the editor only changes the base body morph instead of applying the moprh value also to the head and the apparels etc.
Sepcialties about this function:
- Can be called on its own to update the morph targets.
- [V6] Does not replicate on its own, use Event: Apply Customization Profile (Replicable) instead.
- [V8] Calls Function: Update LODSync Component.
¶ Update Skin Materials
Creates multiple Material Instance Dynamic for the body and head components on the material slots defined in Anatomy Profile > Eyes Material Sets ([V7 removed] previously on hardcoded slots Body and Head).
It then applies the Scalar Parameters and HDR Vector Parameters from Current Customization Profile > Basebody (Profile) > Skin.
Sepcialties about this function:
- Can be called on its own to update the skin materials.
- [V6] Does not replicate on its own, use Event: Apply Customization Profile (Replicable) instead.
- [V8] Calls Function: Update LODSync Component.
¶ Update Eyes Materials
Creates multiple Material Instance Dynamic for the head compoment (or body component, if no head is used) on the material slots defined in Anatomy Profile > Eyes Material Sets ([V7 removed] previously on hardcoded slots Eyes and Eyelashes).
It then applies the Scalar Parameters and HDR Vector Parameters from Current Customization Profile > Basebody (Profile) > Eyes.
Sepcialties about this function:
- Can be called on its own to update the eye materials.
- [V6] Does not replicate on its own, use Event: Apply Customization Profile (Replicable) instead.
- [V8] Calls Function: Update LODSync Component.
¶ Update Apparel, -Equipment, and -Hairstyle
Refreshes the skeletal Customization Data Assets for apparels, equipment and hairstyles.
These are logically more complex, since in these functions happens some cleanup initially. In fact, each call of them removes all current data assets and applies all remaining CDAs again to reset any modification done by a previously assigned CDA if it is not assigned anymore (e.g., change from male to female).
The applied CDAs come from the following profiles in Current Customization Profile:
- BP_CDA_Apparel from Apparel (Profile)
- BP_CDA_Equipment from Equipment (Profile)
- BP_CDA_Hairstyle from Hairstyle (Profile)
The update logic of this function works as follows:
- Cleanup CDAs
- For each valid CDA:
- Add a SKELETAL mesh component and apply the mesh.
- Apply the Post Process Anim Blueprint (if available) as the Custom Anim Blueprint and set its Copy Pose Mesh.
Coming with [V4], this is our new animation workflow. Each Skeletal CDA can have an optional custom animation. (See tutorial: Add your own CDA animations)
- Apply a Material Variant as dynamic material instance to the skeletal mesh component and add it to a global array (each CDA type has its own global array). If Material Variant Index is -1, then the original material of the mesh is used.
For Hairstyles the Material Variant Index is always -1. If you desire, look at Apparel Profile and Update Apparel to copy that functionality over.
- Apply Global Scalar Parameters and Global HDR Vector Parameters.
- Apply AdditionalMorphTargets (e.g., trousers could add a morph target to stretch a pullover apparel outwards).
- In case of Apparel, apply type-specific properties.
In our preset only feet and accessories make use of type-specific properties as an example. Feet set foot transforms for high heels and glasses set translucency sorting. Feel free to add more functionality.
In case of Apparel, after each CDA:
Calls Update Apparel Basebody Masks and optionally, applies the alternative skin textures.
Sepcialties about this function:
- Can be called on their own to update the corresponding CDAs.
- [V6] Do not replicate on their own, use Event: Apply Customization Profile (Replicable) instead.
- [V8] Call Function: Update LODSync Component.
¶ Update Apparel Basebody Masks
Takes a basebody mask texture from each dressed apparel to pass it to the assigned Skin Material. These textures hide specified parts of the basebody which would stick through the apparels otherwise. (See BP_CDA_Apparel > Mesh > Basebody Mask and Anatomy Profile > Basebody Mask Textures for details.)
Sepcialties about this function:
- Can be called on its own to update the basebody masks.
- [V6] Does not replicate on its own, use Event: Apply Customization Profile (Replicable) instead.
- [V8] Calls Function: Update LODSync Component.
¶ Update Groom [V7]
Sepcialties about this function:
- Can be called on its own to update the corresponding CDAs.
- [V6] Does not replicate on its own, use Event: Apply Customization Profile (Replicable) instead.
- [V8] Calls Function: Update LODSync Component.
¶ Update Attachments [V2]
Refreshes the static Customization Data Assets for attachments.
Works like its skeletal counterparts (apparel, etc.). Though in contrast to these functions, all static CDAs like the attachments get attached to a specific socket with a relative transform to set their position on the character.
The applied BP_CDA_Attachment CDAs come from the Attachments (Profile) in Current Customization Profile.
The update logic of this function works as follows:
- Cleanup CDAs
- For each valid CDA:
- Add a STATIC mesh component to the specific socket and apply the mesh.
- Set relative transform.
- Apply a Material Variant as dynamic material instance to the skeletal mesh component and add it to a global array (each CDA type has its own global array). If Material Variant Index is -1, then the original material of the mesh is used.
For Attachments the Material Variant Index is always -1. If you desire, look at Apparel Profile and Update Apparel to copy that functionality over.
- Apply Global Scalar Parameters and Global HDR Vector Parameters.
Sepcialties about this function:
- Can be called on its own to update the corresponding CDAs.
- [V6] Does not replicate on its own, use Event: Apply Customization Profile (Replicable) instead.
- [V8] Calls Function: Update LODSync Component.
¶ Update Morph Targets on All Meshes
This is necessary, since the master pose component (the “Mesh” component of the character) does not propagate its morph targets properly to the apparels and hairstyle in Construction Script. When playing in editor (during runtime) the morph targets work properly.
Sepcialties about this function:
- Can be called on its own to update the morph targets on all meshes.
- [V6] Does not replicate on its own, use Event: Apply Customization Profile (Replicable) instead.
¶ Update Skeletal Merging [V8]
BETA feature: This is meant for testing and not recommended for production.
Alongside Function: Update LODSync Component, this function shall as well increase performance by merging various skeletal mesh components into one component. Currently, it only supports merging of the Basebody Body mesh with all applied Apparel CDAs - separate Head meshes and other CDAs are not supported.
Using it with the in-game Character Editor is also not supported, thus feel free to use it as a testing feature in the Unreal Editor viewport and as a starting point for your own implementation.
Furthermore, with its current plugin implementation, the Skeletal Merging feature comes with the big caveat of having no Morph Targets, which our Character Editor heavily relies on depending on the CDAs you dress your character with. E.g., weight, muscles, hair, and clothing morph targets are all stripped off, so please expect unwanted clipping, depending on the combination of CDAs.
See this Unreal Engine documentation for details, especially the Comparison Chart at the very end of the page. Nevertheless, we are investigating further possibilities for future performance improvements in this regard.
To activate this feature, please read tutorial Activate Skeletal Merging Plugin first.
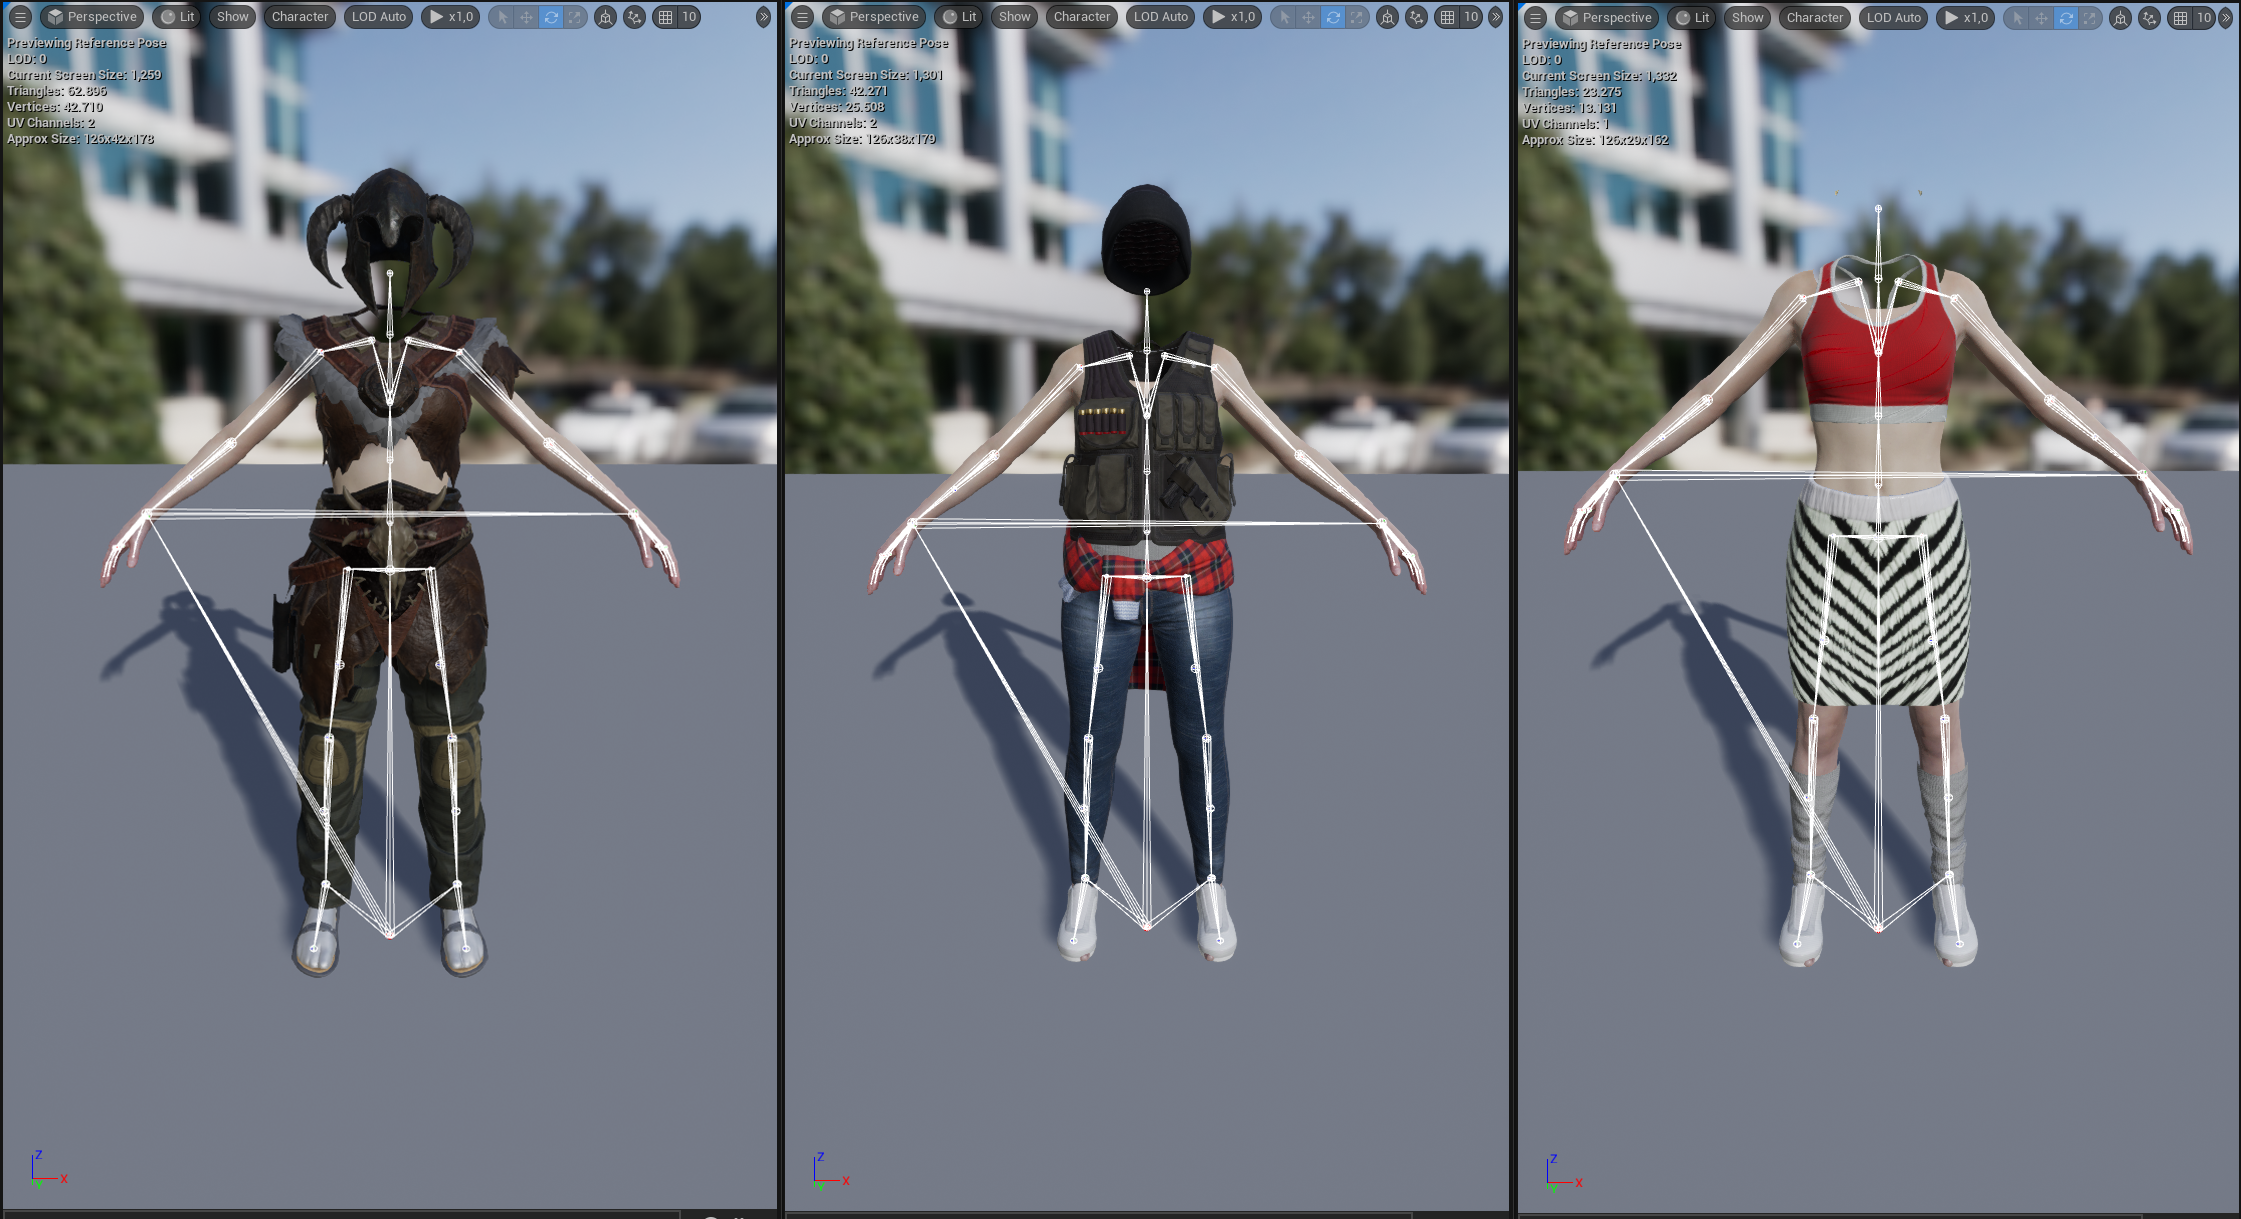
BP_Character has a Use Skeletal Merging checkbox, whoes value is passed to the BP_CharacterCustomization > bUseSkeletalMerging in Construction Script. Obseve the BP_Character details panel when changing the variable to see its effect as shown in the screenshots below. You can open the merged meshes as normal meshes from the Content Browser.

With bUseSkeletalMerging = false the function does nothing, (1) each Apparel CDA gets its own component as usual and the "Mesh" component is populated with the (2) Body mesh from the Anatomy profile.
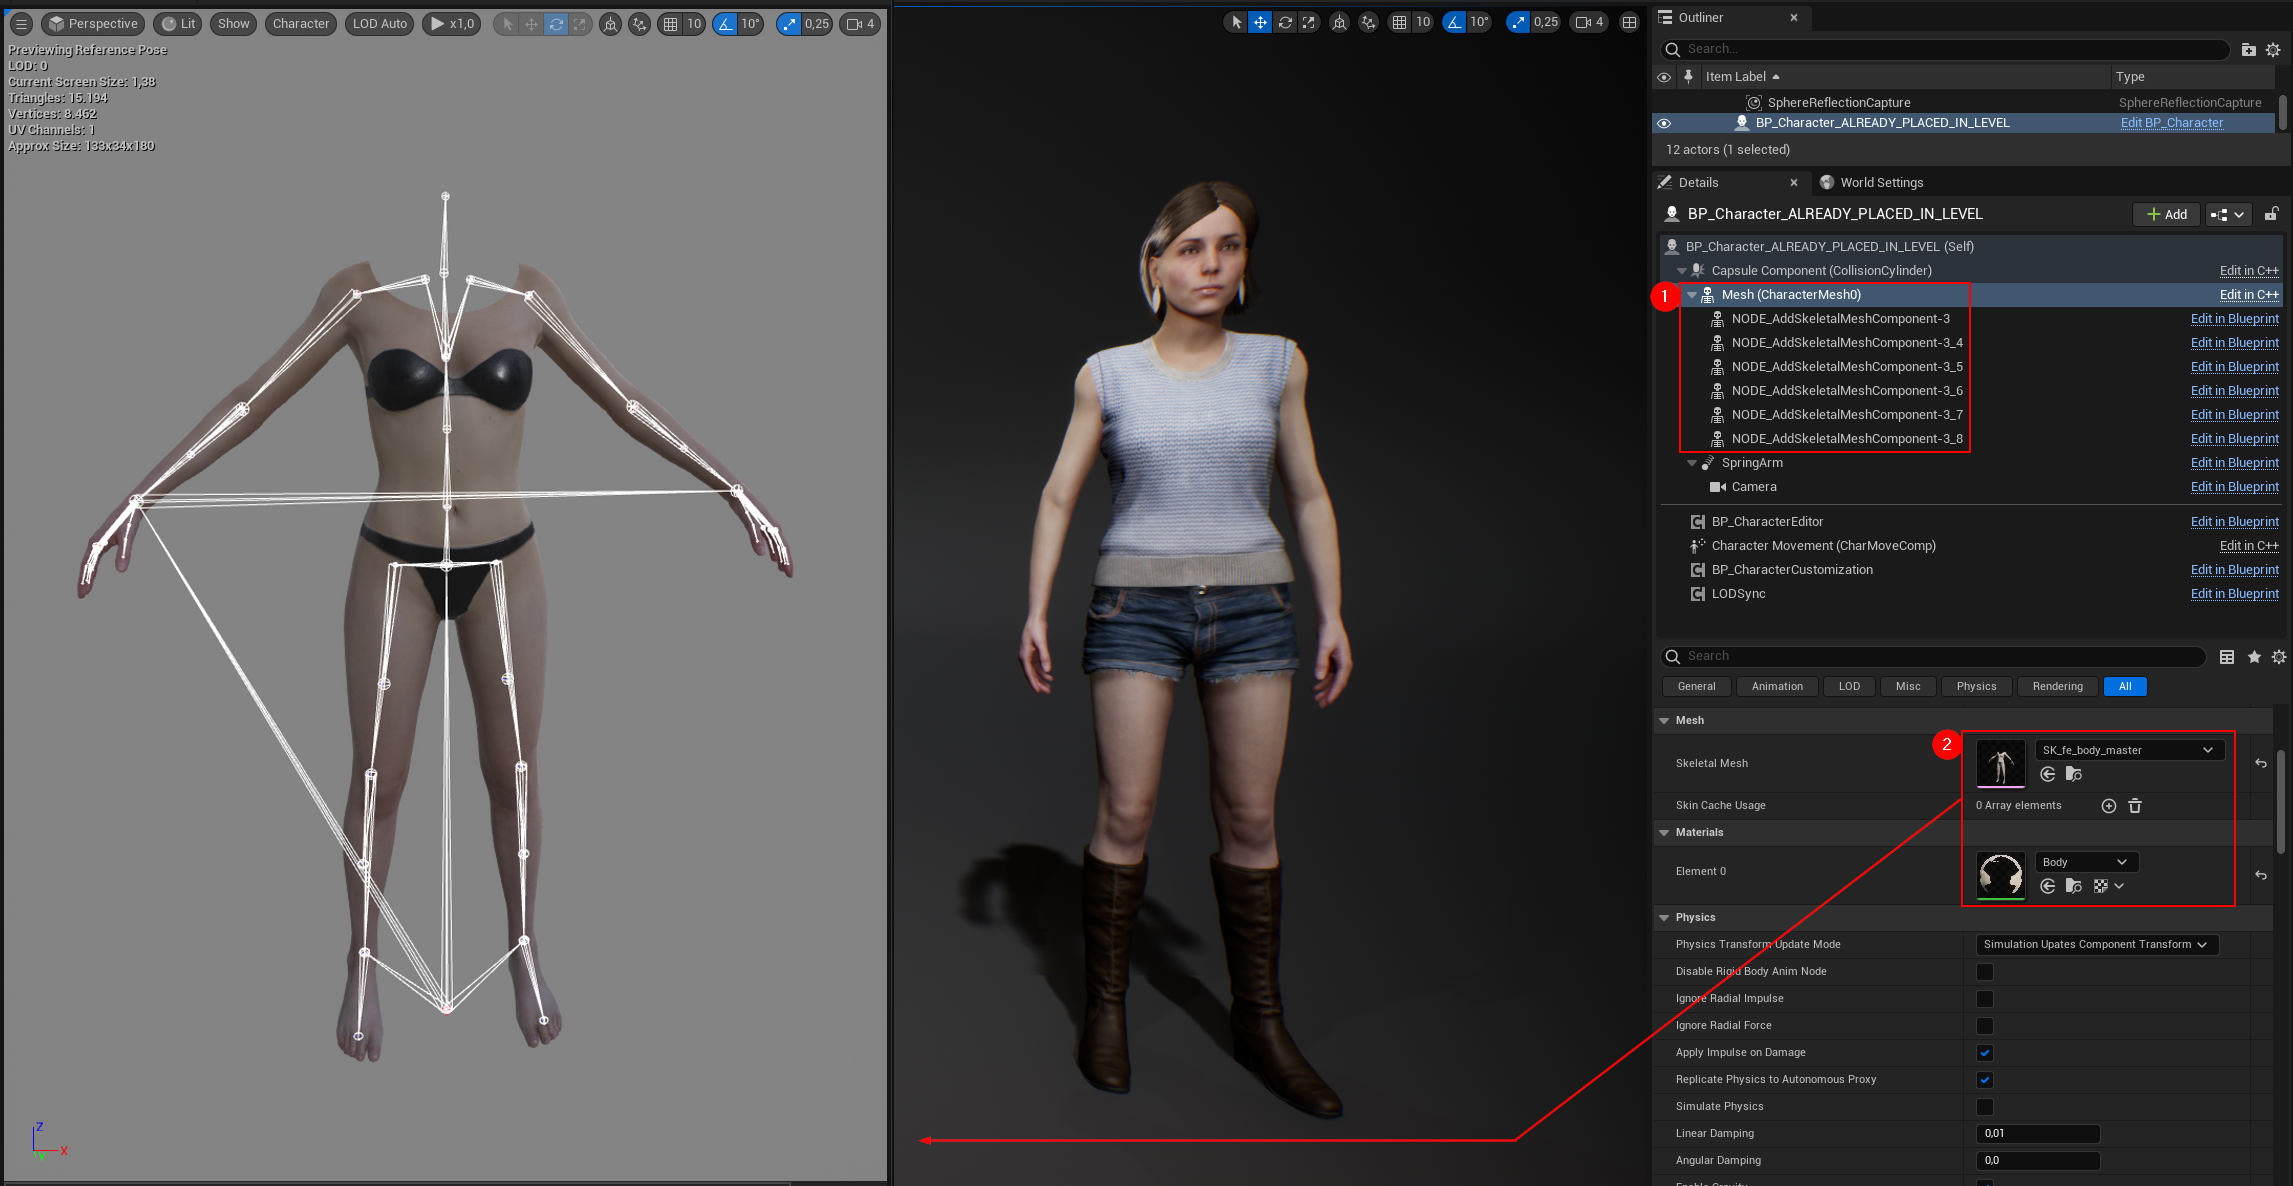
Whit bUseSkeletalMerging = false the body and apparel meshes are merged. There are (1) no more individual components and the "Mesh" component is populated with the (2) merged skeletal mesh. You can also see, that all the material slots have been added to it.
This feature also works with Blueprint randomization from within the Character Editor Tools, thus each randomization generates a new merged skeletal mesh.
Sepcialties about this function:
- Can be called on its own to update the skeletal merging.
- [V6] Does not replicate on its own, use Event: Apply Customization Profile (Replicable) instead.
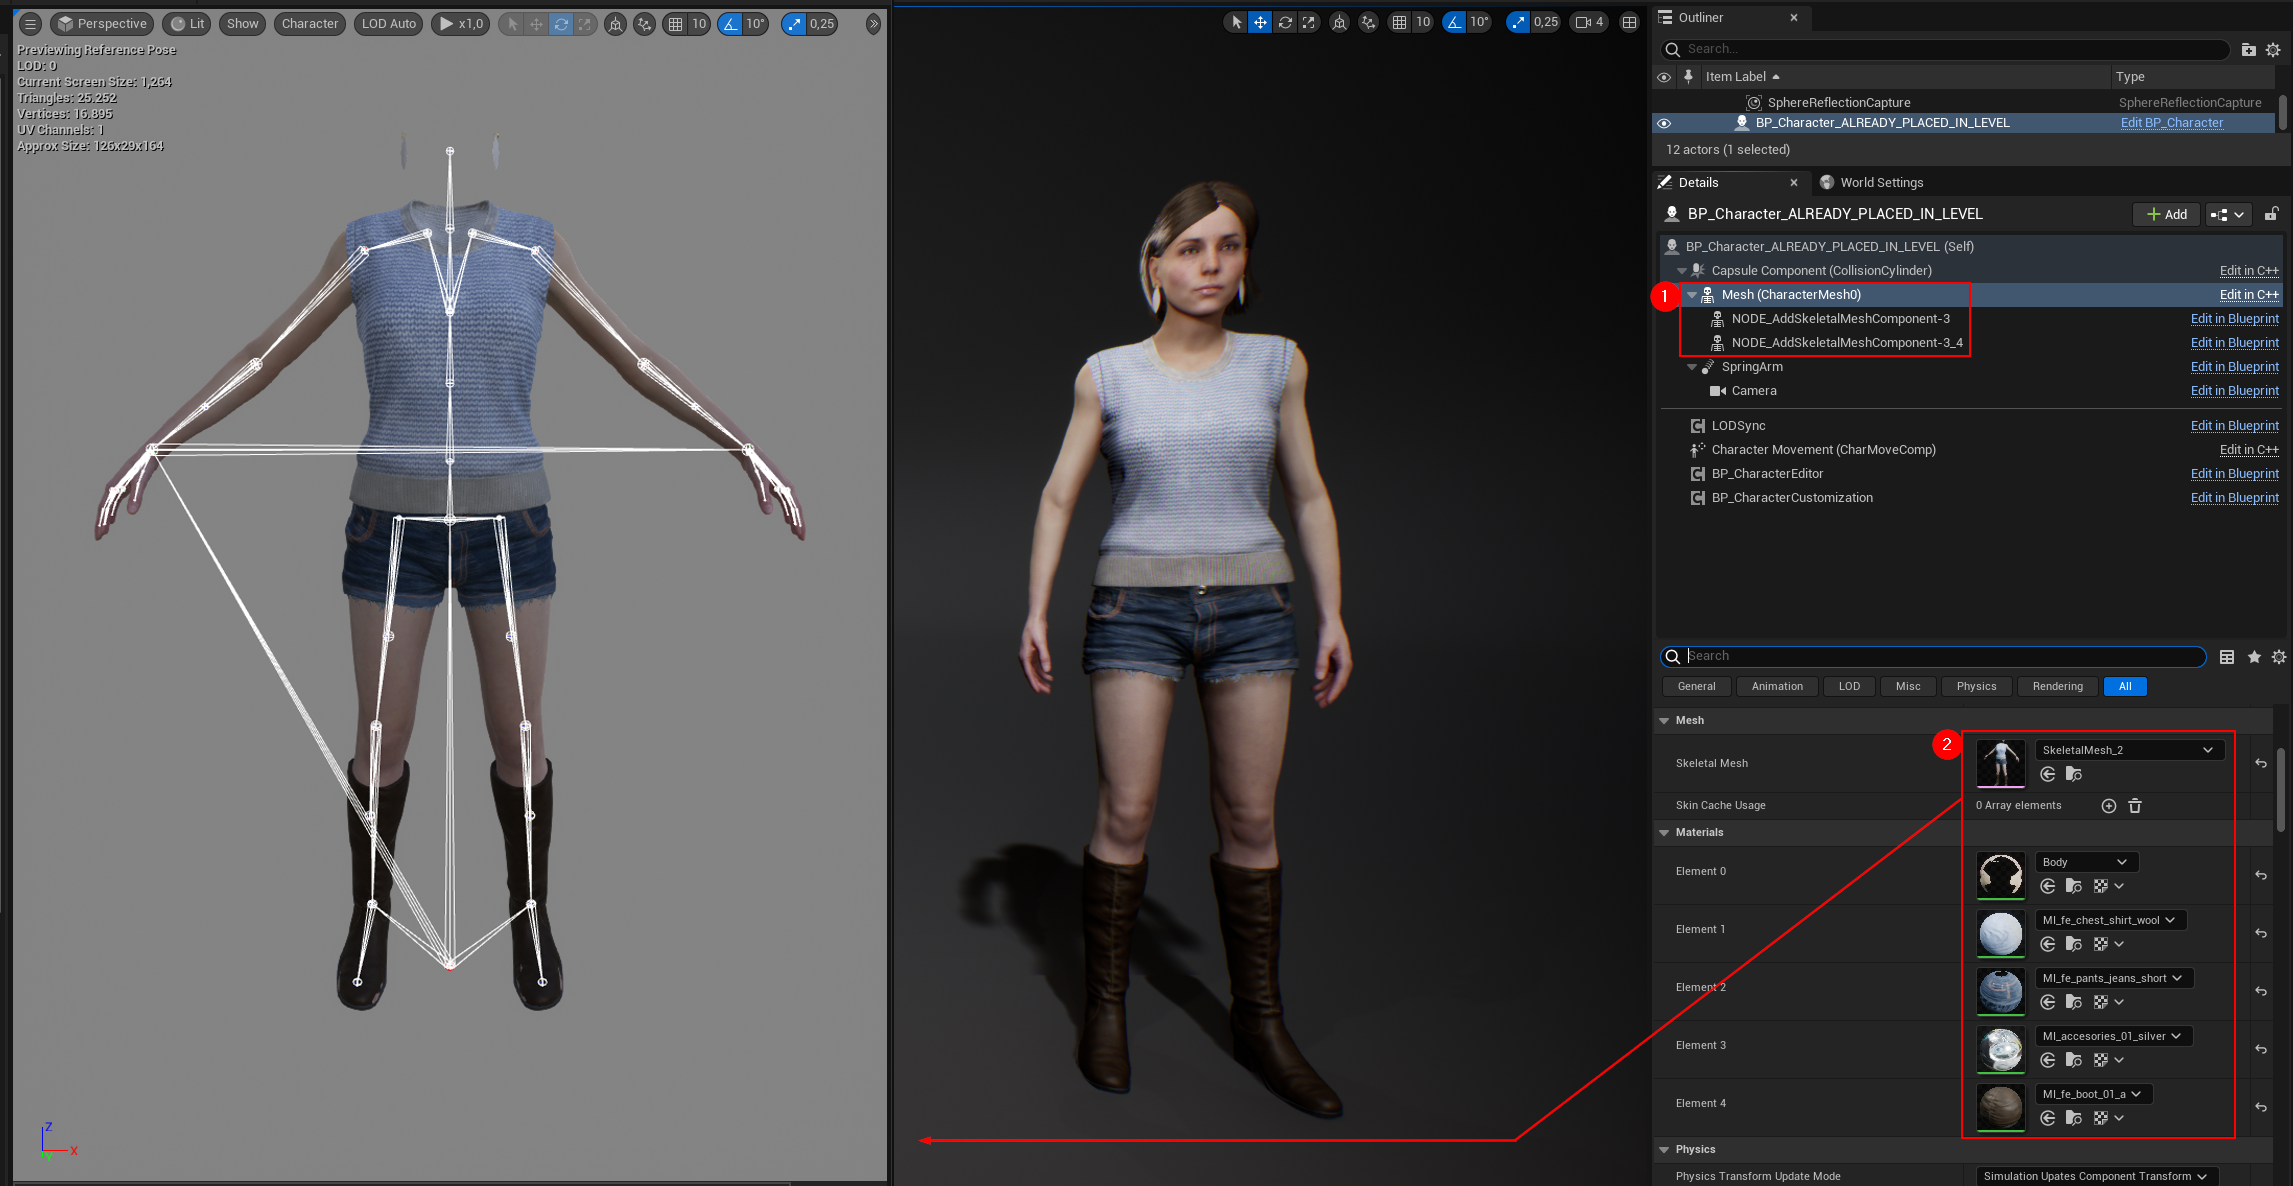
¶ Function: Update LODSync Component [V8]
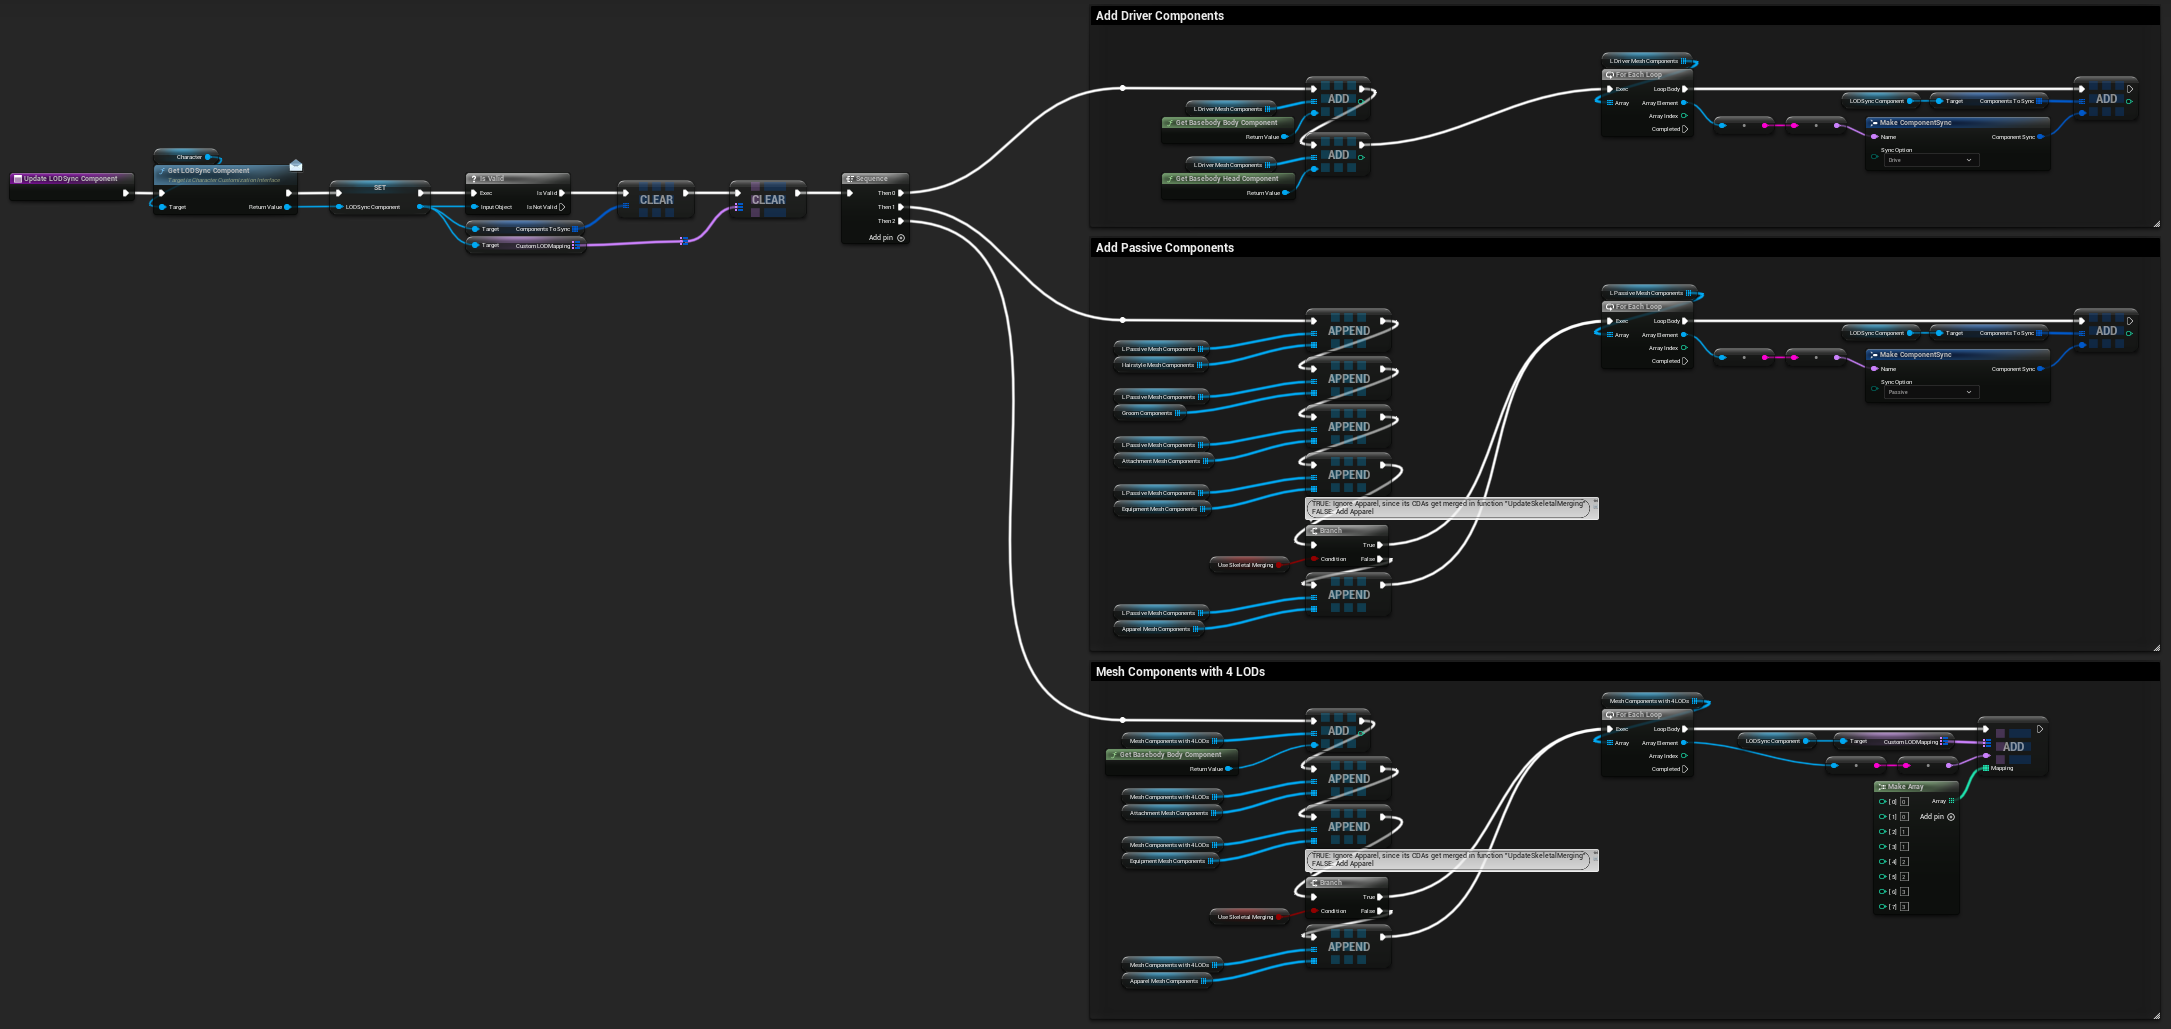
Refreshes the optional LODSync component on the Character. See LODSync and this Unreal Engine documentation for details on how the component itself is working.
The update logic of this function works as follows:
-
Clear ComponentsToSync and CustomLODMapping variables from LODSync component.
-
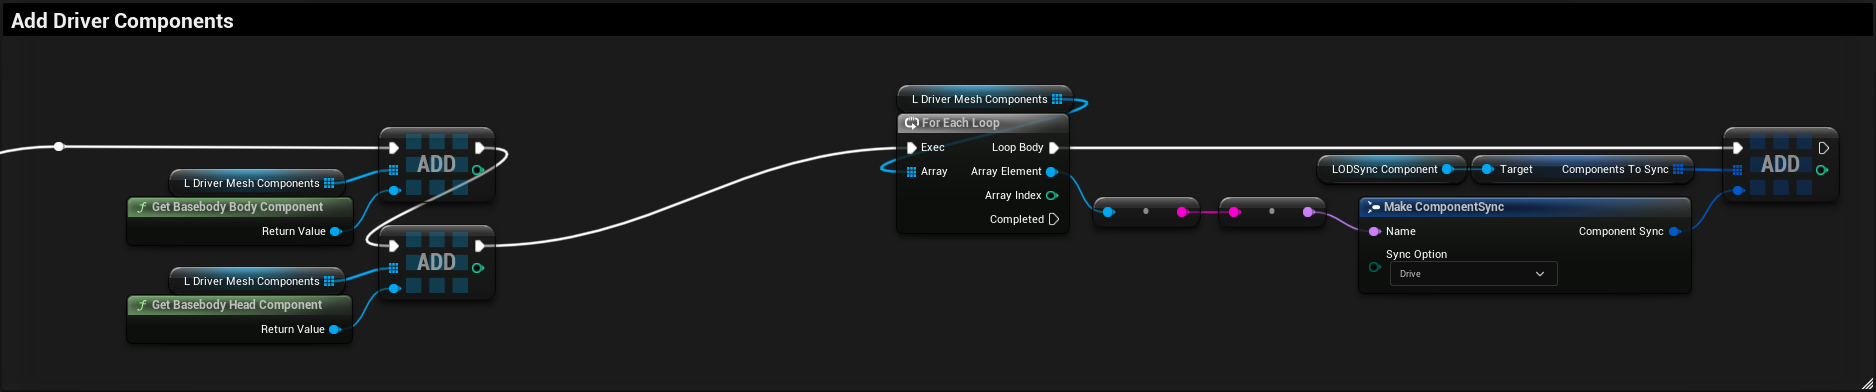
Add Basebody Body and Head mesh components to ComponentsToSync with Sync Option = Drive.
-
Add all CDA-related components to ComponentsToSync with Sync Option = Passive.
If UseSkeletalMerging is true, Apparel is excluded. See Update Skeletal Merging for details.
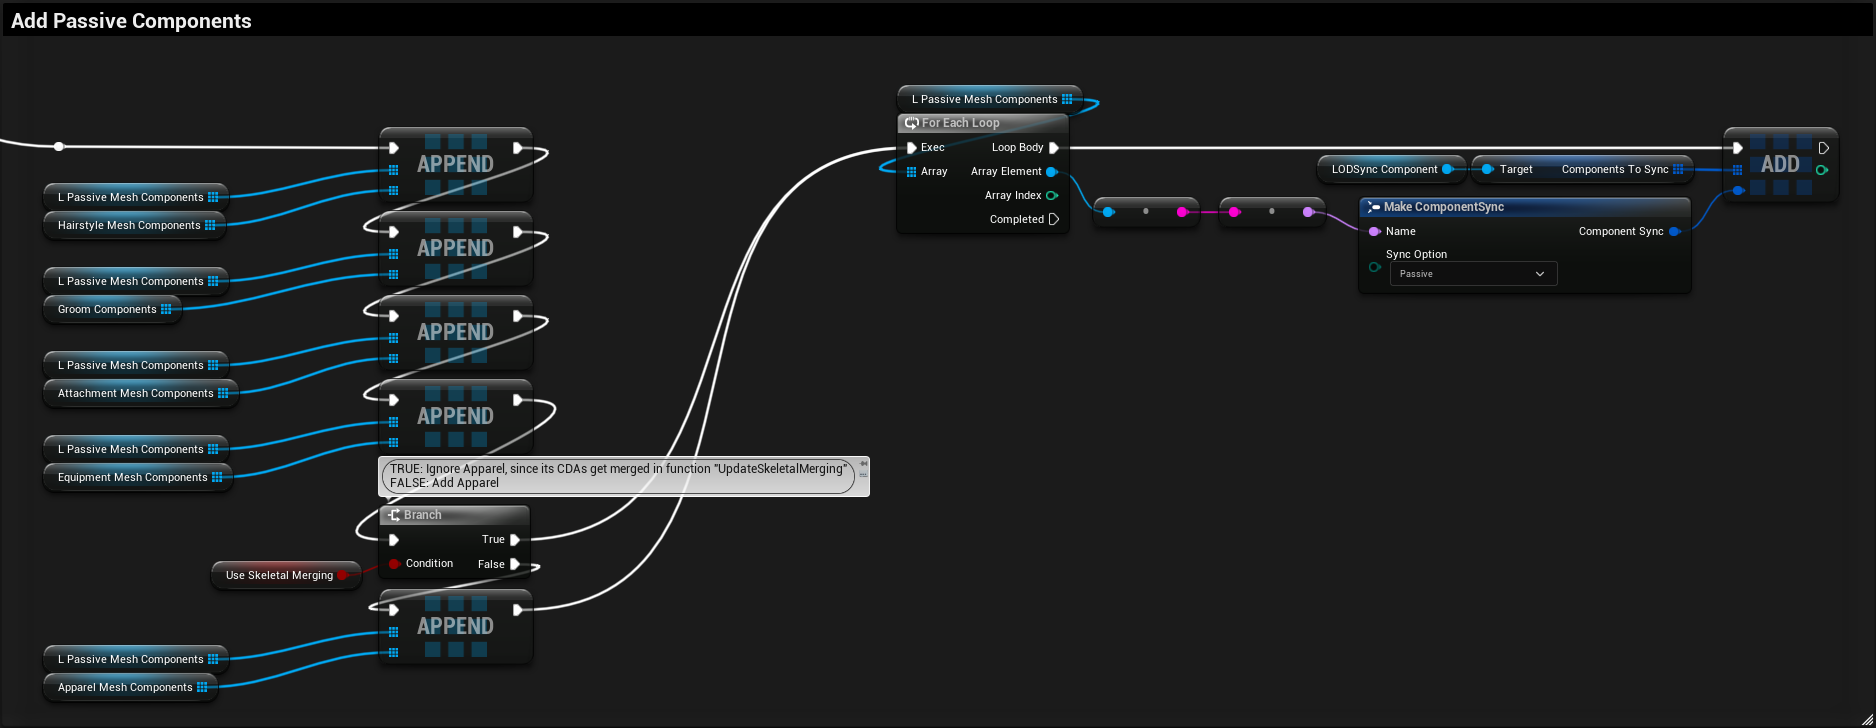
-
Add Basebody Body, Attachments, Equipment and Apparel CDAs to CustomLODMapping using 4 LODs, while Basebody Head, Hairstyles and Groom are using their 8 LODs.
If UseSkeletalMerging is true, Apparel is excluded. See Update Skeletal Merging for details.
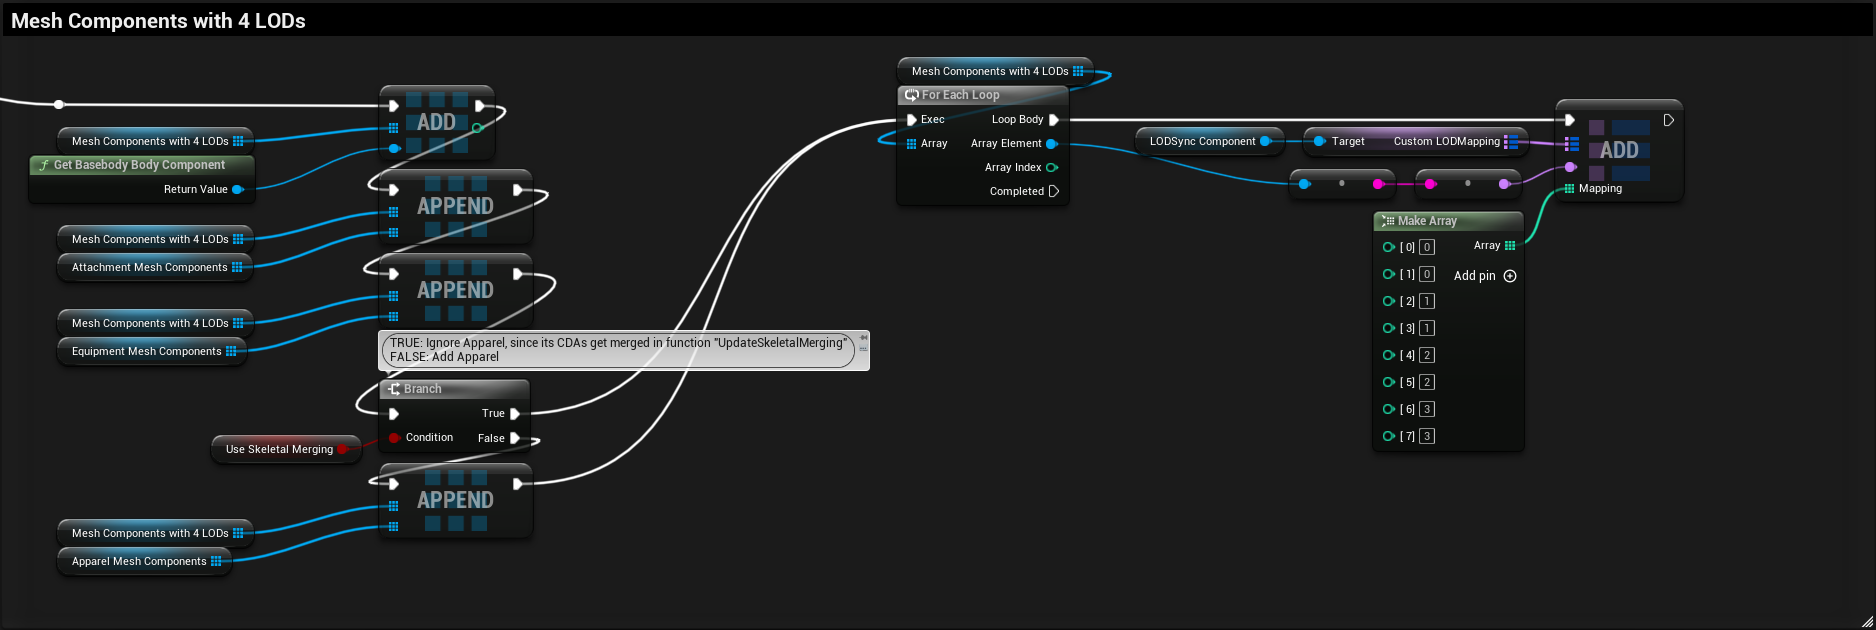
Sepcialties about this function:
- Can be called on its own to update the lodsync component.
- [V6] Does not replicate on its own, use Event: Apply Customization Profile (Replicable) instead.
¶ Additional Events for Individual Changes [V6]
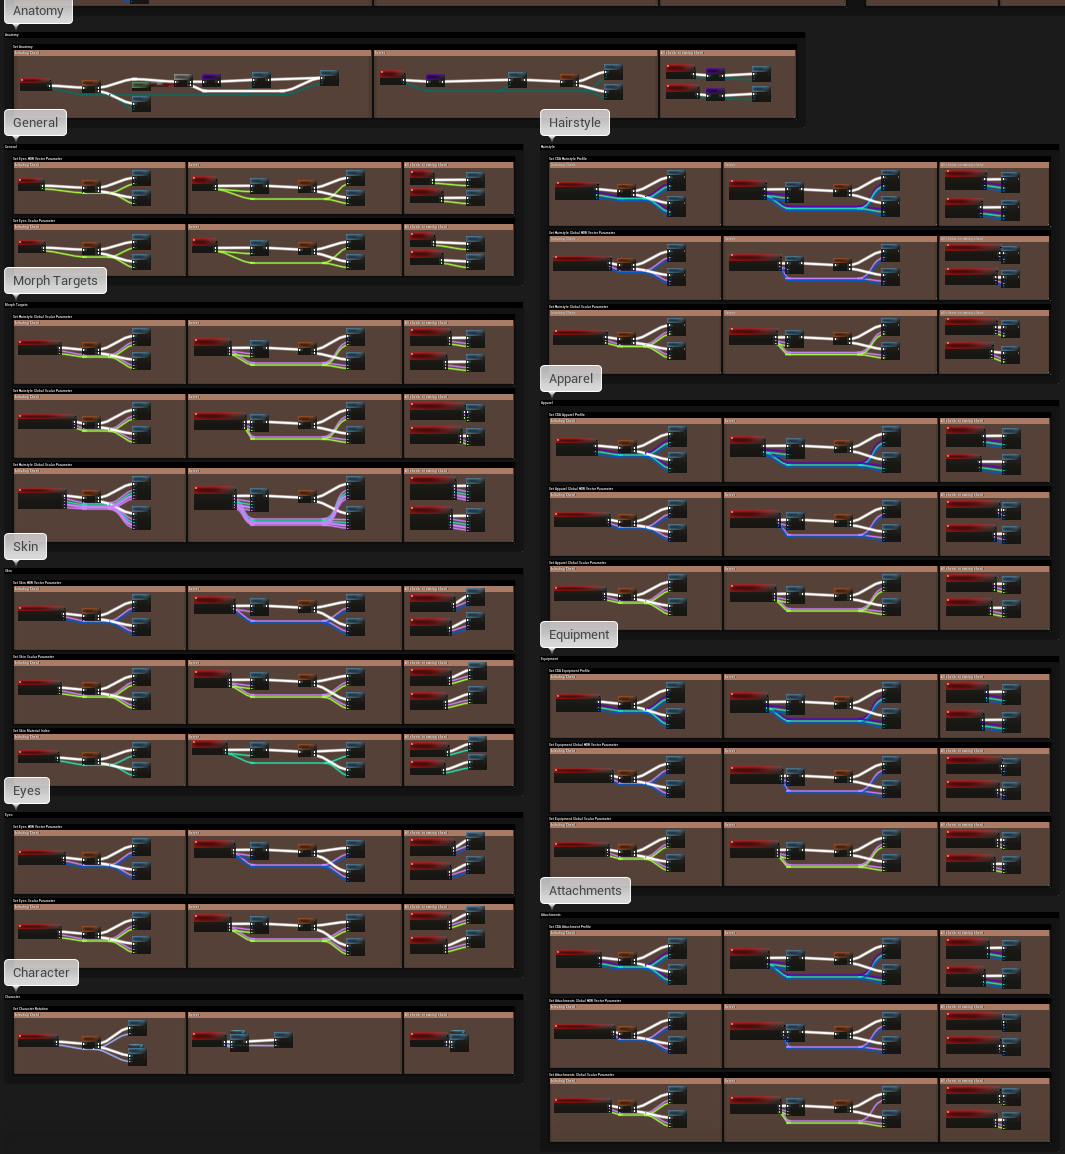
The largest number of new nodes in the Event Graph is made up by the setter events. Do not get overwhelmed because there is simply much repetition.
¶ Setter Event Line

In general, each line consisting of three orange comments makes up one setter event line, which is described below. They are intended to replicate even a single value change, like changing the skin color, pupil scale or a single CDA for live interaction between players.
Although this is an unusual scenario for a Character Editor, just imagine that you play in an open world and go to a clothing store, where you could make small fashion show by changing apparels or hairstyles while other players are watching you.
¶ SetXYZ (Replicable)
The event “SetXYZ (Replicable)” (where SetXYZ can be found for any replicable setter method of BP_CharacterCustomization component), is the entry point of the Setter Event Line.
Branching on “Replicate Individual Changes”, checks for bReplicateIndividualChanges and bReplicate.
- If replication is disabled, we just call the function SetXYZ locally.
- If replication is enabled, we follow the replication and call the event Server_SetXYZ.
[V6] Since the Replication Update, these events replace most occurrences of setter functions, meaning in Widget Blueprint bindings and similar places, where the client may trigger a replication setter.
We intentionally separated individual changes from application of whole customization profiles in case you want to replicate initialization and saving a profile but do not replicate individual changes until the player has finished with its customization.
¶ Server_SetXYZ
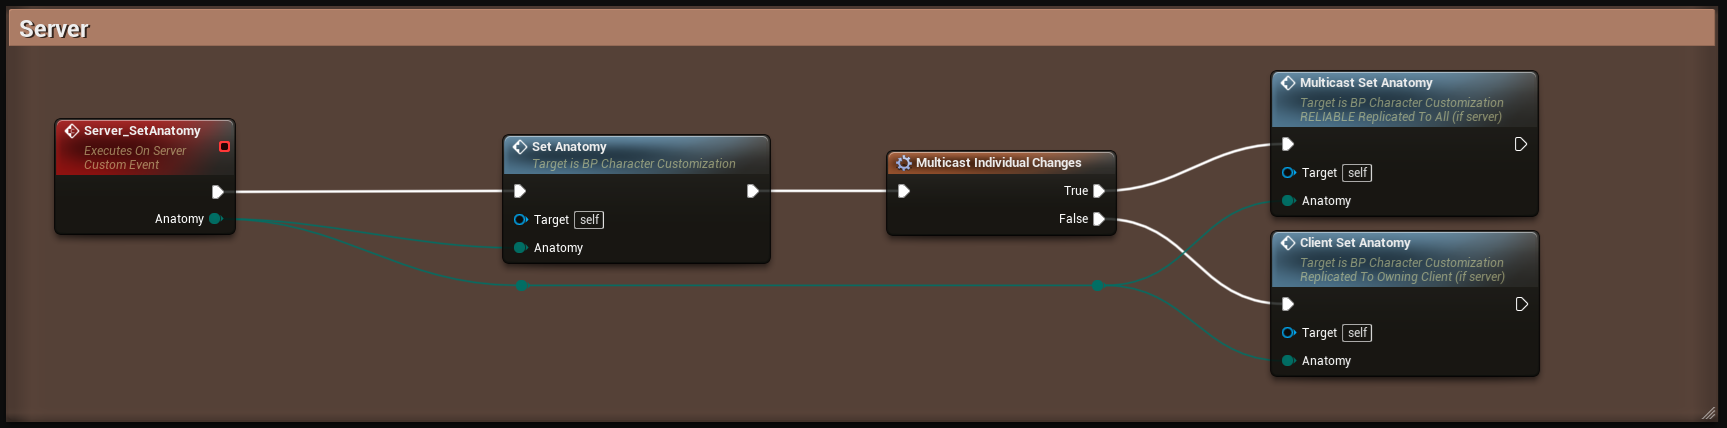
This event calls the corresponding setter function on server-side and branches on “Multicast Individual Changes”, thus checking bMulticastIndividualChanges.
¶ Multicast / Client_SetXYZ
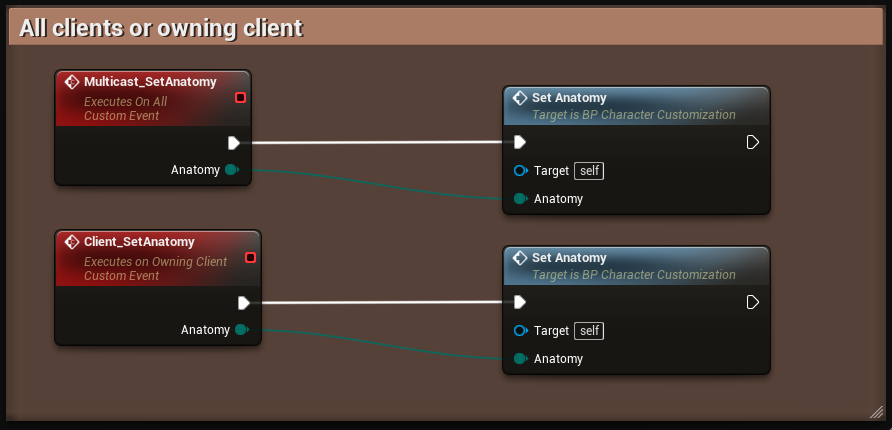
These events call the corresponding setter functions on client-side.
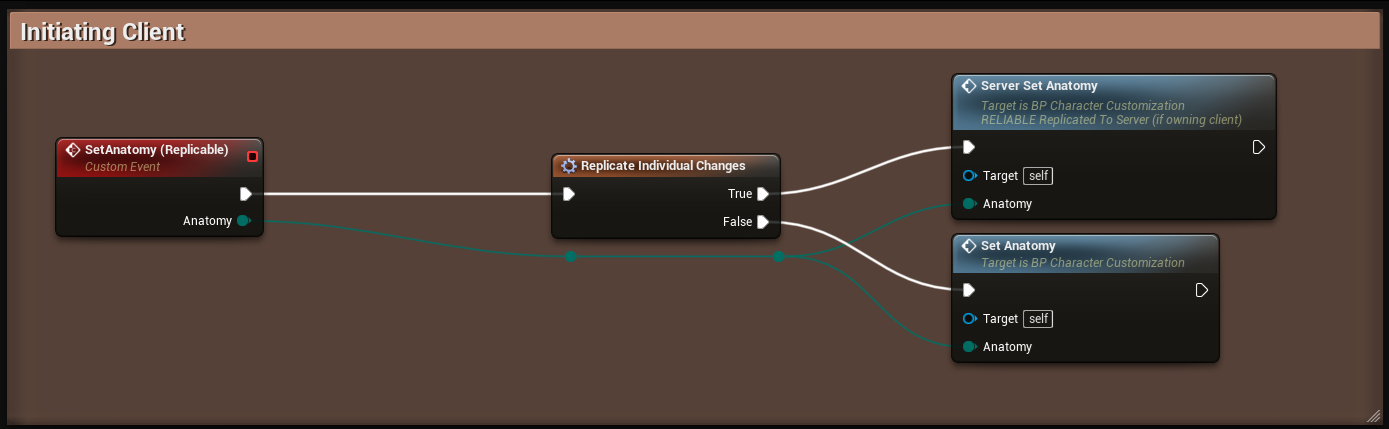
¶ SetAnatomy (Replicable)

Although this is a setter event, this event behaves like Event: Apply Customization Profile (Replicable) as it also calls SetAnatomy locally to bypass the network delay. This way we are able to update the in-game Character Editor properly, since SetAnatomy applies a cached or new Customization Profile on which WBP_ProfileManager relies on.
¶ Set and Replace CDAs
¶ "Set and Replace" Events
The following events mainly set CDAs or replace them if Index is already set to a CDA.
[V9] Since the V9 Utility Update, the events can remove CDAs by passing a CDA_[TYPE]Profile with Data Asset = None, instead of leaving an empty profile behind. There is also dedicated removal support (see Remove CDAs).
- SetCDA_ApparelProfile (Replicable)
- SetCDA_AttachmentProfile (Replicable)
- SetCDA_EquipmentProfile (Replicable)
- SetCDA_GroomProfile (Replicable)
- SetCDA_HairstyleProfile (Replicable)
Each event can be called with the following input:
- Class: The CDA class to set, replace or remove
- Index: The index within the filtered class array (see info boxes below)
[V9] When removing with an empty CDA_[TYPE]Profile, an Index of -1 removes all CDAs of the given class. - CDA_[TYPE]Profile: The profile to set, replace or remove. [TYPE] matches the name of the function.
How Index is used:
Let's assume there are 5 BP_CDA_Apparel CDAs (including 2 accessories) dressed in the current CDA_ApparelProfiles array: [0: UpperBody, 1: LowerBody, 2: Accessory_A, 3: Accessory_B, 4: Hat].
If we want to replace 3: Accessory_B with another Accessory_C we need to call SetCDA_ApparelProfile (Replicable) for Class = BP_CDA_Accessory and Index = 1. The function filters for the class to get the array [0: Accessory_A, 1: Accessory_B] where the second item at Index = 1 is found in the original CDA_ApparelProfiles array at index 3.
This index 3 is then replaced with Accessory_C in the current CDA_ApparelProfiles array to get the final [0: UpperBody, 1: LowerBody, 2: Accessory_A, 3: Accessory_C, 4: Hat] array.
How Index is used with base classes:
E.g., with the example from above, when inputing the base class BP_CDA_Apparel instead of the specific subclass BP_CDA_Accessory, the function will filter for all apparels.
This means that you still have the array: [0: UpperBody, 1: LowerBody, 2: Accessory_A, 3: Accessory_B, 4: Hat] and with the given Index = 1 the function now replaces the 1: LowerBody.
¶ "Set and Replace" Event Dispatchers [V9]
There are event dispatchers for each CDA type, which are called at the end of setting or replacing CDAs.
When removing CDAs the removal event dispatchers are called instead (see Remove CDAs).
- OnSet_CDA_ApparelProfile
- OnSet_CDA_AttachmentProfile
- OnSet_CDA_EquipmentProfile
- OnSet_CDA_GroomProfile
- OnSet_CDA_HairstyleProfile
Each event dispatcher passes the following input:
- CharacterCustomization: The calling BP_CharacterCustomization
- Class: The set class
- ClassIndex: The set, replaced or removed index within the filtered class array (see info box below)
- CDA_ProfilesIndex: The set, replaced or removed index within the CDA profile array (see info box below)
- CDA_[TYPE]Profile: The set, replaced or removed profile.
How ClassIndex and CDA_ProfilesIndex differ:
Generally, ClassIndex is identical to SetCDA...(Replicable) input Index, but has another name to explain the difference with the second CDA_ProfilesIndex.
Given the first example from above in SetCDA...(Replicable) with Index = 1 and replaced index 3 in the current CDA_ApparelProfiles array, eventually, the event dispatcher is called with ClassIndex = 1 and CDA_ProfilesIndex = 3.
If the profile had been removed, the CDA_ProfilesIndex would have been -1.
¶ Remove CDAs [V9]
Since V9 Utility Update, there is dedicated CDA removal support that properly removes profiles instead of leaving empty profiles behind, also allowing to bind to dedicated removal event dispatchers.
[V11] Since V11 Gameplay Tag Update, the removal support gameplay tags.
¶ "Remove" Events
The following events remove single CDAs, or all of one type by using Index of -1.
- RemoveCDA_ApparelProfile (Replicable) (replaces [V8 removed] RemoveApparel)
- RemoveCDA_AttachmentProfile (Replicable)
- RemoveCDA_EquipmentProfile (Replicable)
- RemoveCDA_GroomProfile (Replicable)
- RemoveCDA_HairstyleProfile (Replicable) (replaces [V8 removed] RemoveHairstyle)
Since V11 Gameplay Tag Update the events are protected. Instead, use the Public "Remove" Functions.
Each event can be called with the following input.
- Class: The CDA class to remove
- Index: The index within the filtered class array (see info boxes in "Set and Replace" Events). An Index = -1 removes all CDAs of the given class.
¶ Public "Remove" Functions [V11]
Since V11 Gameplay Tag Update, the following functions replace the old Public "Remove" Functions to align them with the randomization functions. The new functions are more flexible.
The following function removes one or all CDAs of a single class.
- RemoveCDA (Replicable)
- Calls the protected event from above, matching the given Class.
- Does not accept BP_CustomizationDataAsset itself.
The following function removes one or all CDAs of any base class.
- RemoveCDAs_FromBaseClass (Replicable)
- Calls RemoveCDA (Replicable) for each CDA class inheriting Base Class.
- Does accept BP_CustomizationDataAsset itself.
The following functions remove one or all CDAs of a preset Base Class.
- RemoveApparel (Replicable)
- RemoveAttachments (Replicable)
- RemoveEquipment (Replicable)
- RemoveGroom (Replicable)
- RemoveHairstyle (Replicable)
Each of the functions above use similar inputs as described in "Remove" Events.
¶ Public "Remove" Functions [V10 removed]
Since V11 Gameplay Tag Update, these functions are replaced by the new Public "Remove" Functions to align them with the randomization functions. The new functions are more flexible.
The following function removes one or all CDAs of a single class.
- RemoveCDA_Profile (Replicable)
- Calls the event from above, matching the given Class.
- Does accept BP_CustomizationDataAsset itself, which removes Index for each CDA type.
The following function removes all CDAs of class BP_CustomizationDataAsset.
- RemoveAllCDA_Profiles (Replicable)
The following functions remove all CDAs of a preset Class.
- RemoveAllCDA_ApparelProfiles (Replicable) (replaces [V8 removed] RemoveAllApparels)
- RemoveAllCDA_AttachmentProfiles (Replicable)
- RemoveAllCDA_EquipmentProfiles (Replicable)
- RemoveAllCDA_GroomProfiles (Replicable)
- RemoveAllCDA_HairstyleProfiles (Replicable)
If it says one or all CDAs, the functions use similar inputs as described in "Remove" Events; otherwise ther is no input.
¶ "Remove" Event Dispatchers
There are event dispatchers for each CDA type.
- OnRemoved_CDA_ApparelProfile
- OnRemoved_CDA_AttachmentProfile
- OnRemoved_CDA_EquipmentProfile
- OnRemoved_CDA_GroomProfile
- OnRemoved_CDA_HairstyleProfile
Each event dispatcher passes the following input, while the Index mentioned below, comes from RemoveCDA...(Replicable) (replaces [V10 removed] RemoveCDA_Profile (Replicable)).
- CharacterCustomization: The calling BP_CharacterCustomization
- Class: The removed class
- ClassIndex: The removed index within the filtered class array (see info boxes in "Set and Replace" Events)
- CDA_ProfilesIndex: The removed index within the CDA profile array (see info boxes in "Set and Replace" Events)
- Is >= 0, if a specific CDA was removed
- Is -1, if Index >= 0 but was not in the class array, thus no CDA was removed
- Is -1, if Index = -1 to remove all CDAs
- CDA_[TYPE]Profile: The removed profile, if Index >= 0; an empty profile otherwise
- RemovedCDA_ProfilesCount: The count of removed elements:
- Is 0, if no CDA was removed
- Is 1, if one CDA was removed with Index >= 0
- Is >= 1, if one or more CDA were removed with Index = -1
How ClassIndex and CDA_ProfilesIndex differ:
See info box in "Set and Replace" Event Dispatchers
¶ Randomize CDAs [V7]
Since V7 Customer Update, there is Blueprint randomization support for Apparel and Hairstyle CDAs. Previously, it was only possible to randomize in-game with the WBP_CharacterEditor widget.
For that purpose, the new Package Registry got introduced, which gets initialized in Function: Initialize From Character Begin Play. Afterwards, you can call the following built-in functions for all CDA classes as follows.
[V9] Since V9 Utility Update, the randomization support the other CDA types as well.
[V11] Since V11 Gameplay Tag Update, the randomization supports gameplay tags.
¶ Base "Randomize" Functions [V9]
The following functions randomize one CDA.
- SetRandomCDA_ApparelProfile (Replicable) (replaces [V7 removed] SetRandomCDA_ApparelProfile)
- SetRandomCDA_AttachmentProfile (Replicable)
- SetRandomCDA_EquipmentProfile (Replicable)
- SetRandomCDA_GroomProfile (Replicable)
- SetRandomCDA_HairstyleProfile (Replicable) (replaces [V7 removed] SetRandomCDA_HairstyleProfile)
Since V11 Gameplay Tag Update the functions are protected. Instead, use Public "Randomize" Functions.
Each function can be called with the following input:
- Class: The CDA class to randomize
- Index: The index within the filtered class array (see info boxes in "Set and Replace" Events)
- Collections [V11] (replaces [V10 removed] Collection): The collection(s) to further narrow down the possible CDAs
- AcceptDebugAssets: If CDAs marked as DebugAsset = true are included in possible CDAs
- Can be Empty [V11]: Allows to apply CDA None, which removes the current CDA.
¶ Public "Randomize" Functions [V11]
Since V11 Gameplay Tag Update, the following functions replace the old Public "Randomize" Functions to align them with the randomization functions. Some of the functions have a new naming convention.
The following function randomizes one CDA of a single class.
- RandomizeCDA (Replicable)
- Calls the protected function from above, matching the given Class.
- Does not accept BP_CustomizationDataAsset itself.
The following function randomizes one or all CDAs of any base class.
- RandomizeCDAs_FromBaseClass (Replicable)
- Calls RandomizeCDA (Replicable) for each CDA class inheriting Base Class.
- Does accept BP_CustomizationDataAsset itself.
The following functions remove one or all CDAs of a preset Base Class.
- RandomizeApparel (Replicable)
- RandomizeAttachments (Replicable)
- RandomizeEquipment (Replicable)
- RandomizeGroom (Replicable)
- RandomizeHairstyle (Replicable)
Each of the functions above use similar inputs as described in Base "Randomize" Functions.
¶ Public "Randomize" Functions [V9] [V10 removed]
Since V11 Gameplay Tag Update, these functions are replaced by the new Public "Randomize" Functions to align them with the removal functions. Some of the functions have a new naming convention.
The following function randomizes one CDA of a single class.
- SetRandomCDA_Profile (Replicable)
- Calls the protected function from above, matching the given Class.
- Does not accept BP_CustomizationDataAsset itself.
The following function randomizes one or all CDAs of any base class.
- RandomizeCDAs (Replicable)
- Calls SetRandomCDA_Profile (Replicable) for each CDA class inheriting Class.
- Does accept BP_CustomizationDataAsset itself.
The following functions remove one or all CDAs of a preset Class.
- RandomizeApparel (Replicable) (replaces [V7 removed] RandomizeApparel)
- RandomizeAttachments (Replicable)
- RandomizeEquipment (Replicable)
- RandomizeGroom (Replicable)
- RandomizeHairstyle (Replicable) (replaces [V7 removed] RandomizeHairstyle)
Each of the functions above use similar inputs as described in Base "Randomize" Functions.
¶ "Randomize" Event Dispatchers
There are no dedicated event dispatchers for randomization, but "Set and Replace" Event Dispatchers and "Remove" Event Dispatchers are used depending on the randomization input.
¶ Debug Mode & Logging
The logging functionality can help you figure out what BP_CharacterCustomization component does internally at a certain point in its logic. Setting a specific Debug Mode on BP_Character, respectively on the component let you choose what is printed to the Unreal Engine Output Log. There are 6 logging types:
- Errors: Logs if something is wrong in the first place with setting up your custom character, e.g., missing the implementation of the Character Customization Interface.
- Warnings: Logs problems you might want to fix, e.g., you are trying to load a profile that could not be found neither in save game file nor in the Preset Data Table.
- Information (light blue in screenshot): Logs most important steps like initialization, profile application and as a special setter also for SetAnatomy.
- [V6] Detailed Information (green in screenshot): Logs subordinated steps of these main steps. Here you see all subordinates of “Initialize Character Customization”.
- Verbose Information (yellow in screenshot): Logs function internal information.
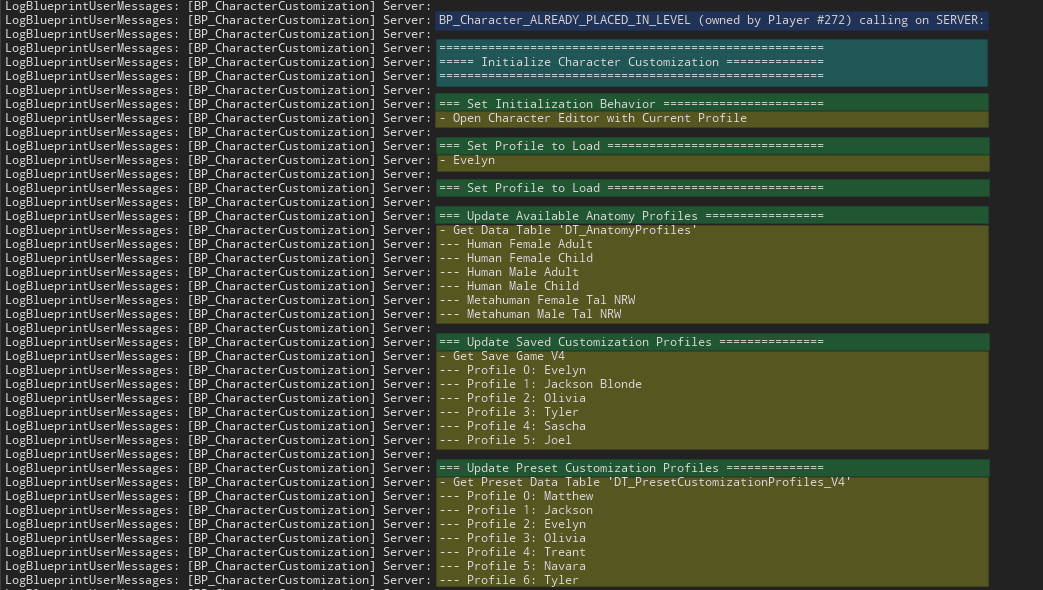
- [V6] Replication (blue in screenshot): If Debug Mode is at least set to Errors, Warnings and Information, if the game is replicating and if Debug Replication is True, then above each log with type of Information another line is printed about the calling character, who owns the character, and on which target the event will be called. In the case above you see that Server: BP_Character… is owned by the player with ID 272 and calls the following Initialize Character Customization on server.
The target information is useful to track down from which event (Server, Multicast or Client) the following step has been called, since the log printing game instance on the left side Server can also be Client 1, Client 2 etc. but sometimes confuses, because especially multicasts on listening server are printed by Server as well, but actually are happening on the so to say “server’s client”.
If you want to find these logs, simply search for them in Blueprint. As a general hint, “information” and “detailed information” are mostly named by their corresponding function.