¶ Introduction
Anatomies define the look of your character’s body. The profiles hold all information about anatomies that are possibly selectable by the BP_CharacterCustomization component and the in-game Character Editor.
The anatomies are a part of Customization Data Assets and should be as flexible as possible while already restricting to most generic visual differences of living beings. We have looked at games, books, and other sources where various living beings other than “humans” are introduced.
We wanted to prepare the Character Editor for your own extensions, since the skeletal meshes matching CDAs may have to fit different body topologies. Hence, we broke those living beings down to Race, Gender and Generation.
- Race represents the general visual differences like humans, dwarfs, elves, orcs and the like.
- Gender is simple as the name says and represents the second level of granularity.
- Generation then makes up the last level and supports for adding differences in aging and the like.
Of course, the logic behind the Anatomy Profiles does not restrict to always have all possible combinations of a new race you would implement into the pack. This is rather a guideline you can follow.
¶ Setup
The add anatomies you need to define them and prepare a data table entry.
¶ Definition by Gameplay Tags [V11]
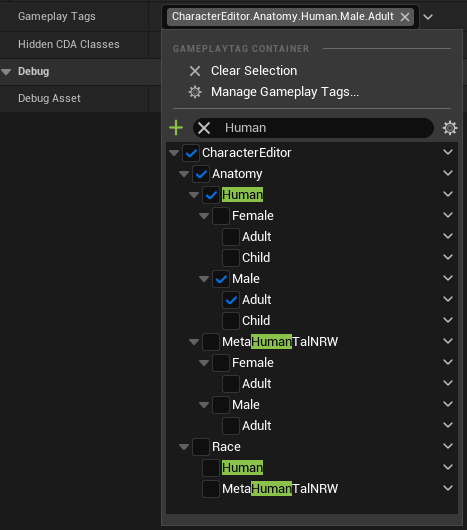
Since the V11 Gameplay Tag Update, anatomies are defined by a Gameplay Tag under the CharacterEditor.Anatomy namespace.
Opposing to the deprecated EAnatomy enum, they are more flexible due to their hierarchical structure, when it comes to adding new anatomies and performing filtering.
The gameplay tag CharacterEditor.Anatomy.# and its children are special filters and not meant to be assigned to CDAs.
In the Blueprints, you will find CDA Filter, Anatomy and similar variables and parameters for its usage.
See Filtering by Gameplay Tags below for fitering details.
See Gameplay Tags for further details.
¶ Definition by Enumeration [V2] to [V10]
From V2 Anatomy Update to V10 Selection Update, anatomies are defined by the EAnatomy enum.
Its display names can be written with spaces, but apart from that they have to match the row names of DT_AnatomyProfiles.
See Filtering by Enumeration below for further details.
¶ DT_AnatomyProfiles
¶ Overview
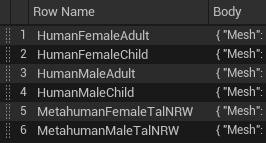
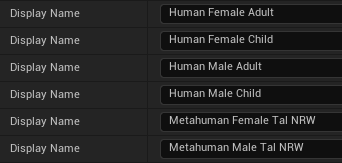
This data table stores all the information for the anatomies. Each table row must be named like the corresponding enum value of EAnatomy, but without spaces, as this is how data tables work.
It can be assigned to BP_Character ➝ AnatomyDataTable, which is then passed to BP_CharacterCustomization ➝ AnatomyDataTable in BP_Character ➝ Construction Script.
An anatomy consists of the following properties.
-
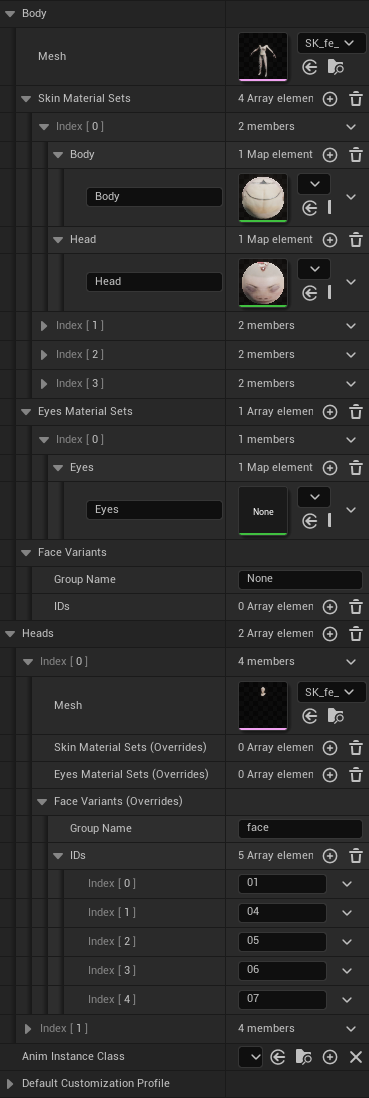
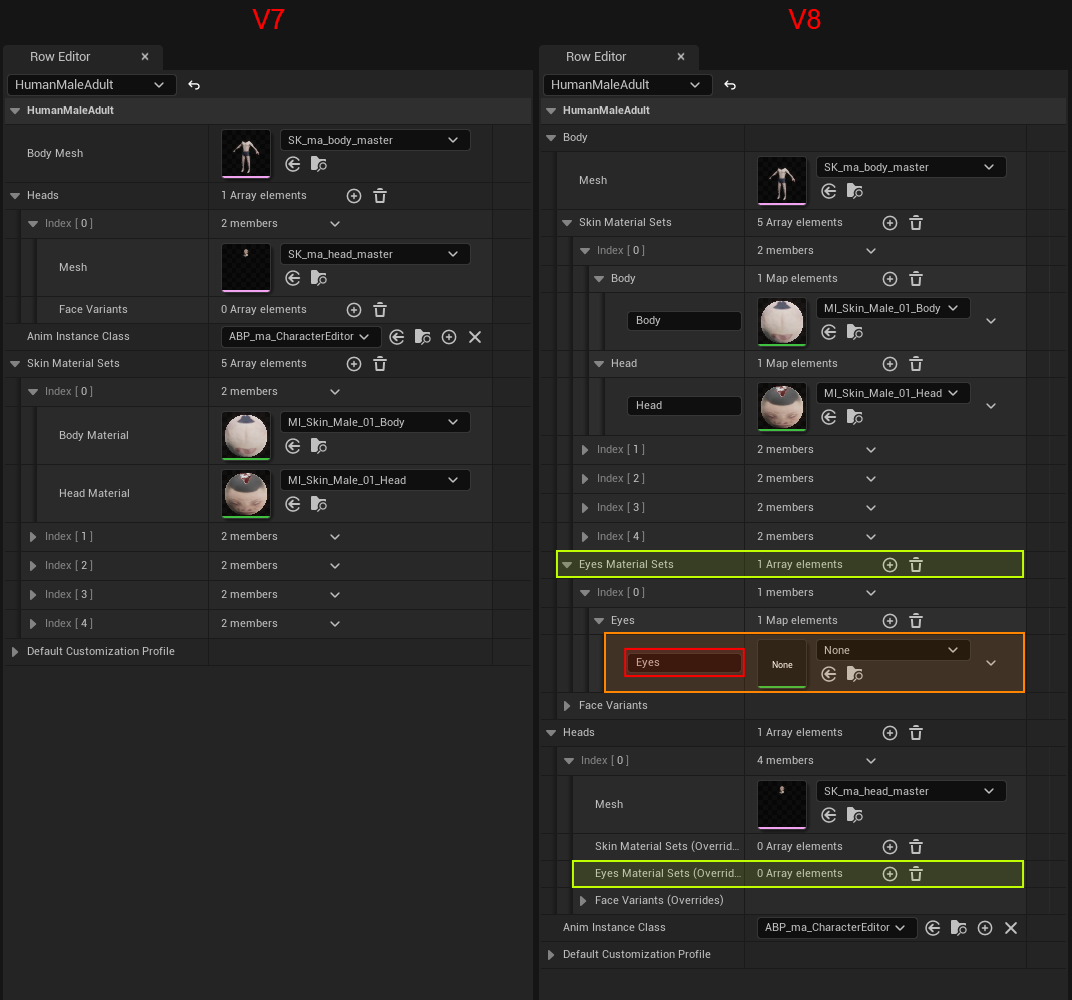
[V8] Body contains the Mesh property for a valid anatomy. The head-related properties in this section are intended to be used as defaults or for combined body and head meshes.
-
Mesh (replaces [V7 removed] Body Mesh) defines the mandatory skeletal mesh for the body. It can optionally have a combined mesh including a head (like our child anatomy).
-
[V9] Anim Instance Class (replaces [V8 removed] Anim Instance Class on root level) contains the Anim Blueprint that is applied to the Mesh component (Body mesh).
See Anim Instance Classes below for details. -
Skin Material Sets (replaces [V7 removed] Skin Material Sets on root level) contains possible skin material sets.
See Skin Material Sets below for details.-
Body contains material slot names and materials affected by editor changes (skin color, aging, etc.) and basebody masks.
-
Head contains material slot names and materials affected by editor changes (skin color, aging, etc.). If your mesh has no head material slot (like our combined child mesh), this material is optional.
-
-
Eyes Material Sets contains possible eyes material sets.
See Eyes Material Sets below for details.- Eyes contains material slot names and materials affected by editor changes (eyes color).
-
Face Variants contains possible face variants.
See Face Variants below for details.-
Group Name is the prefix for the final morph target.
-
IDs contains possible suffixes for the final morph target.
-
-
-
[V8] Heads (replaces [V7 removed] Heads; replaces [V6 removed] Head Mesh) contains optional heads that you can switch between in the Character Editor.
-
Mesh contains the skeletal mesh for the head.
-
[V9] Anim Instance Class (Override)
See Anim Instance Classes below for details. -
Skin Material Sets (Overrides)
See Skin Material Sets below for details.- Head (there is no Body in the overrides)
-
Eyes Material Sets (Overrides)
See Eyes Material Sets below for details.- Eyes
-
Face Variants (Overrides) (replaces [V7 removed] Face Variants array)
See Face Variants below for details.-
Group Name
-
IDs
-
-
-
Default Customization Profile is used in the in-game Character Editor to setup the character if you choose this anatomy in the editor for the first time after Begin Play. (See BP_CharacterCustomization ➝ SetAnatomy)
¶ Table Version Validation [V11]
Since the V11 Gameplay Tag Update the BP_CharacterCustomization ➝ AnatomyDataTable is validated more robustly than before and does not require you to have the version number in its name.
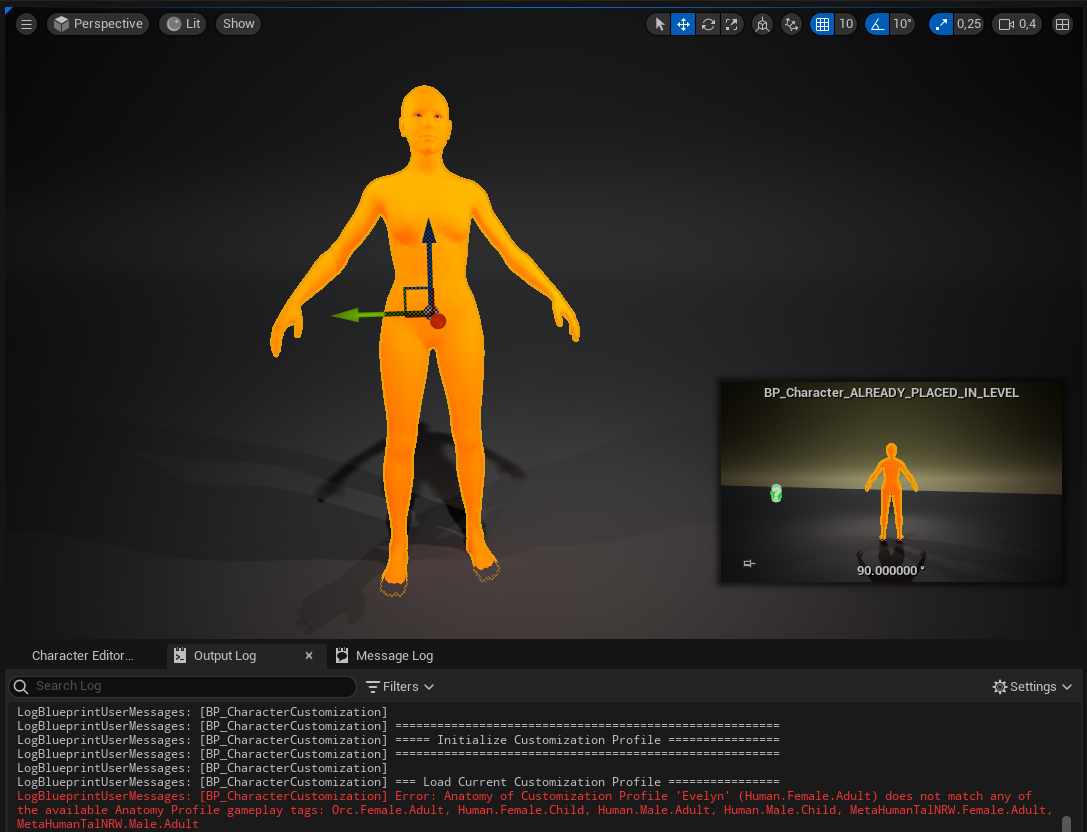
LogScript: Warning: Incompatible output parameter; the data table's type is not the same as the return type.
BP_CharacterCustomization_C /Game /CharacterEditor /Base /Maps /CharacterEditor_Showcase. CharacterEditor_Showcase: PersistentLevel. BP_Character_ALREADY_PLACED_IN_LEVEL. BP_CharacterCustomization
Function /Game /CharacterEditor /Base /Blueprints /Components /BP_CharacterCustomization. BP_CharacterCustomization_C: UpdateAvailableAnatomyProfiles:04DD
LogBlueprintUserMessages: [BP_CharacterCustomization] Warning: Invalid data table. Instead, use a data table with row struct FAnatomyProfile_V11.
Furthermore, an error is logged and the character is displayed in orange, if there is no valid matching anatomy profile or no anatomy profile at all.
LogBlueprintUserMessages: [BP_CharacterCustomization] Error: There must be at least one valid available anatomy profile.
LogBlueprintUserMessages: [BP_CharacterCustomization] Error: Anatomy of Customization Profile 'Matthew' (Elf.Female) does not match any of the available Anatomy Profile gameplay tags: Human.Female.Adult, Human.Female.Child, Human.Male.Adult, Human.Male.Child, MetaHumanTalNRW.Female.Adult, MetaHumanTalNRW.Male.Adult
¶ Table Version Validation [V9 removed]
Since the V9 Utility Update, the BP_CharacterCustomization ➝ AnatomyDataTable is superficially validated to make sure the correct table is assigned. "Superficially" means, that we only check for its name and assume it has been created correctly in the first place, since we cannot check for the underlying table structure in Blueprints.
Our default data table is DT_AnatomyProfiles_V9, where you can add anatomies as you desire, but when creating your own table, make sure you either copy our latest table or use the latest structure FAnatomyProfile_V9 for creating a new table and have the latest version "V9" in its name, e.g. DT_MyCustomName_V9_MyCustomSuffix.
If the name does not contain "V9" and you would assign it to BP_CharacterCustomization ➝ AnatomyDataTable, the logic assumes that you did assign one of the older data tables from previous versions.
In this case the following error is thrown:
Error: Invalid Anatomy Data Table version.
Please use an Anatomy Data Table based on 'FAnatomyProfile_V9'. The name of a custom table must also contain "V9" to be valid. Check your Blueprint defaults or the current instance overrides in the Details panel for the currently assigned table and change them to a valid table.
¶ Profile Validation
The properties Body ➝ Mesh and Body ➝ Anim Instance Class are mandatory for a valid profile. If one of them or both not being set, throws a warning in the BP_CharacterCustomization ➝ Function: Initialize ➝ Update Available Anatomy Profiles and makes the profile unavailable for being selected.
¶ Custom Mesh Setup
If you want to add your own custom meshes, then you can choose between two setups.
- Use the Body ➝ Mesh and the Heads ➝ Mesh separately, similar to our HumanFemaleAdult.
- Use the Body ➝ Mesh, where the head is combined with the body, similar to our HumanFemaleChild.
See Skin Material Sets and Eyes Material Sets below for details on how you have to setup the materials.
¶ Anim Instance Classes
¶ General
Anim Instance Classes animate your Character.
While Body ➝ Anim Instance Class is mandatory for a valid profile, Heads ➝ Anim Instance Class (Override) are optional for each head.
¶ Implementation Details: Body ➝ Anim Instance Class
Body ➝ Anim Instance Class requires an Anim Blueprint, that uses the skeleton of Body ➝ Mesh.
[V11] Since the V11 Gameplay Tag Update, both the mesh and Anim Instance Class are applied to skeletal mesh component, your Pawn Blueprint returns in Character Customization Interface ➝ Get Basebody Body Component.
[V10] Until the V10 Selection Update, both the mesh and Anim Instance Class are applied to the Character Blueprints' default Mesh (CharacterMesh0) component
¶ Implementation Details: Heads ➝ Anim Instance Class (Override)
Heads ➝ Anim Instance Class require Anim Blueprints, that are compatible with the one used for the body.
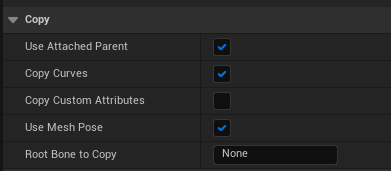
Make sure, that this Anim Blueprint uses the Unreal built-in Copy Pose From Mesh node as shown below. This node will automatically copy the current animation from the Characters' Mesh component. You can use the pose by calling Use cached pose 'BodyPose' (also multiple times) in your head Anim Blueprint to layer-blend body and head animations.

Copy Pose From Mesh details have to be configured this way:
¶ Migration Guide from [V8] to [V9]
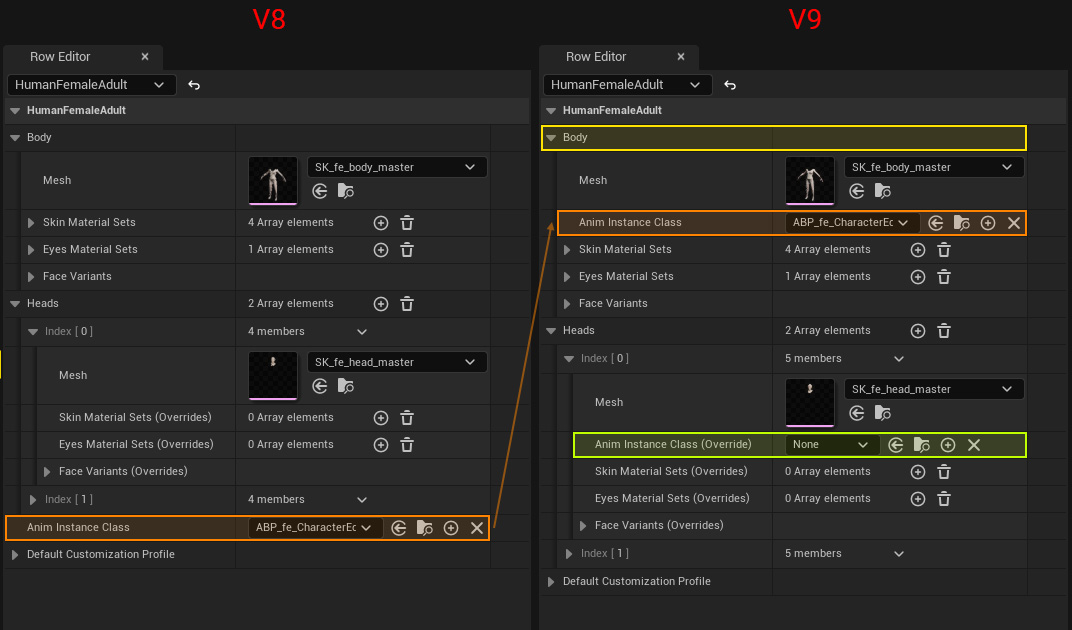
This screenshot shows you that the [V8] Anim Instance Class has been moved into [V9] Body ➝ Anim Instance Class section. Additionally, there are Anim Instance Class (Override) in each element of the Heads section.
¶ Skin Material Sets
¶ General
Skin Material Sets are used to choose between different skin variants.
For Body ➝ Skin Material Sets each array element contains a Body and Head array where you can add one or more material slots and materials. For Heads ➝ Skin Material Sets (Overrides) however, each array element contains only a Head array to override one or more head-specific materials.
Each array element can be chosen by an index in the skin variant Index Picker in the Character Editor and by the Basebody (Profile) ➝ Skin ➝ Material Index property in the Customization Profile.
The currently selected Skin Material Set is updated by BP_CharacterCustomization ➝ Update Skin Materials.
¶ Implementation Details: Body ➝ Skin Material Sets
Use the Body sets, if you want to define different default skin types, as in our Human examples.
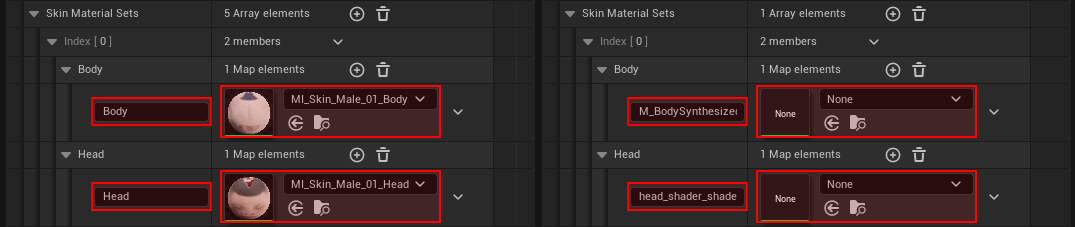
In the screenshot below, the left side shows the HumanMaleAdult anatomy's first Body ➝ Skin Material Sets element. The Body array contains an element for the "Body" slot with a predefined material. The Head array contains an element for the "Head" slot with a predefined material. Then, BP_CharacterCustomization ➝ Update Skin Materials applies the given materials as Material Instance Dynamics.
On the right side of the screenshot however, you can see the MetahumanMaleTalNRW anatomy's first element with two differences: The Body and Head arrays contain different slot names, matching the MetaHuman skeletal mesh and the materials are set to None. Setting materials to None creates material instances based on the currently assigned materials in the given slot. This is useful, if you just want to make the slots controllable but don't worry about specific materials.
Here you can see the corresponding skeletal meshes and their matching slot names.

¶ Implementation Details: Heads ➝ Skin Material Sets (Overrides)
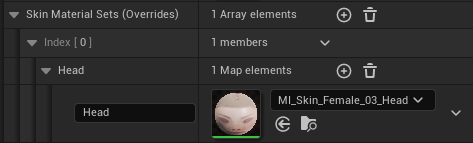
Use the Head override sets, if you want to keep your Body material always the same, but want to define different Head materials, like normal skin, freckles, coffee stains, wounds etc. for each of your head variants.
For Heads ➝ Skin Material Sets (Overrides) each element takes Head array elements that follow the same rules as in the Body section.
Though, the Body section defines how many skin variants can be chosen in the Character Editor. Thus if there should be 2 head overrides, as well there must be at least 2 Body Skin Material Sets. In these body skin material sets you can then ignore the Head array. If you have less overrides than Body Skin Material Sets, it will use the Body element.
Below is an example of having 4 Body Skin Material Sets and 2 Skin Material Sets (Overrides). As you can see, body set index 0 and 1 are overriden by the -Special and -Fancy head material sets, but body set index 2 and 3 with -03_Head and -04_Head are still used.
Body ➝ Skin Material Sets
| Set Index | Slot | Slot Index | Material |
|---|---|---|---|
| 0 | Body | 0 | MI_Skin_Male_01_Body |
| 0 | Head | 0 | MI_Skin_Male_01_Head |
| 1 | Body | 0 | MI_Skin_Male_02_Body |
| 1 | Head | 0 | MI_Skin_Male_02_Head |
| 2 | Body | 0 | MI_Skin_Male_03_Body |
| 2 | Head | 0 | MI_Skin_Male_03_Head |
| 3 | Body | 0 | MI_Skin_Male_04_Body |
| 3 | Head | 0 | MI_Skin_Male_04_Head |
Heads ➝ Skin Material Sets (Overrides)
| Set Index | Slot | Slot Index | Material |
|---|---|---|---|
| 0 | Head | 0 | MI_Skin_Male_Head_Special |
| 1 | Head | 0 | MI_Skin_Male_Head_Fancy |
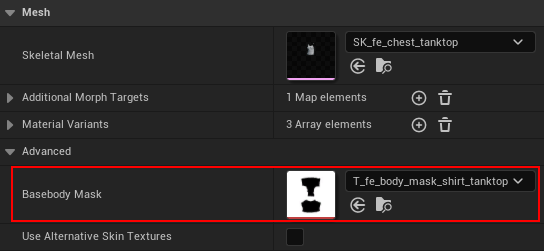
¶ Implementation Details: Basebody Mask Textures
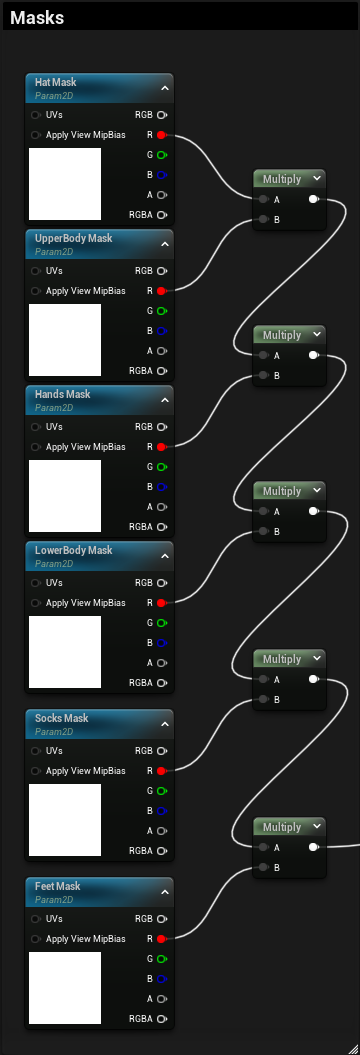
To hide parts of the Body ➝ Mesh and avoid clipping with tighter Apparel CDAs, we use basebody mask textures.
Materials in the Body ➝ Skin Material Sets ➝ Body and Heads ➝ Skin Material Sets (Overrides) ➝ Body slots are used in BP_CharacterCustomization ➝ Update Apparel Basebody Masks to pass those textures to the material(s).
If you have a custom material for your body that matches your own skeletal mesh, you can copy the right-hand nodes from the M_Skin material, plug them into the Opacity Mask output and set your materials Blend Mode to Masked.
If you have custom UVs, you may want to create similar textures to ours in your favorite third party tool and apply assign them to your Apparel CDAs ➝ Basebody Mask.
¶ Migration Guide from [V7] to [V8]
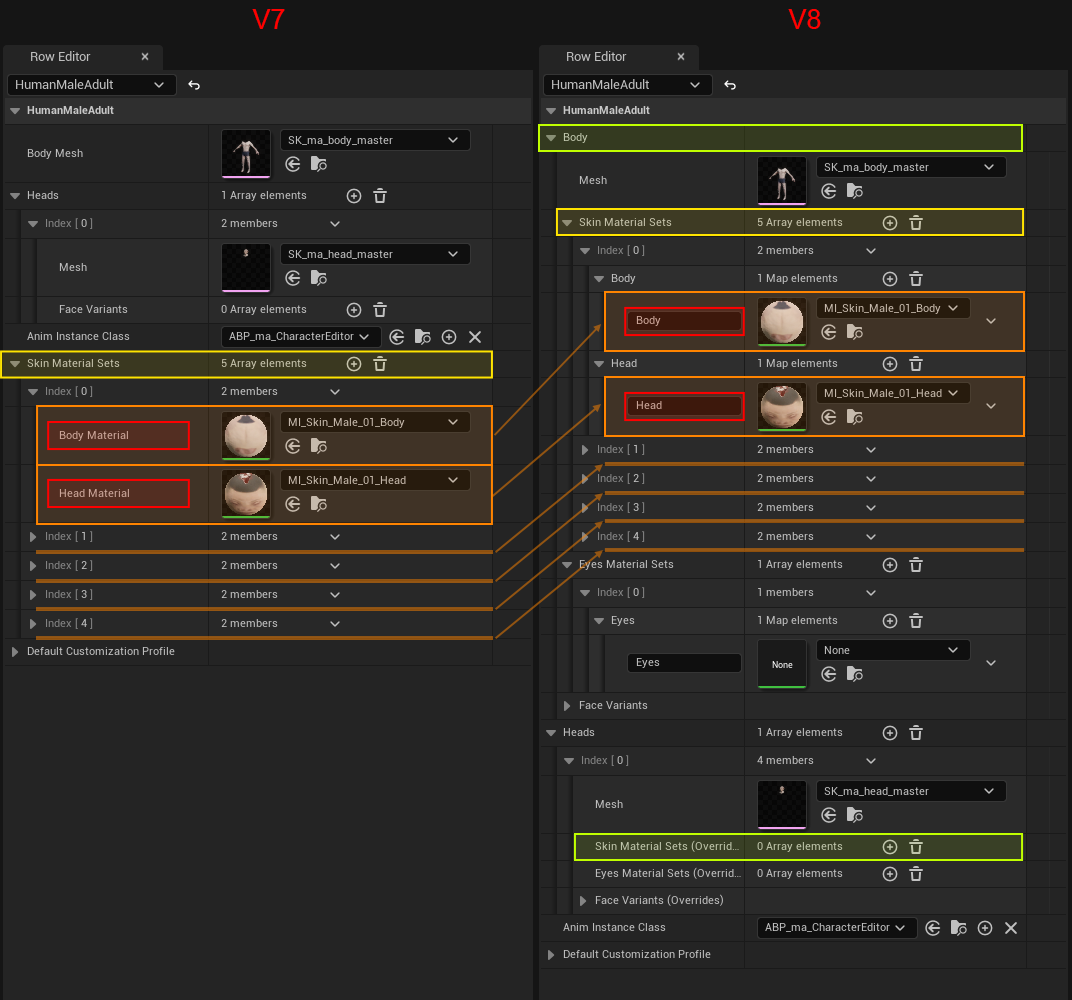
This screenshot shows you that the [V7] Skin Material Sets have been moved into the new [V8] Body section.
The red boxes above show you that the fixed material slots "Body" and "Head" have been changed to slot name inputs that replace the hardcoded logic from BP_CharacterCustomization ➝ Update Skin Materials
As shown on the right side, you can use different slot names, to match your skeletal mesh, in this example the MetaHuman body and head skeletal meshes.
As explained in the implementation details above, you can set the materials to None, if you want to make the material controllable that is currently assigned to the corresponding skeletal mesh.
Additionally, there are Skin Material Sets (Overrides) in the Heads section.
¶ Eyes Material Sets
¶ General
Eyes Material Sets can be used to choose between different eye variants.
For Body ➝ Eyes Material Sets each array element contains an Eyes array where you can add one or more material slots and materials. For Heads ➝ Eyes Material Sets (Overrides) it also has an Eyes array to override one or more head-specific materials.
The currently selected Eyes Material Set is updated by BP_CharacterCustomization ➝ Update Eyes Materials.
Currently, index 0 is hardcoded, since we have no eyes variants picker.
Though, we wanted to prepare the logic the same way as for skin material sets.
¶ Implementation Details: Body ➝ Eyes Material Sets
This works similar to the Body ➝ Skin Material Sets, explained above.
It is up to you to implement logic to change the index.
¶ Implementation Details: Heads ➝ Eyes Material Sets (Overrides)
This works similar to the Heads ➝ Skin Material Sets (Overrides), explained above.
It is up to you to implement logic to change the index.
¶ Migration Guide from [V7] to [V8]
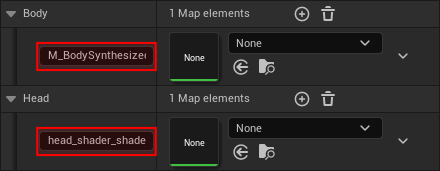
This screenshot shows you the new [V8] Eyes Material Sets that replace the hardcoded logic from BP_CharacterCustomization ➝ Update Eyes Materials. Like with Skin Material Sets, use material None to make the material controllable that is currently assigned to the skeletal mesh.
Additionally, there are Eyes Material Sets (Overrides) in the Heads section.
¶ Face Variants
¶ General
[V7] Since the V7 Customer Update, each Anatomy Profile can have multiple head meshes in addition to the morph target face variants from previous versions. This way, you can decide on your own to import separate meshes or morph targets (or combine both approaches like in our HumanFemaleAdult example). To control this new setup, there is a new Customization Profile ➝ Basebody ➝ Head Profile and a new Index Picker for the head in the in-game editor.
[V8] Since the V8 Groom Update, the Body section got the Face Variant defaults and each Heads element the Face Variants (Overrides).
The currently selected Face Variant can be received by BP_CharacterCustomization ➝ Get Current Face Variant.
¶ Implementation Details
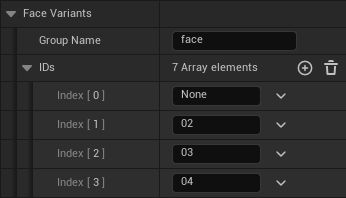
Use the Group Name for your morph target prefix and the IDs array to define possible suffixes. With the setup shown on the right side you could toggle between the morph targets face_None, face_02, face_03, and face_04. Use "None" or something else that is not existing, to have one face variant that deactivates all the others. The Group Name is mandatory to store the selected face variant in the current customization profile.
The Heads ➝ Face Variants (Overrides) logic works similar to the Heads ➝ Skin Material Sets (Overrides), explained above.
The currently selected face variant information is applied to the Character Editor in WBP_CharacterEditor ➝ Event Graph ➝ Initialize - Face Heads and Variants.
¶ Migration Guide from [V7] to [V8]
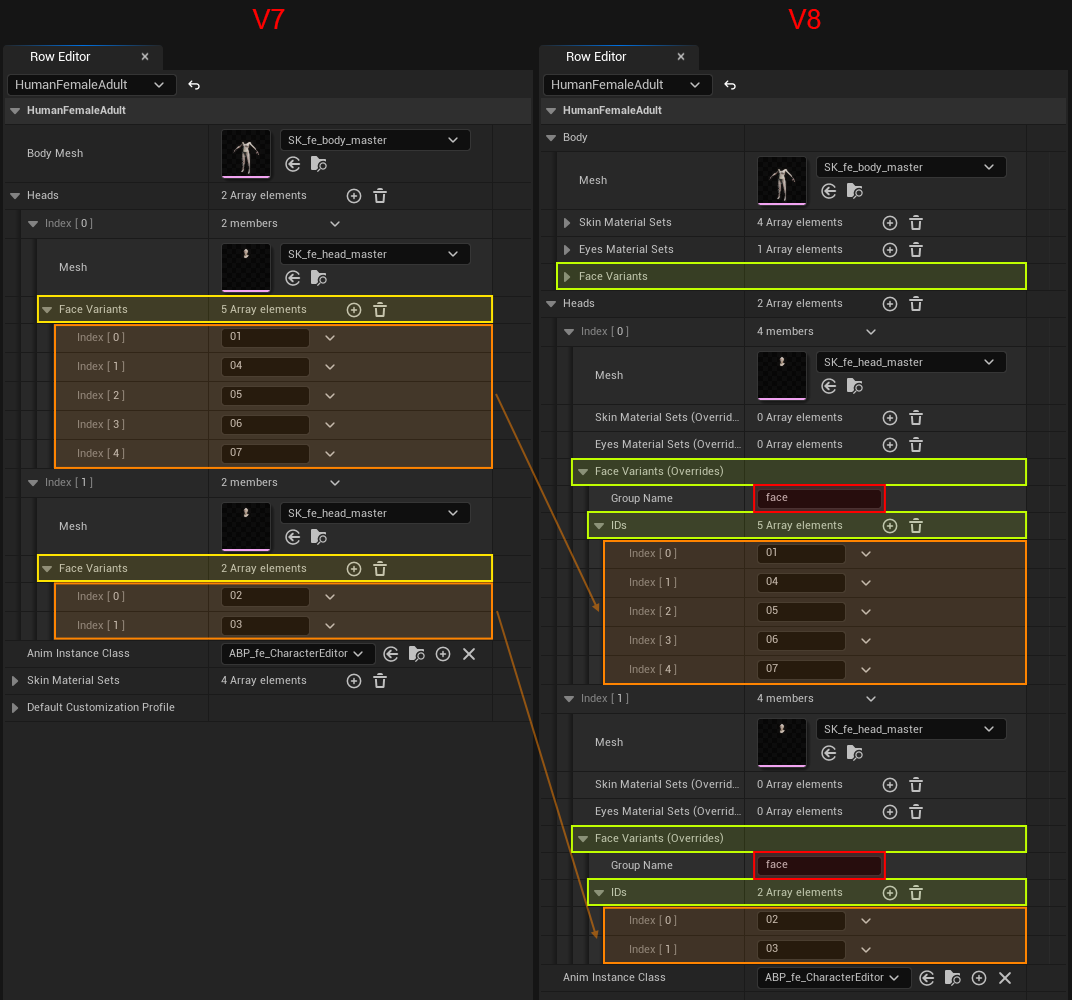
This screenshot shows you that the [V7] Face Variants have been moved to [V8] Heads ➝ Face Variants (Overrides).
The red box shows you that a new [V8] Group Name has been introduced that replaces the hardcoded logic from WBP_CharacterEditor ➝ Event Graph ➝ Initialize - Face Heads and Variants.
Additionally, there are default Face Variants in the Body section.
¶ Assigning CDAs
Once an anatomy is added you can assign it to your Customization Data Assets.
[V11] See BP_CustomizationDataAsset ➝ General ➝ Gameplay Tags for details
[V2] to [V10] See BP_CustomizationDataAsset ➝ General ➝ Anatomies for details
¶ Filtering CDAs
Several places filter CDAs when using the Character Editor. The BP_PackageRegistry directly accesses the Asset Registry and can provide filtered lists of CDAs directly to e.g. the BP_CharacterCustomization randomization functionality or WBP_CharacterEditor to display the CDAs in corresponding CDA pickers.
The actual filtering depends on the Character Editor version, as follows.
¶ Filtering by Gameplay Tags [V11]
Since the V11 Gameplay Tag Update the filter is based on gameplay tags.
They work in all places where enumerations worked before - the logic is called "CDA Filter", which describes either functions or properties. Besides that, the rules to show a CDA got more flexible and extended by a None filter. In the Blueprints, you will find CDA Filter, Anatomy and similar variables and parameters for their usage.
A CDA passes the filter if any rule of points 1-4 and all conditions of point 5 apply.
- The CDA Filter does not contain any anatomy at all.
- The CDA has no anatomy and the CDA Filter contains CharacterEditor.Anatomy.#.None.
- The CDA has at least one collection and the CDA Filter contains CharacterEditor.Anatomy.#.Any.
- The CDA has at least one anatomy and the CDA Filter contains that anatomy or any children vice versa.
- "Children" means that e.g., the CDA has the anatomy Anatomy.Human.Female.Adult and CDA Filter of either Anatomy.Human.Female.Adult or Anatomy.Human will show the CDA and vice versa. This enables CDAs to fitting to multiple child anatomies, e.g., a hat can both fit to Human.Male and Human.Female.
- Other conditions:
- If CDA Filter contains multiple special filters or anatomies, the CDA is shown if any of them matches.
- If CDA Filter contains Collection gameplay tags, they must show the CDA as well.
- If the CDA is a Debug Asset, the functions consuming CDA Filter must use Accept Debug Asset.
See Character Editor Function Library ➝ Is CDA Matching Filter Settings for details.
Use BP_GameplayTagTester in your scene to test if any CDA is matching the given CDA Filter.
¶ Filtering by Enumeration [V2] to [V10]
From V2 Anatomy Update to V10 Selection Update the filter is based on enumerations.
A CDA passes the filter if any rule of point 1-2 and all conditions of point 3 apply.
- The CDA has no anatomy.
- The CDA has at least one anatomy and the Anatomy filter matches that anatomy.
- Other conditions:
- The Collection filter must show the CDA as well.
- If the CDA is a Debug Asset, the functions consuming Anatomy must use Accept Debug Asset.
There is no filter value Any Anatomy as Any Collection in collections.
See Character Editor Function Library ➝ Does CDA Passes Filter Settings [V11 removed] for details.
¶ Different Skeletons
¶ Using Default Anatomy [V5]
To use our default Human anatomies, nothing needs to be changed. The Character Editor uses the base skeleton by default. With the release of V5 Meta Human Update we merged male and female skeletons back to UE4 Mannequin.
If creating a new Human anatomy profile in DT_AnatomyProfiles_V8, choose a body and head mesh based on CharacterEditor/Base/Animations/UE4_Mannequin_Skeleton.

With our shipped CDAs, the Human race can be selected in-game in the Profile Manager. It is selected when the "H" is displayed.
¶ Using MetaHuman Anatomy [V5]
We added MetaHuman TAL NRW body type support besides the UE4 Mannequin. You can easily integrate your own skeleton with the same workflow.
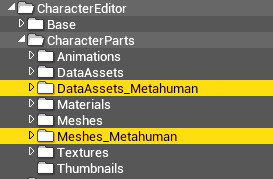
Every CDA can only be linked to one skeleton, therefore we added new CDAs & Meshes subfolders for the MetaHuman apparels.
See the tutorial Third Party Integration: Meta Humans for details.
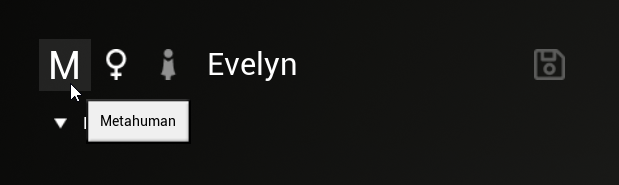
With our shipped CDAs, the MetaHuman race can be selected in-game in the Profile Manager. It is selected when the "M" is displayed.