¶ Introduction
Customization Data Assets (in short CDA) are Data Assets that can be placed onto customizable pawns (like Apparels, Attachments, Equipment, Groom and Hairstyles). They define various info and optionally some asset-specific logic.
The general concept of CDAs is, that all child classes of BP_CustomizationDataAsset define more detailed information describing the actual CDA. They may also have CDA-specific logic in the customization process (like foot transforms for the BP_CDA_Apparel_Feet).
Even cooler, why we did not use “Data Table” as an alternative, is that each data asset could have its own functionality – almost like normal Blueprints do, which can be used for data validation and other things right in the asset itself.
¶ BP_CustomizationDataAsset
¶ Overview
This is the base class of all CDAs and defines basic variables:
- General
- DisplayName is used in-game inside of a CDA Picker.
- Thumbnail is used in-game inside of a CDA Picker. Use them for more as you like.
(See Capture CDA Thumbnails for making your own thumbnails) - Anatomies [V2] (deprecated in [10 removed]) contain zero or more anatomy entries. They define how CDAs are filtered in various places.
(See Anatomies ➝ Filtering by Enumeration for details) - Collections [V2] (deprecated in [10 removed]) contain zero or more collection entries. They define for which selected Collection in the WBP_CDA_CollectionPickers this CDA is visible in their corresponding CDA Pickers. If the Collections list is empty, the CDA will still appear in the “Any Collection”.
(See Collections ➝ Filtering by Enumeration for details) - Gameplay Tags [V11] (replaces [10 removed] Anatomies and [10 removed] Collections) contain zero or more anatomy and/or collection gameplay tags. They define how CDAs are filtered in various places.
(See Anatomies ➝ Filtering by Gameplay Tags and Collections ➝ Filtering by Gameplay Tags for details) - Hidden CDA Classes [V4] (got moved here from [V2 removed] BP_CDA_Apparel) define zero or more classes type of BP_CustomizationDataAsset that shall be hidden when this CDA is assigned. E.g., a hoody mesh already incorporates a hat – the hood – and thus can add the BP_CDA_Apparel_Hat class, to hide each worn hat CDA. The same way other apparels like helmets can add the BP_CDA_Hairstyle_Head to the array to hide the hairstyle.
- Debug
- Debug Asset defines if the CDA is for debugging only. If set to TRUE it will not be visible in the in-game editor and can only be chosen in the Unreal Editor Details Panel and be saved to and loaded from customization profiles.
Debug Assets that are stored in the Customization Profile that your pawn has assigned in the viewport, will get unapplied by CDA pickers when running the game, unless their Accept Debug Assets is set to True (default is False). See CDA Picker for further details..
[V10 removed] Before the V11 Gameplay Tag Update, the default CDA pickers could not accept debug assets, thus Debug Assets were always hidden in-game. See CDA Apparel Picker for further details.
- Debug Asset defines if the CDA is for debugging only. If set to TRUE it will not be visible in the in-game editor and can only be chosen in the Unreal Editor Details Panel and be saved to and loaded from customization profiles.
- Mesh
- Material Variants [V4] (got moved here from [V2 removed] BP_CDA_Apparel) is a list of F_CDA_MaterialVariant entries, where each of them defines a different set of materials that can be applied to the skeletal mesh. Thus e.g., a pullover can have a red, yellow, or green color or even different textures like stripes of blue and white without adding another CDAs to the content browser.
¶ Child Classes
¶ Class Hierarchy
Besides the direct child classes, here is an overview about all current classes.
¶ BP_CDA_Skeletal [V4]
¶ Overview
This is the abstract base class for skeletal CDAs and inherits from BP_CustomizationDataAsset.
Since the V4 Animation Update, this is a new base class for skeletal CDAs like BP_CDA_Hairstyle, BP_CDA_Apparel and the new BP_CDA_Equipment to unify their update logic. (E.g., see BP_CharacterCustomization > Function: Apply Customization Profile > (3) Update Apparel). As we learned about new techniques to animate modular characters in Unreal Engine, it was a logical consequence to make a skeletal base class and replace the Custom Anim Blueprint property of our
BP_CDA_Hairstylewith the new animation workflow using Post Process Anim Blueprints. (See Add your own CDA animations)
It comes with these variables:
- Mesh
-
Skeletal Mesh is the visual appearance of the skeletal CDA.
-
 Additional Morph Targets define zero or more morph targets that are controlled on all the skeletal meshes the character is composed of. To the left is the morph target name and to the right is the strength as it appears in the skeletal mesh editor’s morph target list, which is usually set to 1.0. By e.g., adding (hair, 1.0) to voluminous hairstyle CDAs like the “afro”, we can control the “hair” morph target in specific hat meshes like the beanie to deform them as it would look like the hairs are stuffed under the hat – so that the hairs to not stick through the hat geometry.
There are several additional morph targets that are already present on one or the other type of CDA:- CDA_Hairstyle
- hair deforms or enlarges hats.
- CDA_Apparel_Feet
- boot_high_equipped squashes trousers into the shoe or lays them over the shoes.
- shoe_dressed hides toes in pointed or tight shoes.
- CDA_Apparel_Hat
- hat_equipped_benee compresses hair under tight beanie hats.
- hat_equipped_berett compresses hair under beret hats with a diagonal lower edge.
- hat_equipped_straight compresses hair under straight hats like caps or country hats.
- CDA_Apparel_LowerBody
- tight_long_trousers
- trousers_long
- CDA_Apparel_UpperBody
- waist_cover to remove some width on lower bodies that the upper body covers it.
- CDA_Hairstyle
-
We have prepared all these morph targets in a 3d modelling software. They cannot be added to your custom meshes directly in engine. We only give you a tool for controlling own morph targets.
¶ Child Classes
¶ BP_CDA_Apparel
¶ Overview
This is the abstract base class for apparels and inherits from BP_CDA_Skeletal. It is selectable by the WBP_CDA_ApparelPicker. It comes with these additional variables:
- Mesh
- Basebody Mask is a black and white texture where black hides skin on the basebody body and head meshes and white shows the skin. This is to avoid large amounts of morph targets to compensate skin sticking through clothes.
(See Anatomies ➝ Basebody Mask Textures for details.) - Use Alternative Skin Textures [V3] shows an alternative texture set on the currently assigned skin if its materials (Body and Head) have assigned appropriate textures. As an example, we have prepared the materials MI_Skin_Male_01_Body and MI_Skin_Female_01_Body. By setting up alternative textures like ours, you can make the character naked to support apparels like swimming clothes which might reveal more skin than the painted underwear of the main textures does.
- Basebody Mask is a black and white texture where black hides skin on the basebody body and head meshes and white shows the skin. This is to avoid large amounts of morph targets to compensate skin sticking through clothes.
The main reason for having multiple apparel child classes – beside the information and logic described above – is that each class represents a possible apparel slot on the character. Each WBP_CDA_ApparelPicker in the editor can display all data assets of a specific CDA class, which lets you group them visually.
If you want to create e.g., custom backpack assets, then you would create a child blueprint class of BP_CDA_Apparel called BP_CDA_Apparel_Backpack and place another WBP_CDA_ApparelPicker in the editor for that new class.
¶ Child Classes
- BP_CDA_Apparel_Accessory
- BP_CDA_Apparel_Feet (sets foot transforms in the Anim Blueprint)
- BP_CDA_Apparel_Glasses (set a custom translucency sorting for the glass material)
- BP_CDA_Apparel_Hands
- BP_CDA_Apparel_Hat
- BP_CDA_Apparel_LowerBody
- BP_CDA_Apparel_Socks
- BP_CDA_Apparel_UpperBody
¶ BP_CDA_Equipment [V4]
¶ Overview
This is the abstract base class for equipment and inherits from BP_CDA_Skeletal. Currently, it is not selectable in the in-game Character Editor. It has one example child class.
Coming with V4, we have decided to introduce equipment as a completely new sub class to clearly separate it from apparel and attachments, as potential equipment logic might differ from apparel a lot and needs skeletal meshes. Two logical differences to apparel on our side are that the equipment does not support body masks and changing the skin texture set. You are free to add more logic.
The main differences to Attachment Profiles (that are also meant to be for tools etc.) are that equipment uses a skeletal mesh and the new custom animation workflow instead of a static mesh without animations. Thus, if you need interactive items for your character, you should prefer equipment over attachments.
¶ Child Classes
- BP_CDA_Equipment_SingleHanded
¶ BP_CDA_Hairstyle
¶ Overview
This is the abstract base class for hairstyles and inherits from BP_CDA_Skeletal. It is selectable by the WBP_CDA_HairstylePicker and it comes without additional variables as it only acts as a logically different parent class.
It previously came with this variable:
- Mesh
- Custom Anim Blueprint [V4 removed] got replaced by the new custom animation pipeline.
¶ Child Classes
- BP_CDA_Hairstyle_Beard
- BP_CDA_Hairstyle_Head
¶ BP_CDA_Groom [V8]
¶ Overview
This is the abstract base class for Groom CDAs and inherits from BP_CustomizationDataAsset. It is selectable by the WBP_CDA_GroomPicker and comes with these variables:
- Groom
- Groom Asset is the main visual asset for Groom components.
- Binding Assets contains the binding assets between the Groom Asset and each Head skeletal mesh that is defined in your Meta Human Anatomy > Heads section. Depending on the head it may not be necessary to create a separate Binding Asset.
- If the CDA does not contain a Binding Asset for the currently selected Basebody Profile ➝ Head ➝ Index (or Head Picker index in the UI), the first available Binding Asset is selected as a fallback.
- If the Binding Assets array is empty or the selected Binding Asset is referencing a different Groom Asset than defined in Groom ➝ Groom Asset, warnings are shown in the Output Log.
[V8] In V8 Groom Update the Groom support has been extended after further evaluation since introducing it in V7 Customer Upgrade. It is currently only supported for the Metahuman anatomy and Groom assets are not delivered with this update. See tutorial Third Party Integration: Groom for Metahumans for details to learn how to implement your own Groom assets.
Unfortunately, we are not allowed to deliver ready-to-go Groom assets and CDAs to the Marketplace.
[V7] In the V7 Customer Update this was not an abstract class and the current child classes were not available.
¶ Unreal Editor Details [V7]
You can create Groom assets an assign them to the Customization Profile and it will be applied to your character like other CDA types. All logical parts are already done.
¶ Groom Material [V8]
To colorize Groom assets, currently, we only support the given materials on the Groom material slots as there is no Material Variant Index inside FGroomProfile as in other profiles like FApparelProfile. Thus, we always use an index of -1, meaning the default route, when applying Dynamic Material Instances.
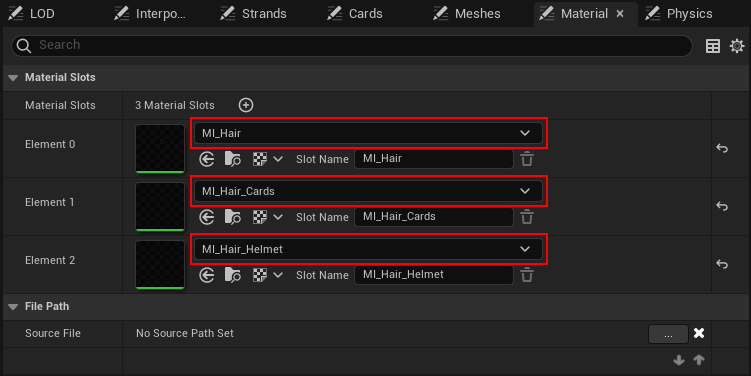
Since V8 Groom Update, BP_CharacterCustomization ➝ Create MID by Material Variant was updated to handle the coloring correctly across different Groom LODs (Hair, Cards, Helmet). From now on, the function creates Dynamic Material Instances on all material slots instead of only the first slot (before V8 Groom Update), if MaterialVariantIndex is -1.
Note, that we are using MetaHumans/Common/Materials/M_hair_v4 for the current implementation and have prepared the color controls in the Character Editor for Parameter Names based on that material, thus using other base materials might not working properly out of the box. If there are more than the 3 material slots on your Groom asset, make sure, that all slots which should be colored the same way with the UI controls, must share the same base material or at least parameter names.
By default, in our tests MetaHumans/Common/Materials/M_hair_v4 did not show Ombre and Highlight colorization, since this is an optional feature of that material. If you want to turn it on, we found the following settings sensible. See below the image, that besides in-editor controls we have one parameter that is directly set in the material instance.
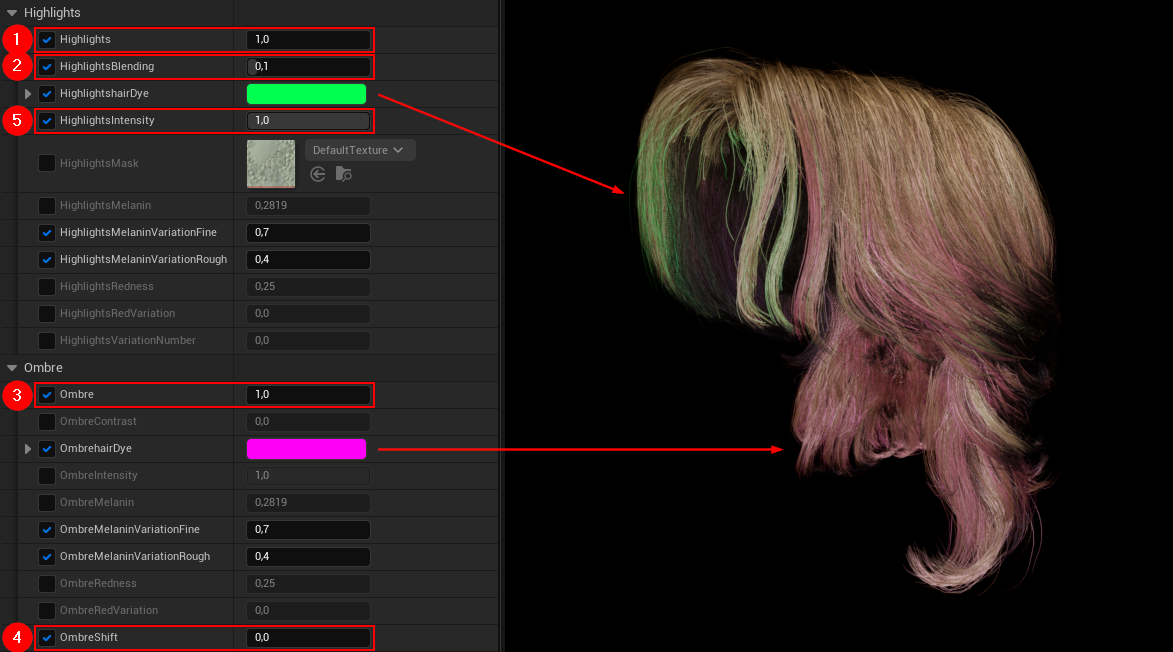
| Parameter | Default Value | Name in Character Editor | |
|---|---|---|---|
| 1. | Highlights | 1.0 | Highlight Alpha |
| 2. | HighlightsBlending | 0.1 | Highlight Blending |
| 3. | Ombre | 1.0 | Ombre Alpha |
| 4. | OmbreShift | 0.0 | Ombre Shift |
| 5. | HighlightsIntensity | 1.0 | * |
* There is no Float Slider for HighlightsIntensity in the editor. Setting this parameter directly to 1.0 in the material instances MI_Hair, MI_Hair_Cards, and MI_Hair_Helmet (as shown in the first image above) is like enabling Highlights for the Character Editor, and 0.0 disabling them. Then you can reduce or increase the amount by the Highlights Float Slider. Depending on your own base material you might want to adjust other parameters.
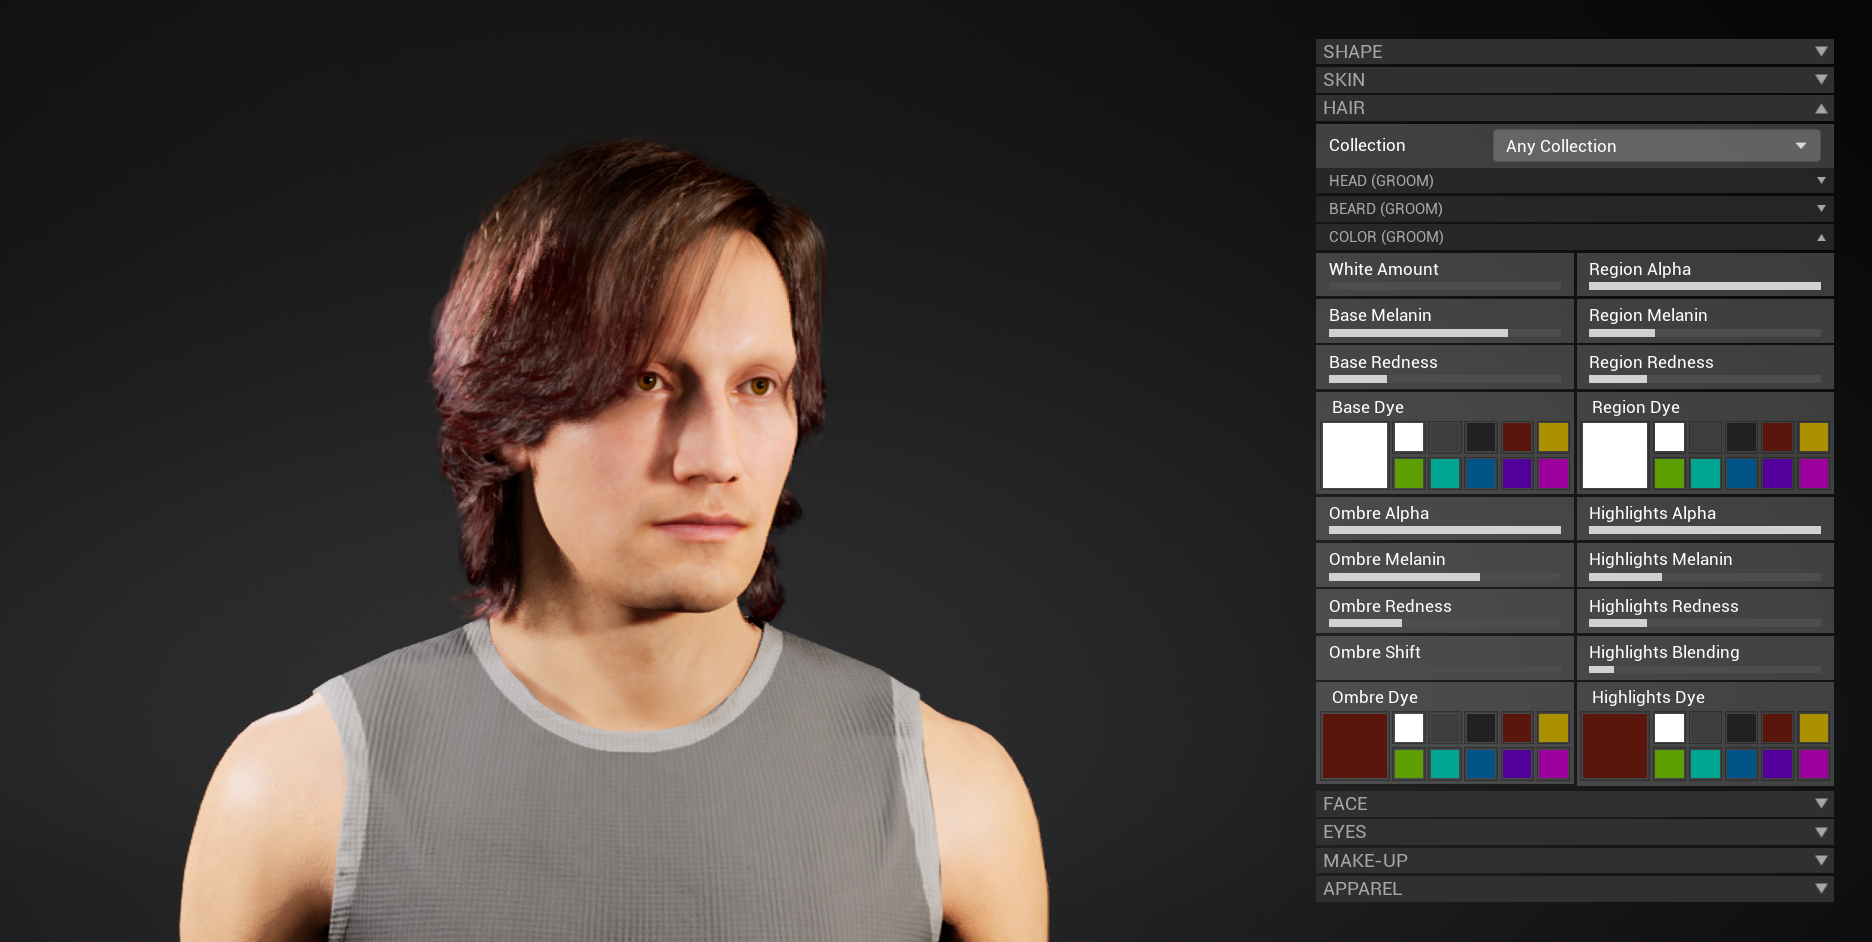
¶ Character Editor Controls [V8]
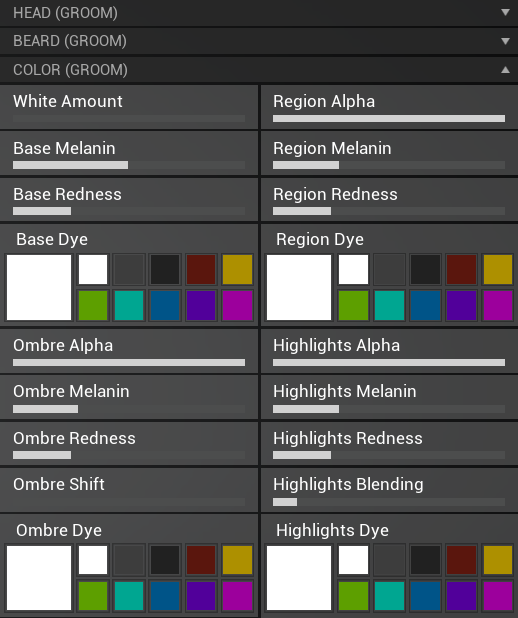
In WBP_CharacteEditor there are CDA Pickers (replaces [V10 removed] CDA Groom Pickers) available for both head, beard (and [V10] eyebrows) classes inside the Expandable Categories named Hair (Groom), Beard (Groom) (and [V10] Eyebrows (Groom)).
Furthermore, there are several Float Sliders and HDR Color Pickers below the CDA pickers in the category Color (Groom) to control different values of the Groom Material we tested with, as described above.
The section comes with these parameters:
- White Amount: Defines how many hairs are white.
- Base XXX: Defines the base color.
- Ombre XXX: Defines color at the back volume of the hair.
- Highlights XXX: Defines colors at the edges/details of the hair.
- XXX Melanin: Defines how brown/dark the specific group is.
- XXX Redness: Defines how red the specific group is.
- XXX Dye: Defines the dye color on top of the specific group. The darker a group is, the less impact it has.
- XXX Alpha: Fades the specific group.
- Ombre Shift: Defines the shift between Ombre and Highlights colors. May be affected by Highlights Blending.
- Highlights Blending: Defines how Highlights blend into the hair. May be affected by Ombre Shift.
The Region XXX parameters are also prepared but not fully tested, yet, since we still try to fiddle with test Groom assets and did not get it properly working. We are sure, you do.

All controls are toggled in the WBP_CharacterEditor > Event Graph > Update Anatomy Specific Controls subgraph.
If you are using a different base material than MetaHumans/Common/Materials/M_hair_v4 on your Groom assets, adjust the Float Sliders and HDR Color Pickers various Parameter Name variables as desired. Their Tag variable has to be set to GroomGlobal.
You may want to set one ore more material parameters to a specific value in the base material by default as described above in Groom Material > Table row 5 for parameter Highlights Intensity.
¶ Child Classes [V8]
- BP_CDA_Groom_Beard
- BP_CDA_Groom_Eyebrows [V10]
- BP_CDA_Groom_Head
¶ Known Issues
- Unusual visuals under certain circumstances [V7]
- Groom ignores LODSync ForcedLOD value [V8]
- Binding Asset errors when changing LODs [V8]
¶ BP_CDA_Static [V4]
¶ Overview
This is the abstract base class for static CDAs and inherits from BP_CustomizationDataAsset.
Coming with V4 Animation Update, this is a new base class for static CDAs like
BP_CDA_Attachmentand other potential CDAs to unify their update logic. (E.g., see BP_CharacterCustomization > Function: Apply Customization Profile > (4) Update Attachments)
It comes with these variables:
- Mesh > Skeletal Mesh is the visual appearance of the skeletal CDA.
¶ Child Classes
¶ BP_CDA_Attachment [V2]
¶ Overview
This is the abstract base class for attachments and inherits from BP_CDA_Static.
Currently, it is not selectable in the in-game Character Editor. It has one example child class.
The main reason for having multiple attachment child classes – besides the information and logic described above – is that each class represents a possible attachment slot on the character or type of attachment. Like for Apparels or Hairstyles you could display all data assets of a specific CDA class in separate attachment pickers, which lets you group them visually.
If you want to create e.g., custom two-handed assets, then you would create a child blueprint class of BP_CDA_Attachment called BP_CDA_Attachment_TwoHanded.
¶ Child Classes
- BP_CDA_Attachment_SingleHanded